The oral soft tissue examination is the way a dentist can detect many problems that may have an origin in the mouth, or may be manifestations of systemic disease. There is a good article on oral cancer detection published by the American Dental Association. And Dentistry Today has also published a useful article on this important subject. Be sure to check them for more details in this area.
Organization of this Chapter
Basics for Soft Tissue Considerations
The Dentist must SEE
The Dentist must LOOK
What we Check and Where we Look
In General, what are we Looking for?
Bottom Line for Soft Tissues
………………………………………………………………………………………………………………………..
Basics for Soft Tissue Considerations
The mouth is notorious for presenting signs and symptoms associated with a large number of disease states – both systemic and local.
We’ve already looked at PAIN – what brings someone to the dentist’s office – and all of the potential causes of pain, and locations where it might be experienced.
This previous discussion will help us know what to look for when simply looking in a patient’s mouth to see if any of the tissues are abnormal in any way. We are not looking at the teeth, and not looking so much at the tissues immediately surrounding the teeth, the gums (gingiva), as these are studied in detail in another part of the examination. But the mucosa, tongue, palate, and under the tongue are the primary areas of inspection.
The Dentist must SEE
For the dentist to carry out a thorough examination of the soft tissues, it must be systematic. There must be a pattern to the inspection that is reproduced in all patients, reducing the likelihood that something will be missed. It is strictly a visible inspection – and often using magnifying loupes and a strong light.
In 1992 and again in 1997 I carried out an evaluation of 2300 former airforce personnel from the days of the Vietnam war. The original program, starting in 1982, was set up to determine if there was any link between exposure to agent orange during the Vietnam War and disease in this population. Half of the participants were exposed to agent orange and half were not. They had already been evaluated twice, in 1982 and 1987 – so this was an ongoing program. My job in the 90s was to examine all of the participants for any soft tissue pathology, and to document the restorative materials that were used on their teeth – both the nature of the material, and the number of tooth surfaces covered.
It was notable that for the above-mentioned study, very few participants had significant soft tissue lesions of any significance – probably less than a dozen. It is no wonder that many dentists are less than thorough when it comes to soft tissue examination, thinking that if something is there, they will see it.
The Dentist must LOOK
On the other hand, to thoroughly evaluate a person’s oral tissues, one must LOOK. Check the hard and soft palates with a mirror. Look for dark colorations, whitish areas, red areas, and ulcerations. A dentist should have a diagram in the chart where he/she can mark the location of significant observations. Then pull out the cheeks on the upper left, and running the fingers around to the midline, look up into the deepest part where the cheek connects to the tissue of the tooth-supporting ridge. Repeat the same on the upper right and lower left and right. Then with a gauze pull out the tongue and inspect the upper surface for irregularities, maybe associated with the taste buds, and dark, light, red lesions or ulcerations. Also check the edges of the tongue, and, lifting the tongue, look at the underside of the tongue, and the mucosa that underlies the tongue. Anything abnormal or unusual should be noted. Also, the lips need to be evaluated.
For most dentists, lesions of the soft tissues are not going to be managed by them – but will be referred to an oral surgeon, even an oral and maxillofacial surgeon – who has MD training as well as a dental doctorate, and surgical skills that involve the entire facial structure and joints.
To give a little more detail, without elaboration here beyond the point of reason – I will list below the categories for oral soft tissue lesions that are identified in the Manual for Oral Examination and Pathology, published by the National Institute of Health in 1991, especially for our study with the Airforce personnel.
Oral Soft Tissue Examination: What we Check and Where we Look
1. Ask the Patient:
“Have you noticed any cold sores or fever blisters? Have you noticed any canker sores or sores in the mouth that come back frequently?”
“Have you noticed a strange or offensive odor or taste in your mouth?”
When a dentist doesn’t LOOK carefully, he/she should at least ask to see what the patient is aware of. There may be a surprise in store!
2. Check the Lips:
The dentist checks the color, and texture for any possible abnormality on both the upper and lower lips. Inspection is done with the mouth open and closed. The vermillion border, where the lips meet the skin on the outside of the mouth is checked. The corners of the mouth where the upper and lower lips join is checked – often there is redness and irritation showing up there for patients. One of the classic signs to look for is Herpes Labialis, which shows up as vessicles or red lesions at or near the Vermillion Border.
3. The Labial Mucosa
This is the inside of the lips and the place where this tissue connects to the bony ridges that hold the teeth – called the vestibule. It extends up to the gingiva on the bone, and in the upper arch would include observation of the frenum – that thin ridge of tissue which extends inside the mouth from just under the nose to the midline, where the upper central incisors come together. The frenum is sometimes so large that it forces the central incisors apart and can be tied into the esthetics of the upper teeth very notably.
Otherwise, we are looking in this region for any discoloration or swelling particularly. We note the observation and think later about the possible diagnosis.
4. The Buccal Mucosa
This means the CHEEKS – that part of the mouth on the left and right sides. They are retracted outward so the dentist can inspect the moist tissues inside – looking for any change in pigmentation, texture or mobility compared to the normal situation.
5. Gingiva and Alveolar ridges
Any observations here that would not be consistent with “normal” periodontal disease states are noted. We check both the facial surfaces and the inner surfaces near the palate and tongue – looking for discolorations or swellings, particularly.
6. The Tongue and Underneath
Both the top and bottom of the tongue are carefully inspected. There are a variety of things that will impact the appearance of the upper surface of the tongue, including something called “geographic tongue”. This is a harmless anomaly which makes the tongue look like a map of the world. It can come and go with certain patients, but is more of a curiosity.
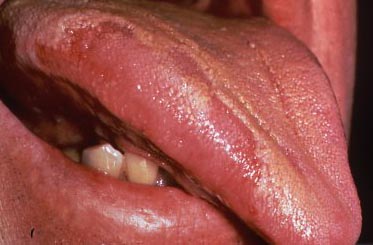
Otherwise the top of the tongue is checked for swellings, ulcerations, texture and coatings that may seem thicker than usual, or unusual. Also the pattern of the papillae of the tongue, and the tastebuds (some of which can actually be seen), the mobility of the tongue (move it around), and the appearance of the margins of the tongue, on the left and right sides. There might be indentations in the sides due to the constant pressure against the insides of the teeth, but there can also be whitish or pigmented colors, or unusual textures observed.
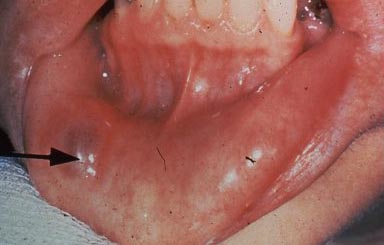
Underneath the tongue there is a frenum and the orifices of the sublingual salivary gland ducts. Swelling in the areas of the ducts might indicate clogging. Ulcerations in this area are especially important to note, MOST importantly if they are not reported by the patient.
And, the underside of the tongue needs to be checked as well – again, discolorations, swellings, changes in texture.
7. Hard and Soft Palates
The hard palate starts just behind the upper teeth and progresses to the midline and toward the back of the mouth. When the bone in this area stops, the soft tissue continues toward the back of the throat as the SOFT PALATE. The most posterior part of the soft palate is marked by the UVULA – that little upside down teepee thing you see sometimes.
The dividing line between the hard and soft palates is important when making dentures, because they must seat on ONLY the hard palate, but extend right up to where the soft palate starts.
For the palates, we are inspecting again for any swelling, pigmented lesions, white lesions, redness or signs of irritation. The observations may range from harmless swellings in the bone, called TORI, that are often found on the midline of the hard palate to pigmented lesions on the right and left sides of the posterior palate that may be indicative of Karposi’s Sarcoma, which is very characteristic of AIDS. But, I’ve had patients come in that complained of pain on the palate just behind the teeth, and found a tortilla chip that had penetrated into the gingival tissue and had to be removed in a small surgical procedure!
Sometimes the dentist notices a small break in the tissues of the palate, or even those tissues overlaying the alveolar ridge toward the cheeks, and notes that there is some exudate (a polite word for pus) that can be pushed out of that hole, or FENESTRATION called a FISTULA. That is an indication that an infection in the bone, probably at a tooth apex, is needing to discharge dead cellular material, and finds this way to do it.
In general, what do we look for?
We look for pigmentation that is not normal, be it darker black, red or whitish pigmentation.
We look for ulcerations – those areas that look like canker sores. It is VITAL that these ulcerations be carefully tested for PAIN. A PAINLESS ulcer is generally a very bad sign when occurring in a patient’s mouth, especially when there for some period of time, far longer than a typical canker sore would last. It is a strong indicator of oral cancer and must be biopsied immediately.
We look for areas that are, or are not painful – especially when associated with ulcerations – but anytime.
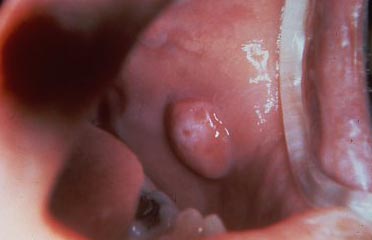
We look for lesions that are raised above the surface – potentially due to swelling of some origin, or perhaps there is a growth that is raised – like a wart or mole.
When we note an area of whitish discoloration on a surface, we check to see if it can be removed by wiping with gauze – it if can be, and there is a red and bleeding surface below, that is indicative of a fungal infection called candidiasis or thrush.
We look for cuts and bruises in the tissues, and if seen on the lips or cheeks this may be an indication of lip or cheek biting.
We look for swelling of the gingiva – which could result from just poor oral hygiene, or the use of certain medications, such as those for epilepsy.
We look for lesions on the lips, which we would call herpes labialis, if we suspect a herpes infection – but the patient would be familiar with these and often they are called cold sores. Herpes simplex virus type I can also affect the gingiva, giving a fiery red and swollen appearance, and small to large ulcerations.
While smokeless tobacco products, chewing tobacco or snuff, is not as prevalent as it once was in most places, there are typical white lesions with rough appearance that appear there the product is “stored”. It is a good idea to refer these to specialists for evaluation for the risk of developing cancerous tissue in those areas.
Oral Soft Tissue Examination: Bottom Line
There are literally hundreds of systemic illnesses and other pathological states that show up in the mouth. It is NOT a frequent observation, but it can be an important one. Your dentist should carry out a systematic soft tissue exam of your mouth on a regular basis – once per year may do. If you do not get such a thorough exam, there may be things missed which could compromise your health and well-being.