Here we discuss the ultimate dentistry – dental gold fillings and inlays. While many consider direct gold, or gold foil, to be an “outdated” restorative technique – that is only because many dentists don’t know how to do it, and their patients don’t realize the advantages. In Dentistry Today, a magazine written mostly for dentists, there is an article written to remind dentists what CAN be done if there is a will.
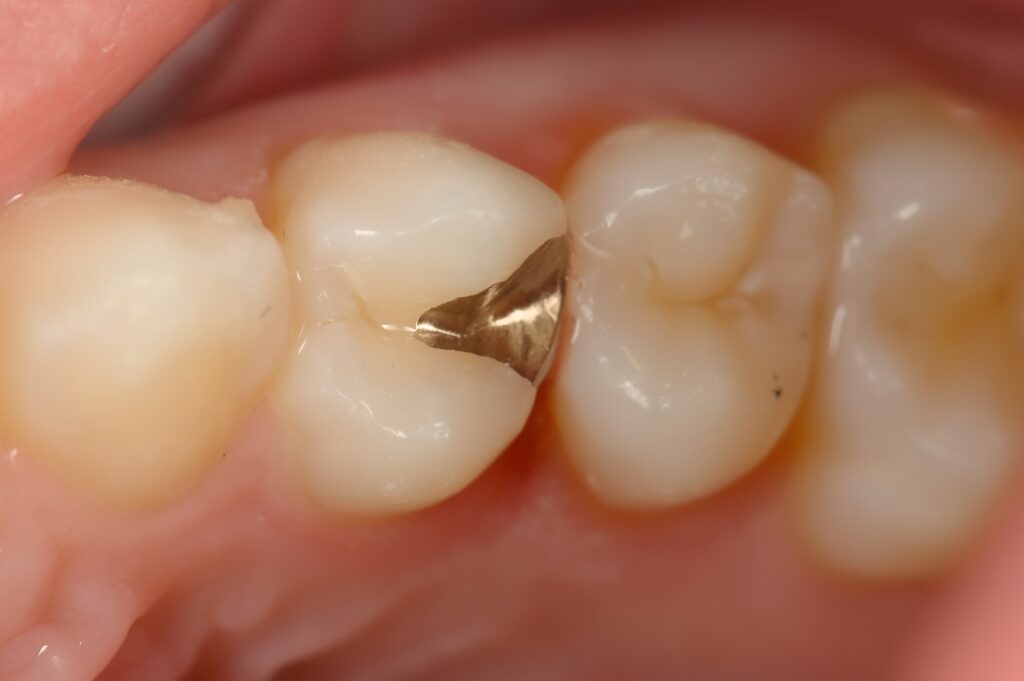
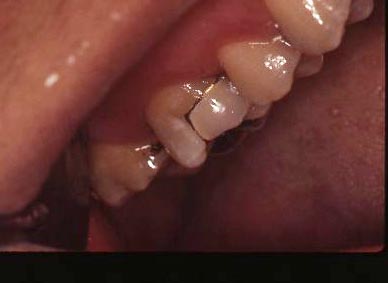
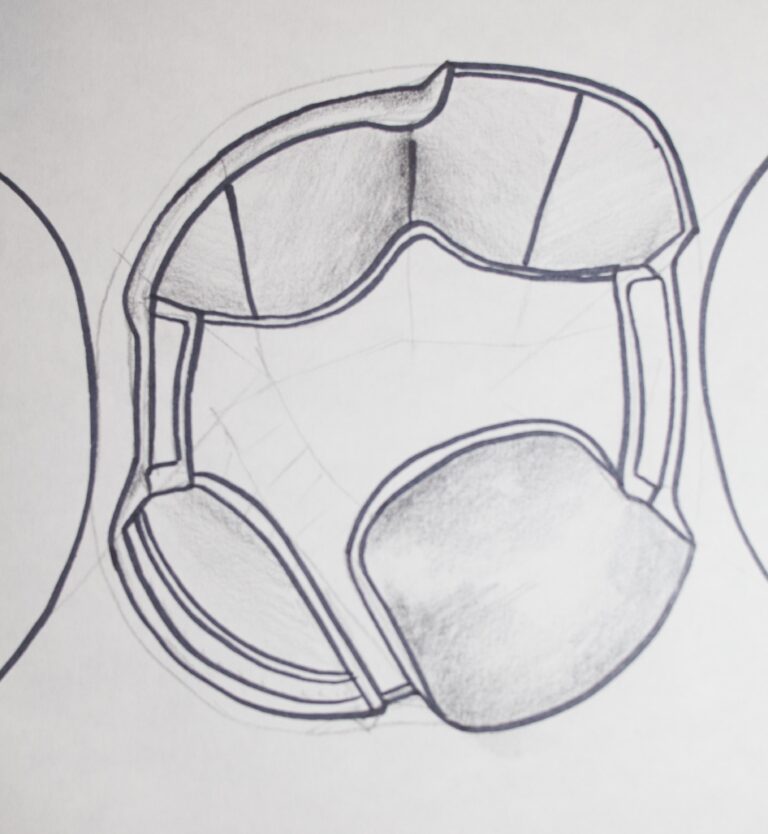
The gold inlay has been considered the Rolls Royce of dental fillings for over 100 years. Dentists who care to do the best dentistry do both porcelain restorations and gold as the situation demands. One dentist describes some gold inlays he did for his daughter. I often say to my dentist students that they should do the dentistry for their patients that they would do for their family members!
The picture below shows a very conservative inlay he did for his daughter:
Dental Gold Fillings and Inlays: Organization of this Chapter
You May Skip to Whatever Subject Interests You Now
Basics: Direct versus Indirect Restorative Techniques
Gold Foil – a Direct Restoration
Class V Gold Foil Restorations
Class I Gold Foil Restorations
Other classes of Gold Foil Restorations
Carving of Gold Foil
The Success of Gold Foil Restorations
The Gold Inlay – an Indirect Restoration
Making a Gold Inlay
The lost Wax Method
Making the Stone Model and the Wax Pattern of the Inlay
Converting Wax into Gold
Cementation of a Gold Inlay
Gold Inlay including Porcelain Cusp
The Gold Inlay-Onlay
Bottom Line: The Dentist who Cares to provide the Best to their Patients
………………………………………………………………………………………………………………………….
Basics: Direct versus Indirect Restorations
First – we need to discuss the difference between two different approaches to dentistry. I am talking about Direct and Indirect restorations.
Direct restorations are done by using materials that are placed into the prepared tooth and they are formed and hardened IN the tooth. For example: 1. Amalgam is condensed into a prepared tooth, where it sets and is then carved to match the surrounding tooth structure; 2. Composite resin is placed in layers into the tooth, then cured and then the final form is created using burs to help the resin match the tooth as well as possible; and 3. GOLD FOIL can actually be placed in a prepared tooth, piece by piece and carved to match the tooth.
Indirect restoration are when some material is used in the laboratory by a technician or cut out of a block of porcelain by a milling machine – to create a piece which will fit into the prepared tooth, and it is secured by some kind of cement.
In this section we will talk specifically about direct gold, which is a rare procedure these days as few people are skilled in this art, and indirect gold inlays, which is relatively common for class II restorations. In this Chapter I will go over the steps in fabrication of a gold inlay – which are the steps used to fabricate ALL types of gold crowns. The steps used for making porcelain crowns will be discussed later.
In the Chapter V.6 will be discussed onlays and crowns in detail. Both of these restorative methods cover part or all of the occlusal, biting, surface of the tooth and are more aggressive and require more tooth reduction than inlays, because more of the tooth is in jeopardy. In particular, for the inlay restoration there is generally no or at most one cusp that are at risk.
Gold Foil – a Direct Restoration
This material can be purchased by the dentist in several forms. While very much like the kind of gold leaf that is used to decorate picture frames and the like, for dental applications it is often available as little gold balls. The important thing about gold in this form is that, like many metals, if the surface is CLEAN, at the molecular level, when you push one clean surface against another they BOND. There is a very strong connection between two REALY CLEAN metallic surfaces.
The dentist insures the surfaces are clean by taking a small ball of the foil at the end of a needle and heating it in a flame. This vaporizes anything that might be contaminating the surface, and then he/she can apply it to another piece already placed in the prepared tooth, and they connect permanently.
It must be emphasized that the control of contamination for this kind of restoration is critical, even more critical than for amalgam and composite resin. Isolating the tooth using a rubber dam is essential! There are no substitutes for the dam in this kind of work.
But – gold foil is absolutely NOT going to adhere to the tooth in any way – it must be strictly retained in the prepared tooth by mechanical means – undercuts, grooves, etc. Not only this, but as each piece of the foil is placed into the tooth, that one piece, particularly critical is the first one, must find some kind of mechanical undercut so it will stay in place while the second piece is being prepared. Once several pieces are placed and are staying in place, subsequent placement becomes much easier.
The Gold Foil Class V Restoration
This has been a common gold foil restoration because it is often needed and fairly easy to do. In fact, up until the late 80s, the California Restorative Technique Examination, required of all international dentists seeking licensure in CA, included a class V gold foil preparations and restoration.
As you may recall, the Class V lesion is typically on the facial surface of the tooth, toward the cheeks and lips. It is found on any tooth, but most commonly canines and premolars – and can be due to decay, or NOT involve decay at all. We’ve discussed non-carious Class V lesions previously (visit Chapter V.3).
The location of the Class V lesion is always at or below the gingiva. While carious (decay) lesions can be extremely large, non-carious lesions are generally not as invasive and can be small. For lesions due to decay, they must be filled, and for non-carious lesions it may be optional.
In the era of World War II there were a lot of Class V gold foil restorations done, largely due, according to my Mother, to the advent of sugary carbonated drinks – soda pop – one in particular. During the war there were many people working in factories to produce war materials – my Mother was a draftswoman involved with the designing of tools for building planes. She told me that as soon as soda drinks were available, they were drunk at a great rate, and many people experienced class V lesions as a result. She had hers filled in 1942 by a military dentist, and he did gold foils.
These gold foil restorations were still in her teeth when she died in 2015!
The preparation of the tooth for a Class V gold foil restoration is quite challenging technically, as might be surmised from the discussion about adding the gold foil balls to the preparation. The preparation must remove all of the decay, of course, if there is decay, and the four walls which border the preparation must converge toward the surface. In other words the size of the preparation at the surface is SMALLER than the size internally. In this way, once it is filled, it CANNOT fall out. IF there is one wall that cannot be made to converge, for example often the wall closest to the gumline, there must be grooves cut into the dentin on this wall using a miniature chisel, specially designed for this task. The precision with which the preparation must be done is considerable – really sharply defined angles and corners, for example.
The Class I Gold Foil Restoration
This is the other most likely restoration to be done with gold foil, because it is relatively easy. It involves the grooves and pits on the occlusal, biting, surface of the tooth, and is generally used for restoring decayed areas. The size of the decay will determine if it is practical to restore by this method, generally only small lesions that penetrate to the dentin, but not close to the pulp are done. On the other hand, a larger decay area CAN be removed closer to the pulp and a cement used to fill it back close to the surface. The the gold foil is placed upon the cement base.
I’ve even used gold foil to restore the occlusal portion of a tooth where I had done root canal therapy THROUGH an existing full gold crown. As I finished the work I filled the pulp chamber with a cement, leaving only a layer about the thickness of the original gold crown on the occlusal, which I replaced with gold foil. Otherwise the gold crown would have a mismatched cement or restorative material in the middle of it, with uncertain integrity of the margins between it and the gold crown.
Other Classes of Gold Foil Restorations
It is possible to do Class II and Class III gold foils. Recall that both of these classes involve the contact with the adjacent teeth. In the 90s I knew several people that did these types of restorations for their patients that wanted the absolute best possible dentistry! But there are precious few dentists in the world that have the skill to do these restorations today.
If a dentist could start a practice where his patients were all demanding the best possible dentistry, that which would last the longest with the least possibility of recurrent problems, and these patients could afford the best, then there would be motivation again for dentists, even younger ones, to learn how to do gold foil restorations.
If you’d like to find a dentist near you that is skilled in this dental art, you can check online with the American Academy of Gold Foil Operators.
The Carving of Gold Foil
Once the gold foil is placed in the prepared tooth by packing each layer HARD against the other, and it has been built up to the point where there is slight excess, sharp carving instruments are used to cut off the excess at the margins of the preparation, and match the gold evenly to the surrounding tooth structure. After this rotary instruments in a handpiece may be used to form the contours within the margins, and then special polishing discs are used to take it to a high shine – just like a piece of gold jewelry.
The Success of Gold Foil Restorations
Because of the intimate adaptation of the gold to the margins of the preparation and the inertness of the material over decades, there is little likelihood that decay will start again at the margin, there is no place for bacteria to get a “foothold”.
Since there is NO cement between the gold and the tooth at the margin, there is nothing to leach out over the years and create a space for bacteria to congregate.
Since these restorations are generally used to restore small lesions on a tooth, for whatever class is involved, there is unlikely to be much in the way of force on the restoration, and the ability of the gold to resist wear from the opposing natural tooth, and avoid wear TO the opposing tooth, is great.
As the example above illustrates, I personally know of one Class V gold foild that was still going strong after 73 years!
The Gold Inlay – an Indirect Restoration
The gold inlay is a class II restoration, which includes part of the occlusal, biting, surface, and one or both of the sides of the tooth touching the adjacent teeth. The preparation is much like we saw for the class II amalgam and class II composites – adjusted to take into account the physical characteristics of the materials, as was done for the others.
In the case of the amalgam and composite direct restorations, or a gold foil direct restoration, the walls of the prepared tooth will generally converge toward the occlusal surface, and for the walls of the box form near the adjacent tooth (teeth) the walls will typically diverge toward the adjacent tooth.
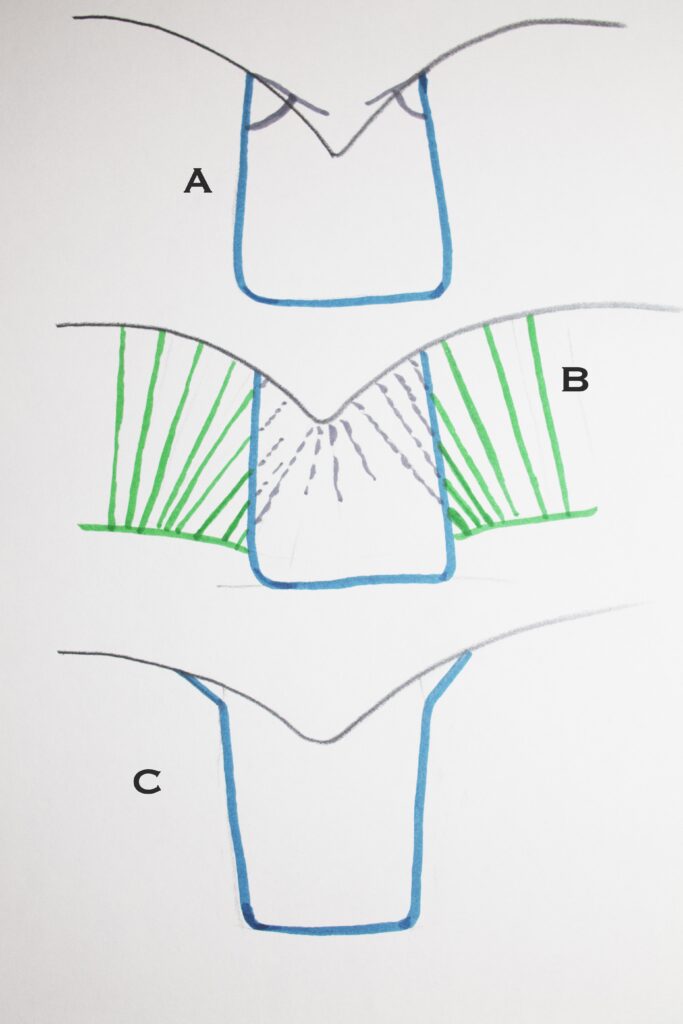
The drawing above shows occlusal portions of preparations – either Class I or Class II. “A” shows the occlusal convergence necessary for retention for either amalgam or gold and generally used for composite. “B” shows these occlusal walls cutting across the ends of the enamel rods (in green), to provide adhesive retention for a composite restoration. “C” shows that for Gold Inlays the walls will DIVERGE, and we will often BEVEL the occlusal margins, so that the thickness of the gold at these margins allows burnishing of the margins.
For the indirect class II inlay, both the occlusal walls AND the walls of the box DIVERGE toward the occlusal – this is so that the restoration can be made outside the tooth and then placed into the preparation. If there is any pair of opposing walls that converge, as in the direct preparation, we cannot even MAKE the inlay.
The RETENTION of the gold inlay is based on the height of the walls of the preparation, the taller they are the more retentive, and the ANGLE of divergence – the more divergent the LESS retentive it will be. Dentists work hard to make sure that the walls diverge, but not too much!
Making a Gold Inlay
The Lost Wax Method
Now – to make a gold inlay we use the LOST WAX METHOD – the same technique that is used for some gold jewelry. We need to make a model of the inlay out of wax to start, and then we convert it into gold.
Originally, gold inlays were made by fabrication of the wax model of the inlay in the tooth in the patient’s mouth! I’ve known dentists that did that in the early years of their practice. They would take a soft wax and carefully place it into the prepared tooth, shape it to match the tooth, make sure the adaptation of the wax is good to the margins of the preparation (this is especially challenging for the margin of the box near the gingiva), make sure the wax is touching the adjacent tooth, and then CAREFULLY remove the wax so that it is not damaged or distorted in any way.
In more modern times, the dentist will make the wax pattern on a plaster die that is made to duplicate the tooth. First the dentist takes an impression of the tooth preparation using one of a variety of types of impression material, and then plaster (actually a much harder material than common plaster – dentists call it “stone”) is poured into the impression. Once set, the plaster is removed and the tooth with the preparation is revealed in great detail, as well as other teeth in the arch. If the inlay will not be in occlusion with teeth on the opposite arch, the dentist will not have to have a cast of that arch, but often they will, and always for crowns that involve more of the biting surface and cusps.
By the way – when the impression is taken, the patient is finished for the day, but we need to temporarily fill the tooth before sending the patient home. There are many materials that can be used for this, ranging from acrylics to cement materials, and it is up to the choice of the dentist, as long as the material stays in place until the patient returns for the fitting of the inlay.
Making the Stone Model of the Prepared Tooth and the Wax Pattern of the Inlay
Once the cast is made, it is sectioned so that the tooth with the preparation on it can be removed and then replaced exactly where it was in relation to the adjacent teeth. The removable die is where the wax pattern is made.
Wax is placed into the stone die and adjusted so it fits exactly to the margins, the internal form, and the adjacent tooth. Then a small plastic straw is inserted into the wax pattern far from any margins, and with this “sprue” as a handle, the pattern is removed from the die.
Converting Wax into Gold!
The wax pattern must then be embedded into an “investment” of temperature resistant stone, with the sprue sticking out one side. Later, the gold will enter where the sprue sticks out. The investment will be ready to literally throw hot gold into it, once the wax and plastic sprue are gone. The wax and plastic are vaporized out when the investment is put into a really hot oven – and now the investment is ready to throw the gold in.
The lab technician (or the dental student) will have a centrifuge, where the gold is melted in a crucible on an arm, and the investment is placed at the outside of an arm that can be made to rapidly rotate. Once the gold is melted, using a torch, the investment is placed in the cradle at the end and the arm is triggered, spinning rapidly around a few times. The gold, by centrifugal force, is sent rapidly into the investment through the hole where the sprue was.
The gold cools quickly, and we normally drop the hot investment into a bucket of cold water and it fractures and falls apart, and the gold inlay is found within. After careful inspection of the inlay to make sure there are no defects, it is carefully trimmed and polished, ready to fit into the tooth.
Cementation of the Gold Inlay
This process requires first that we fit the gold into the preparation in the patient’s tooth. When the patient returns we remove whatever temporary material used to fill the tooth, and the inlay is placed into the tooth. Hopefully, it will have a smooth fit – if it is a little distorted and requires more force to get it into place, it may be quite difficult to get it OUT again, for cementation. But, we will try the inlay in and check margins and contact with the adjacent tooth. Before final cementation we can also take small rotating sandpaper discs and run them over the gold toward the margin with the tooth – this is called BURNISHING. This procedure will take the slightly maleable gold and move it to absolutely perfect the fit to the preparation at the margins. It is the burnishing process that makes many gold restorations fit so well that they are far more successful than other methods.
Once the gold inlay has been fit and partially burnished, a cement is mixed and placed on the gold as it is reinserted into the prepared tooth. It is best to use a cement that will take a few minutes to set, for once it is in the tooth, it is TAPPED into place firmly, and then given a final and finest level of burnishing. This final burnishing, to make the marginal adaptation perfect, must be done while the cement is still soft enough to move out of the way as the gold closes any gap that may be left.
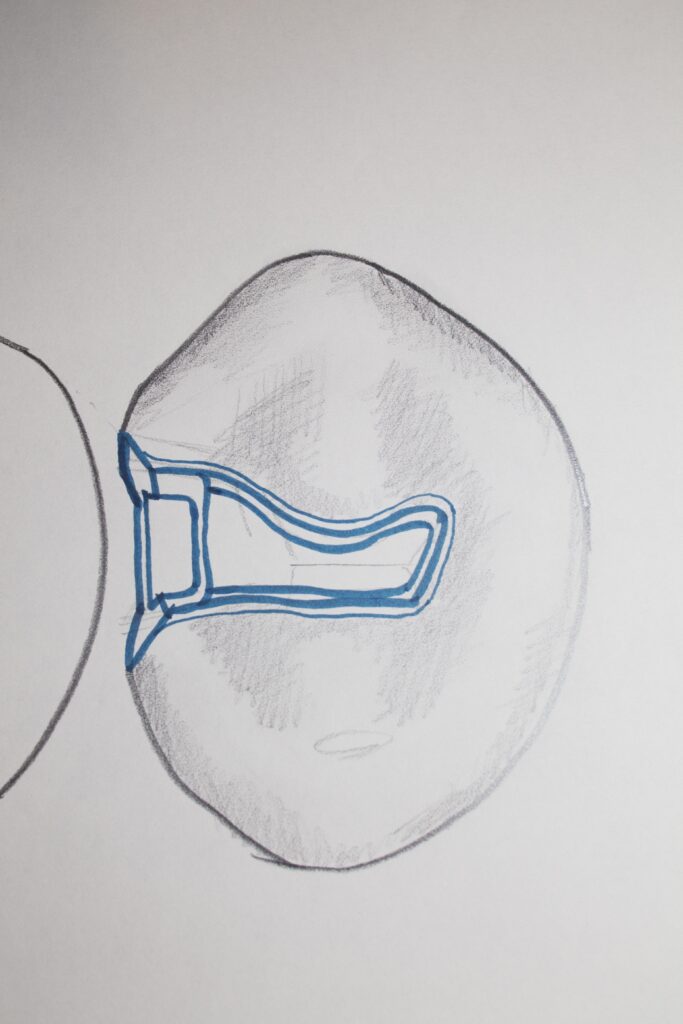
Gold Inlay including Porcelain Cusp
As a final discussion of gold inlays, we might look at a more unusual case. There are times when a Class II restoration doesn’t quite take care of the problems with a particular tooth. As will be discussed at length in the section below, a CUSP may need to be replaced as well.
Replacing a cusp with gold, and retaining it with the form of an inlay, is readily accomplished in most situations. But, if it is a VISIBLE cusp, we may not want to replace it with gold.
The picture below shows that it is possible to replace a visible cusp with porcelain, retain it with the form of a gold inlay, and have all of the benefits of BOTH. Appearance of the porcelain, and marginal adaptation of gold.
All it requires is a dentist, AND a laboratory technician, that is willing to go a little beyond “normal” dentistry, to offer the patient something customized for their best benefit.
The Inlay-Onlay discussion below further elaborates on the dentistry that CAN be done when one has the patient’s best interests in mind.
The Inlay-Onlay – Covering a Cusp while Preserving Others
Now that we know something about the inlay – imagine a situation where there is little decay on the occlusal surface and surface touching the adjacent tooth, but there is one area where the decay tends to go under a cusp, undermining it. This cusp may not be one of the major cusps for the tooth, but it should be covered, and the gold that covers it can possibly be connected to the rest of the gold inlay. The inlay part of the preparation is used as retention for the gold that will cover the cusp.
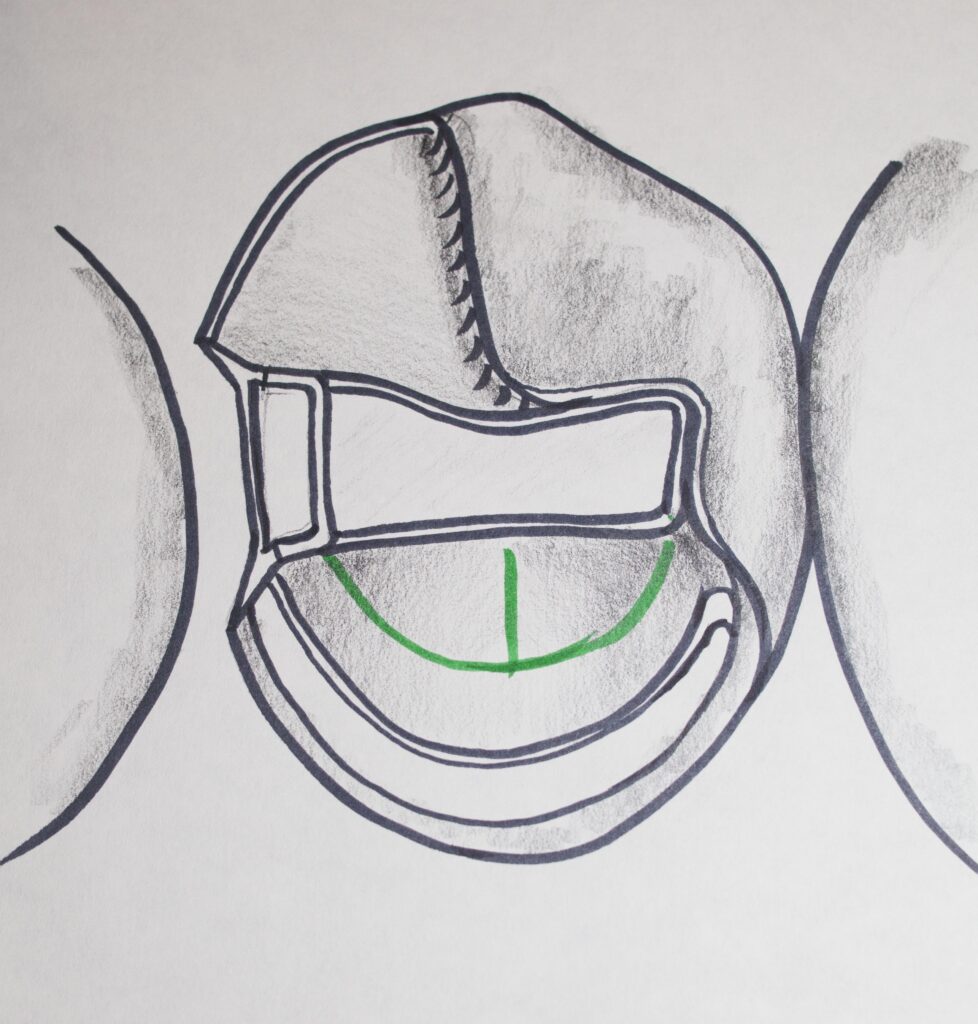
We will see in Chapter V.6, that a GOLD ONLAY generally covers the entire occlusal surface and all of the cusps, but a more conservative restoration can often be done, covering only one or two cusps, retaining it with a conservatively done inlay preparation.
Both of the designs shown above must be done so that the gold which extends into the box or boxes, and the gold following the central part of the occlusal surface, will RETAIN the entire gold restoration. The more vertical walls need to not diverge TOO much, and the walls need to be adequately TALL so that retention is assured. The mechanics of this are left to the dentist to manage by using his/her best judgement.
Bottom Line: The Dentist that Cares to Provide the Best
This chapter presents restorative methods that are typically not used these days, but these are methods that can guarantee the longest success for the restoration of the tooth.
There are dentists out there that have the skill and will to do such dentistry for those patients that want the best!
In fact, for those dentists that do such customized gold dentistry for their patients, it represents a great source of satisfaction for them. There is satisfaction in finding a conservative solution to the problem that the patient presents. There is satisfaction in knowing that the patient is receiving the very best of care, for the long-term. There is satisfaction when the patient knows they are getting a more customized approach to their dentistry than is available to most.