For those who want to explore this topic in more depth than I cover here, check out the Wikipedia page on complete dentures. There are many references to the primary literature on this topic as well.
Organization of this Chapter
Complete Dentures: Basics
Steps in Making Dentures for a Patient
Immediate Denture – step zero
Final Denture Step 1
Final Denture Step 2
Final Denture Step 3
Final Denture Step 4
Final Denture Step 5
Overdentures
The Success, Failure and Repair of Dentures
Denture Adhesives
Relining a Denture
Denture Repair
Bottom Line for Complete Dentures
…………………………………………………………………………………………………………………………
Complete Dentures: Basics
When a patient is missing ALL of his teeth, then restoring their appearance and function CAN be done with full dentures. This is not the ONLY way to effect this restoration, but certainly the most common and most affordable.
Traditional dentures are designed to be supported on what remains of the boney ridges on the top and bottom, and the upper ones, particularly, are RETAINED by suction.
Dentures are designed to go over the outside of these ridges and terminate in the bottom of the place where the mucosa over the bone and the cheeks come together. If they are a little LONG, then when the cheek pulls up in a smile, the dentures may displace. If they are a little short, then there will not be as much retention or suction. Dentists make certain that the edges of the denture are precisely in the correct location in every part of the mouth.
And, of course, the teeth need to look right for the patient, and the vertical dimension of the bite must be right for the patient, and they need to be able to enunciate their speech adequately, and the upper lip needs to be supported so that it is not caved in, and when the patient smiles just the right amount of upper and lower teeth should be seen. Ideally, the patient will be totally comfortable, and nobody else will know they are wearing dentures!
One of the most interesting things about dentures is that the fabrication and adjustment of them does not involve much or ANY of the patients overall health concerns. The procedures don’t involve any bleeding and each step of making them is comfortable enough to not generate substantial stress for the patient. There is nothing that needs to be prepared in the mouth before the denture is made, as there is with partial dentures supported on teeth. For these reasons, some states allow “denturists” to make dentures that are not trained dentists. This, of course, is a rather controversial topic and I will not pass judgment on the subject. Except, that is, to say that there are dentists that are not very good at making dentures because they don’t have much experience (depending on where they practice), and there are denturists that have a lot of experience, but in some cases are making dentures where the conditions in the mouth do not allow them to be made with the desired range of function.
For example, for some patients the ridges that they have, especially on the lower, simply will not allow a conventional denture to work well – it will slide around in the mouth. Patients can sort of “get used” to this over time, but it restricts their interactions with other people, and their eating.
In these cases of advanced bone resorption, it is far better for the patient to support their lower denture on a few small implants – the improvement of function is dramatic. This can be done quickly in a general dental office or a dental specialists office, but no denturist is not allowed to perform this type of procedure.
Steps in Fabrication of Complete Dentures
First, it must be noted that there is a BIG difference between making a FIRST denture for a patient, and making a new one for someone who has been wearing dentures for years.
Some years ago I used to teach classes to practicing dentists in California that wished to get licensed in Nevada, and to do that they needed to pass a clinical exam, involving several patients. One of the procedures they were tested on is making a set of dentures for a patient. They did all of the procedures listed below in just a couple of days. But, they were making dentures for patients that were used to wearing dentures. In fact, many of the denture patients for the exam SOLD their services as patients, and were quite cooperative with the dentist in their fabrication. Some of these patients had a new set of dentures made every year in this way – and they probably knew more about making dentures than many dentists.
The Immediate Denture – step Zero
When a patient comes in that NEEDS dentures, in that their teeth cannot be saved, we need to extract the teeth AND make them a denture to wear while the extraction sites are healing, and then make a final denture later when everything heals.
Again – at some point every denture wearer went through this procedure, but only ONCE.
The dentist will have the laboratory make a set of immediate dentures by taking the cast of the patient, which shows the remaining teeth, grinding the teeth off to simulate what the ridge will look like immediately after the teeth are extracted, and make a denture to fit that ridge. The dentist will adjust the edges of the denture in the patient’s mouth to make sure it does not impinge on the tissues, and adjust the inside as needed to fit the tissue in the extraction areas, which may be many. Then the patient goes home with a bleeding mouth and a set of “false teeth”.
The healing stage of this procedure requires the patient to come frequently into the dental office and NOT remove the dentures at home. It is not a particularly pleasant experience, as you might imagine.
The dentist will note the healing progress every time the patient comes in, and within a week or ten days the sites should start to stabilize and any bleeding has stopped. These dentures can be adjusted and relined to fit the resolving tissues as they change, so the fit will be better and better.
These are NOT expensive dentures, and are made without all of the steps or perfect tooth forms that will be used later. They are just temporary to allow the healing process to take place, and the ridge to assume its final form. This will take some months.
Final Complete Denture Fabrication – Step One
Whether the patient has an existing immediate denture where the ridge has now healed well and is in its final form, or the patient has an existing denture that has been relined to fit the ever-changing ridge many times and needs to be remade – there is a sequence of steps involved.
The first step is to get a good impression of the ridges. It is upon the cast poured from this impression that the acrylic rims will be made that will allow a more accurate impression later. For this first impression a custom tray is used that will fit the arches well and allow the impression material to “pick up” the shape of the region where the cheeks connect to the ridges (the vestibules).
Once we have a pretty accurate cast showing the ridges and vestibules, the acrylic final impression tray is made to FIT the ridges and into the vestibules – this tray approximates the final denture form, but is not accurate enough yet.
Then wax is used to build up a rim on both the upper and lower trays, that will approximate the occlusal plane. It is adjusted in the patient’s mouth for the best vertical dimension. It will also be adjusted by the dentist at this time in the front part to show where the front teeth should be to give adequate LIP SUPPORT for the patient’s upper lip. This is an esthetic choice. Once these trays are used to finalize the impressions and new casts are made to fit them, this wax rim will show how the upper and lower casts should be related on the articulator.
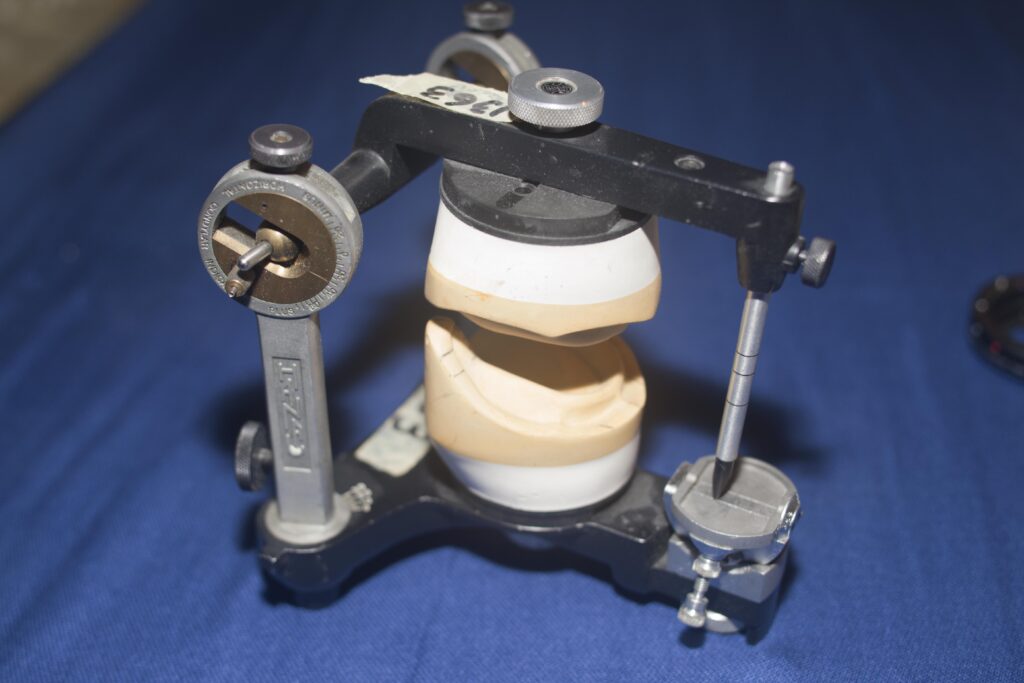
The picture below shows how two denture model casts are in relation to each other on a typical articulator.
Finalizing the impression of the arches with these trays is very accurate because just a little impression material needs to be used to fill in errors that occurred before. AND – the dentist will take warm wax and use it to record the edges or borders of these trays in the vestibule very accurately as well. When the border molding is done and the wax at the borders is still warm, the dentist can move the cheeks to shape the wax exactly where it should be when the cheeks are functioning.
Also, while the upper impression tray is adapting well to the upper arch and the wax rim is in place, the dentist will take a device that will allow him/her to measure exactly WHERE the tray and hence arch, is relative to the joint. This is so that the upper arch can be mounted exactly in the right place in the articulator, which simulates movement about the joint.
Complete Denture Fabrication – Step Two
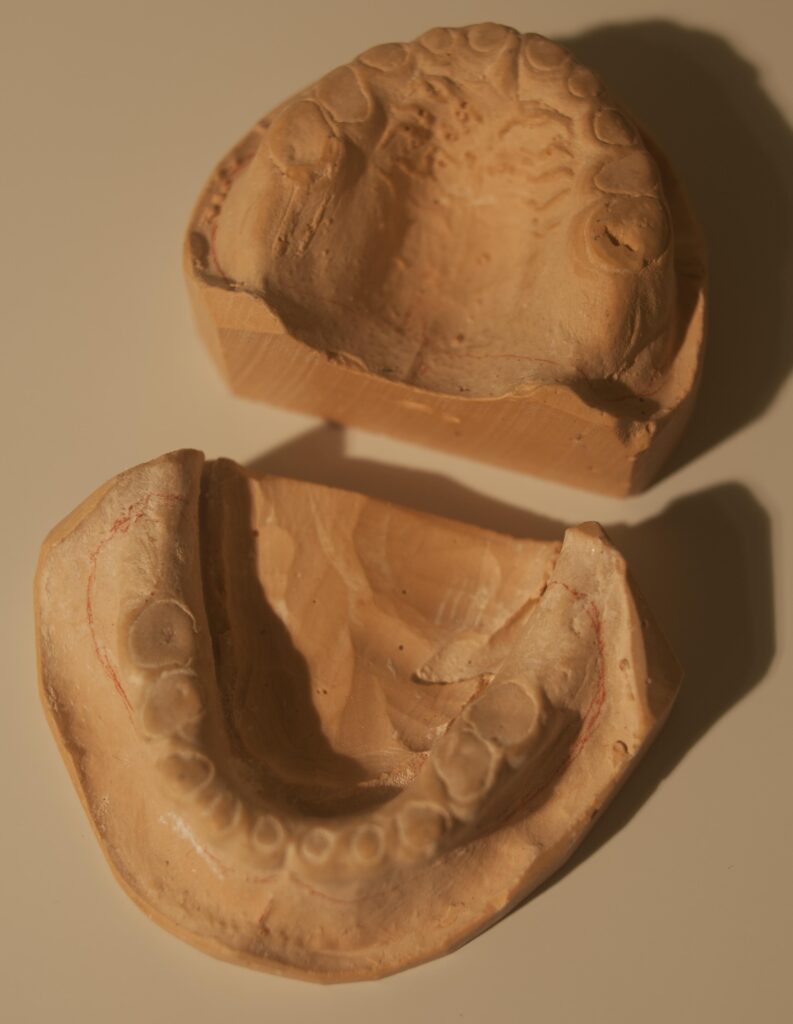
With this very exact impression taken and the border molding done, the dentist can pour up the master casts, and mount them in the articulator. The upper cast is mounted relative to the hinge of the articulator, as it would be in relation to the joint, and the lower cast is mounted to the upper cast.
Complete Denture Fabrication – Step Three
Now the laboratory will make a set of dentures out of wax. It will include teeth set at the correct occlusal height as determined by the wax rims. The teeth will have been selected ahead of time for the right size and shape to match the patient.
The laboratory will use the front part of the wax rims to demonstrate where the front teeth should be placed for esthetic support of the lip. The shape of the arch will be determined largely by the ridge positions.
IF the denture is made with the teeth set too far outside the ridge, then when the patient bites on these teeth there will be a tipping force on the denture that could cause it to dislodge. So, the technician needs to double check that the teeth will be in the right relationship – and this will be somewhat indicated by the dentist by possibly reshaping the back part of the wax rims as well.
So the technician will have a set of dentures made entirely out of wax, except for the teeth, which will be either acrylic or porcelain. These wax dentures will be delivered to the dentist for try-in.
Complete Denture Fabrication – Step Four
When the dentist tries the wax dentures in the patient’s mouth he is looking for retention – suction on the top – and lateral movement on the bottom. The occlusal relationship should be good both in centric biting AND for any excursions front-to-back and right-to-left.
The technician has set the teeth so that, as far as the articulator can predict, they will remain in contact with all excursive movements.
This latter point is important. For natural teeth as the jaw moves right-to-left, for example, the canines hit and force the jaw to open – this “anterior disclusion” is what protects the back teeth from grinding on each other.
For dentures we cannot use anterior disclusion because the force on the canines would cause the denture to TIP and dislodge. As the patient moves around we want the dentures to be TOUCHING each other at every point. As the patient slides their jaw to the right, the lower denture teeth on both the right AND the left should remain in contact continually – this stabilizes the denture.
The technician should be able to get the excursive movements stabilized well as long as the dentist has given him accurate records to mount the case on the articulator, and the dentist will have little adjustment to make.
But – at this try-in, the dentist may well change things in the wax. The dentist can move teeth in whatever way desired. All dentists HOPE they don’t have to do too much changing.
At this appointment the patient should have a very good idea as to what the denture will look like as they smile and talk, and what it will FEEL like.
Complete Denture Fabrication – Step Five
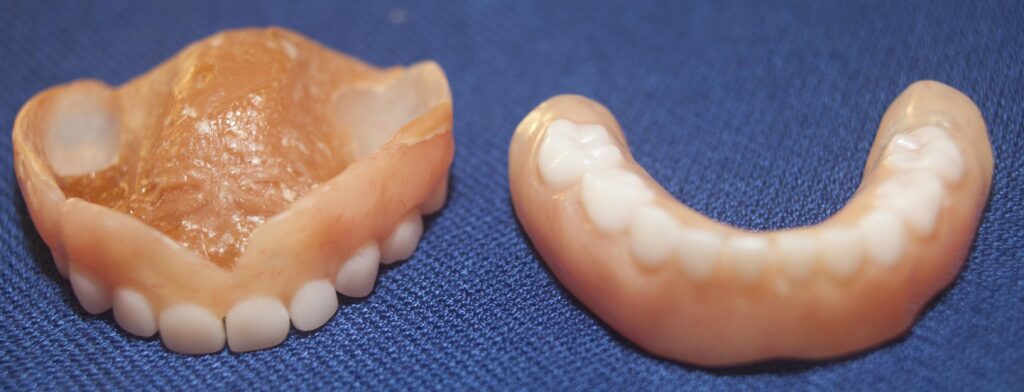
When the technician gets the wax denture back from the dentist with instructions to process a denture – he will take the last laboratory step. The technician, basically, will embed the wax denture in a mold so that the teeth are held tightly, and then melt out the wax with the teeth fixed and replace the wax with acrylic that is especially made to provide a natural shade to the “gums” in the patient’s mouth.
The final dentures look exactly like the wax dentures but are entirely made from acrylic except the teeth – and the teeth are in exactly the same place they were in the wax.
When the dentist gets this back it should fit the patient’s mouth well, and may need little adjustment. There are checks that are done and occasionally one of the borders needs to be adjusted. Over the first couple of weeks it may be that the patient gets a sore under a border of the denture somewhere, often on the inside of the lower denture – and will come back in to get that area adjusted.
Overdentures
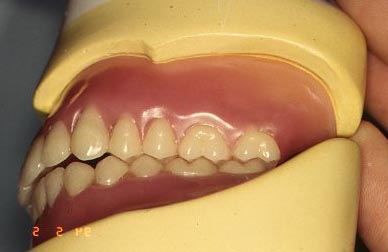
Dentists will often make dentures that fit OVER some teeth that are still in the mouth. Sometimes these teeth are broken down somewhat and a type of rounded crown is made for the denture to fit OVER. This tooth will help to stabilize and support the denture, and is found to be helpful by most patients.
The case above is an unusual case where a young boy with a genetic disease affecting the connection of the enamel to the dentin has allowed all of the enamel to fall off the primary teeth, so they just wore down to the gumline.
I made these dentures for him – and these actually provided the first SMILE he ever gave in his life. Other than this huge help to him, they were responsible for protecting the permanent teeth as they grew in underneath. The reason I still have these dentures is that I made him a second pair a couple years later to fit the growing permanent teeth better. In cases like this it takes at least 15 years of careful management before it is possible to put crowns on the permanent teeth, so they will remain intact and fully contoured. Unfortunately, his family was not in my practice for that long period of time.
The Success, Failure and Repair of Complete Dentures
The problem with complete dentures is that they exert little force on the underlying bone!
Why is this important? It is important because if there is no force on the bone, the bone will erode away. Osteoporosis is a similar phenomenon, in that there are cells in the bone that both erode bone and build bone – and the eroding cells are more active. FORCE on the bone, concentrated in small areas, activates the bone forming cells, so that the bone level and volume is maintained.
Dentures do not apply enough concentrated force within the bone to maintain the level, so the bone will erode over the years until the denture doesn’t fit as well anymore.
Tooth roots and implants both serve the important function of transmitting forces of biting into the bone, thereby the bone level is maintained well in both cases.
When the bone is lost under a denture, there is a space created. The ridge upon which the denture sat well at one time, is not fitting well anymore. The original denture, whether upper or lower, probably was retained pretty well during talking and eating, simply by suction holding it down on the ridge. But, to have suction, or what dentists call mucoadhesion (mucus – yuck), you must have great adaptation of the inner part of the denture to the tissues. That is why the fabrication process is so carefully done.
Denture Adhesives
When there is space between the tissues and the denture, it may not stay in place well without an adhesive, like Polygrip as an example. The chances are that if your denture is 5 or 10 years old, you will be using an adhesive.
Depending on the amount of space, the thickness or thinness of the adhesive makes a big difference in how useful it is. Eventually a denture patient will get to the point where using the denture is too cumbersome and awkward and something more will have to be done.
Relining a Denture
Instead of an adhesive, which must be applied to the denture every couple days, or even after every meal, the dentist can place a permanent filler between the tissues and the denture, restoring the adaptation and likely the retention as well.
There are two kinds of processes for relining a denture – a chairside reline, and a functional reline. I always preferred to do a functional reline for my denture patients.
For the functional reline a gel-like material, much like an adhesive, is placed in the denture and they are seated as well as possible in the mouth. This gel remains somewhat fluid, or at least, moveable, for some hours. As the patient wears the dentures and bites down, moves around and eats, the dentures track the movement of the jaws, and the gel models itself to the inside of the dentures under these functional movements and pressures. As the gel sets more firmly, it will be a record of what form will best work to adapt the denture to the tissues under various conditions, or at least the average form.
When the patient returns to the dentist the next day, the denture is immediately sent to the lab and they will process the denture so that the gel is replaced by new plastic, just like the original denture plastic, but formed to the new ridge in the mouth.
While the patient has to wait for the processing part of the procedure, they can sit in the dental office for a couple hours, or wear some older dentures and return later – to be greeted by what feels like new dentures, in terms of FIT.
The Chairside reline involves the dentist coating the dentures with some self-curing plastic and placing them back in the mouth while the plastic sets. It will not respond to the patient’s movements or occlusal forces, but it will be better adapted, and will require much less adhesive to retain the dentures.
Denture Repair
There is always the old story of the dog that ate the denture – or at least bit it until it broke. Kind of like the dog that ate your homework in High School I suspect.
Or, the denture fell out onto a concrete floor and cracked through. In any event, if the denture is broken in two, it can be repaired, generally, and not just by using superglue – although many patients will do that. Imagine, however, that if the pieces are not PERFECTLY aligned when glued, the denture will not fit well on both the right and left ridges at the same time – that is a problem.
The dentist can arrange to have the denture repaired for you – it takes a laboratory procedure to do it right. IF the denture is in two pieces that fit well together, that is a big help. Careful alignment of the pieces will allow a plaster mold to be made that relates the two pieces during the repair.
If there are more pieces or they don’t seem to go together well – the dentist CAN even fit them into your mouth, IF the denture adapts at all well to the ridges, and glue them together IN YOUR MOUTH. Sounds like fun? Then the assembled piece is used to make the plaster mold and the pieces can be joined permanently by the lab – producing a finished denture that looks exactly like the original.
Perhaps there is a BROKEN TOOTH in the denture. If this is in the front, it is something that needs to be fixed. A friend of mine had a broken tooth in his denture and the dentist told him it could not be fixed. That was a lie!
Dentists are remarkably well trained in the fabrication of tooth-like shapes with composite resin materials – like doing a filling with composite, or even making a veneer over a front tooth in the mouth for cosmetic purposes.
Any dentist can easily rebuild a broken tooth with composite resin and it will look reasonably good. Of course, for the time it takes to do that, the dentist cannot charge enough to pay for his time – but he has done the patient a good service. If the dentist thinks ahead, he may realize that this patient is more likely to come to him for redoing the dentures because he was treated well!
Dentures are pieces of plastic, and can generally be repaired very well and serve the patient for many more years.
Complete Dentures: Bottom Line
So now you have an idea as to what is involved in the process of making a denture. Of course, you will not likely have read through this section if you have lots of teeth that are in good condition. But for those that are anticipating dentures, this chapter might give you a little more idea about what to expect, and the skills that are required to make a denture for someone that is comfortable, functions well, and looks good.
And, of course, the experience of wearing dentures brings with it the trials that ensue when the mouth changes relative to the denture over time, and the possibility of breakage.
I was not altogether joking when I referred to the dog eating the denture. For whatever reason, dogs are notoriously keen on dentures. Certainly the texture is not appealing even to a dog, and certainly there is no nutritional value, but the taste must be rather good!