There is an excellent and very well referenced section in Wikipedia covering composite dental fillings. While we discuss here anterior fillings (front teeth), where composite as a direct filling material is preferable, bear in mind that composites can also be used for back, posterior teeth.
Composite is clearly one of the most important developments made in dentistry since amalgam was discovered in the 1800s. Adhesive dentistry is discussed in Chapter V.4 – and all of the applications to dentistry permitted by this technology are described.
But – while the use of composite materials for direct anterior restorations is unquestioned, the use for back teeth is questionable because of the relative lifetimes of the alternatives.
Organization of this Chapter
You May Skip to Whatever Subject Interests You Now
Basics
Class III Restorations
General Considerations of Lesions
Preparation
Bonding to Enamel
The Misunderstanding of Most Dentists
Placement of Composite
Class IV Lesions and Restorations
Class IV Preparation
Restoration
Class V
Lesions
Preparation and Restoration
Isolation
Bottom Line for Anterior Direct Restorations
…………………………………………………………………………………………………………………………..
Dental Fillings – Anterior: Basics
In the last Section we looked at the restoration of posterior teeth by DIRECT methods – both at the preparation of the tooth, and the filling of this prepared tooth with silver-amalgam.
Now we will study the direct restoration of anterior teeth – those in the front of the mouth, where the visibility is maximized. The anterior teeth that can be restored well by DIRECT techniques are minimally involved with decay or fracture, and do not necessarily need crowns.
I will illustrate the use of composite resin materials and methods for this direct restoration of anterior teeth, as I illustrated the use of amalgam in the previous section.
Some discussion of the difference between these two materials may be found in the Introduction to this Section.
In Chapter V.4 will be discussed adhesive dentistry, which highlights the difference between these two materials. THIS subject is of landmark importance in dentistry, because the availability of TWO materials to do similar tasks, and the dentists response to the choices that needed to be made, has altered the field of dentistry, perhaps irrevocably.
Dental Fillings – Anterior: The Class III lesion
General Considerations
Here we address the decay on the proximal surface (touching adjacent teeth) of the anterior teeth. If you are talking to someone and looking at them from the front, this decay is sometimes visible “between” the teeth. Actually, decay is progressing, typically, in both adjacent teeth near the edge of the contact closest to the gumline.
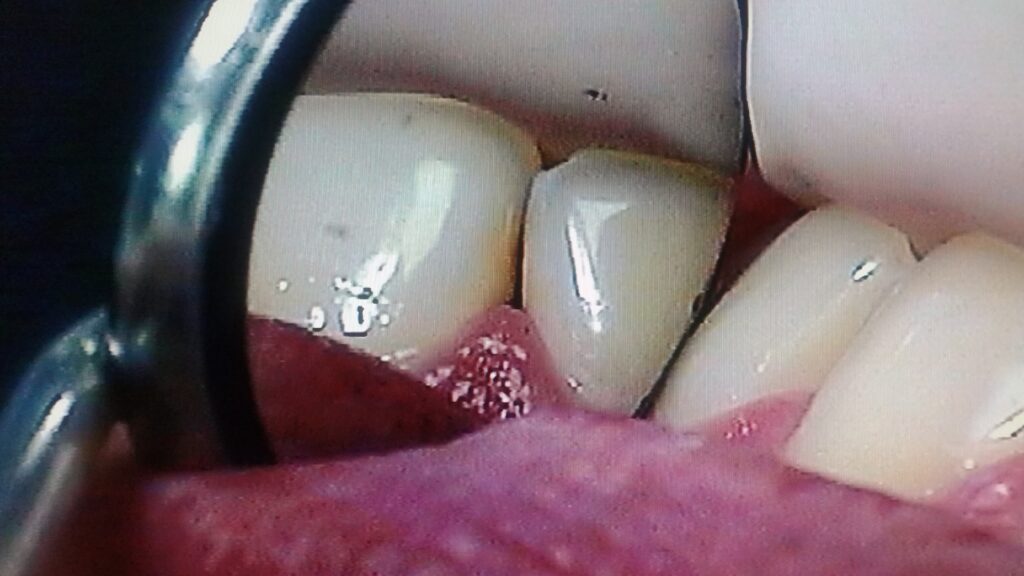
As discussed in the section on X-rays, these carious lesions (decay) will generally be visible in the radiographs, but are more easily seen by direct observation in the mouth. This visible inspection is done by shining a strong light on the facial surface of the tooth and looking from the lingual direction in a mirror. This transillumination will allow the dentist to see THROUGH the tooth, visualizing the DEJ (dentinoenamel junction) within the tooth, AND, typically, a gray shadow in the enamel that can be seen to extend from the surface near the adjacent tooth toward the dentin.
See the pictures below of class III lesions, both in the X-ray and by transillumination.
The smallest Class III lesions that need to be restored can be seen to stop AT the DEJ. Anything less deep than this, stopping within the enamel, may NOT need to be restored. When I worked regularly with candidates for patient-based clinical exams I evaluated thousands of class III lesions in patients. In one instance I recall my students suggesting the patient use fluoride gel to keep the lesion from getting too much deeper before the exam – as it was very close to the DEJ at that point. If it penetrated into the dentin it would get very much larger quickly. When he saw the patient again after a few months the lesion could not be found!
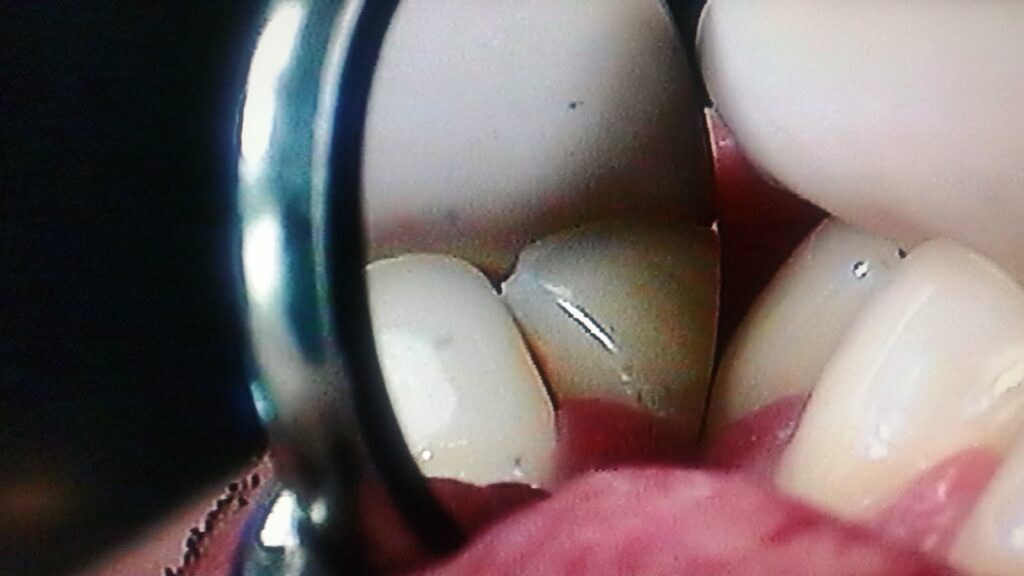
Lesions that penetrate TO the DEJ need to be restored by removal and replacement. Generally, by transillumination, we can SEE clearly when the lesion has entered the dentin, as the COLOR of the lesion changes from gray to brown, and it spreads along the DEJ in all directions, as the dentin is softer and more susceptible to damage from decay than is enamel.
The photograph below shows this clearly.
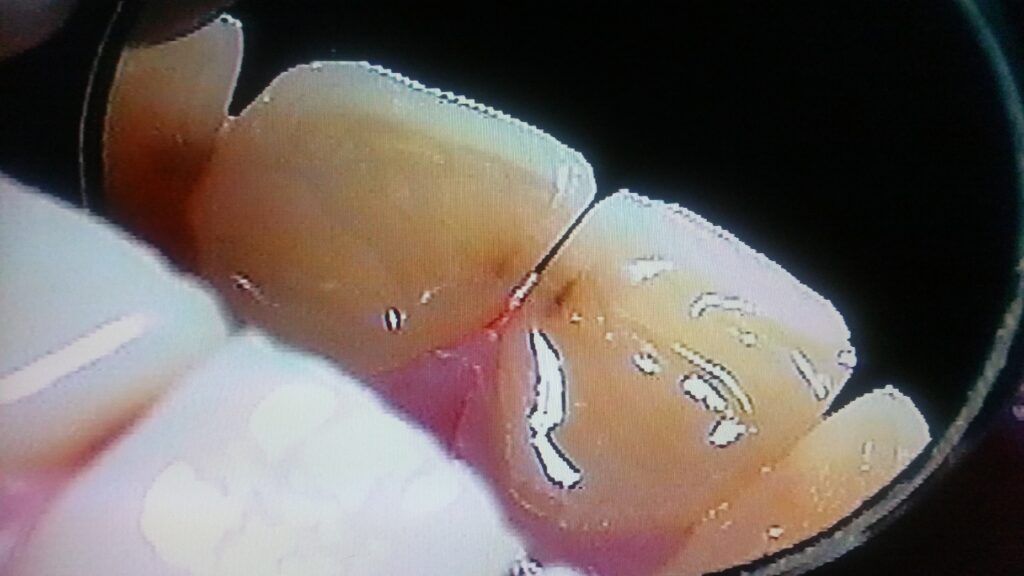
The LOCATION of the lesion is most typically involving just the gingival border of the contact area. It is in the enamel under the contact closer to the gumline and it does involve the contact area with the adjacent tooth, but only JUST at the “lower” edge. AND, when we see this pattern of decay on one tooth, we often find a matching lesion on the adjacent tooth.
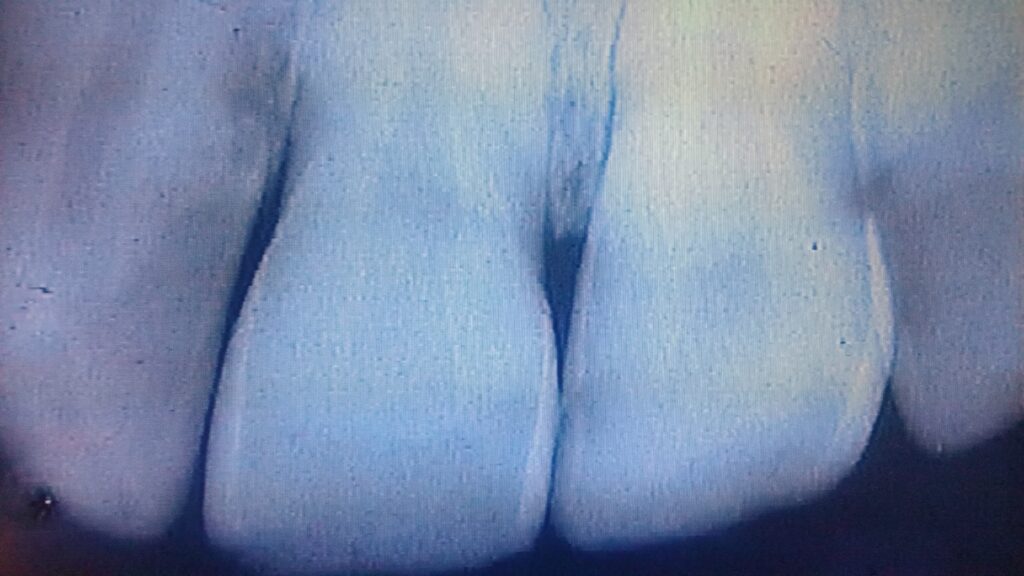
The facial extent of the lesion is important esthetically. Most often, when we find a lesion that penetrates to the DEJ, it also extends out onto the facial surface to some extent, as surface decalcification. There are two pictures above that show this graphically.
Talking to someone that has a class III lesion, we often observe whitish or brown staining, as a sign that decalcification is present on the surface in the facial embrasure. When the dentist DRIES the tooth with a stream of air, this decalcification becomes very much more obvious. When the tooth is restored, we must include this area.
The Class III Tooth Preparation:
Having identified by X-rays or visible inspection that there is a class III lesion, we need to remove the decayed area and prepare the tooth for the restorative material, in this case composite resin.
The dentist normally works from the lingual/palatal surface to access the lesion, since it involves less extension in a visible area. Since the lesion can be seen visibly through the enamel while working, the dentist knows exactly where to penetrate the tooth.
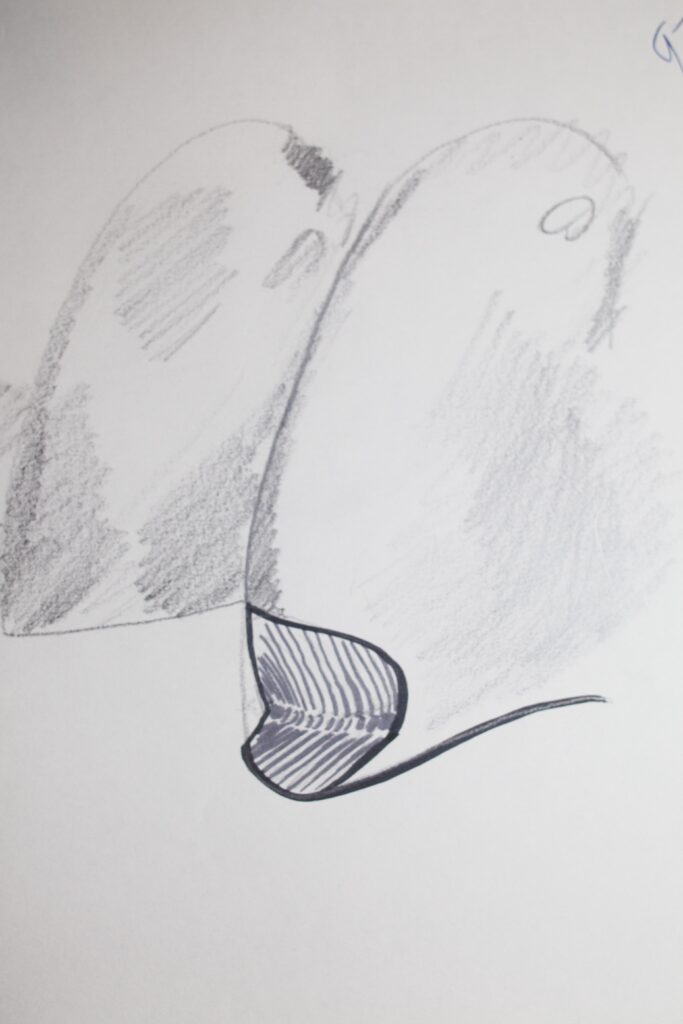
A drawing of a typical, conservative, class III preparation is shown below, as seen in the mirror from the lingual side.
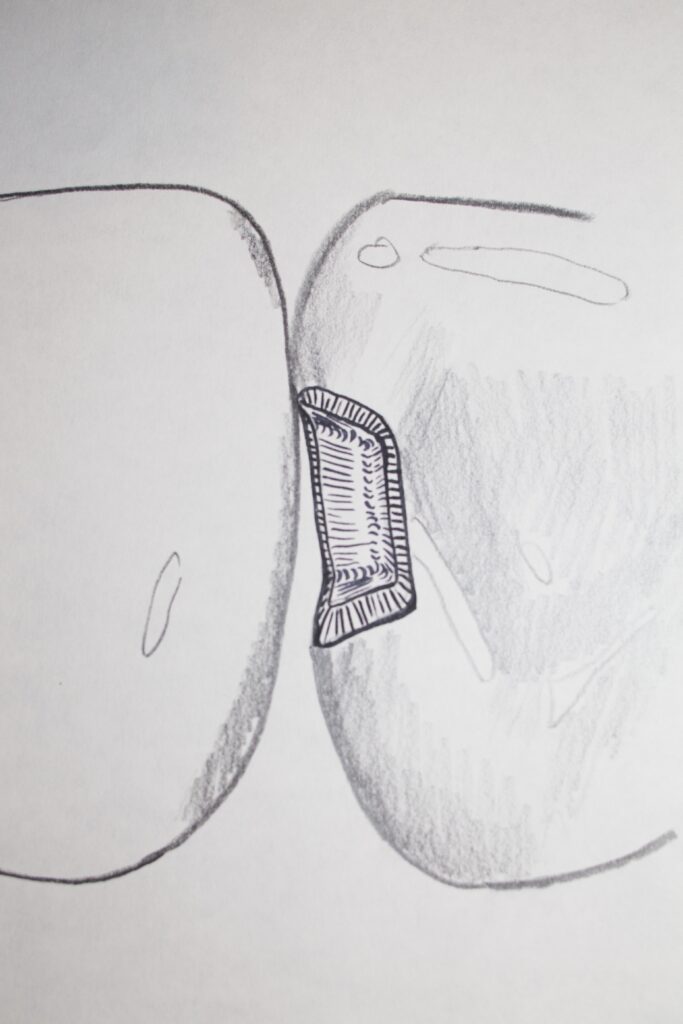
Note that the margin of the preparation closest to the incisal edge is just touching the adjacent tooth, and that the margin closer to the gunline (gingiva) is minimally into the open space below the contact. Also note that the facial margin, into the conversationally visible area of the tooth, extends onto the facial surface enough so that there is clearance (space) between the facial margin and the adjacent tooth. Note as well that the margins are BEVELLED.
We discussed that for silver-amalgam the preparation must be done so that the angle of amalgam at the margin is as close as possible to 90 degrees, so that the amalgam will be strong enough there to resist chipping away. For composite, we deliberately make the angle of the preparation at the margin small – not worrying for this material that it might chip away. This is because at the bevelled margin the composite is adhesively BONDED to the enamel.
Bonding to Enamel
The distinction of the last paragraph should be elaborated upon somewhat. First of all, composite resin CAN chip at the margins when the angle is small, but, if restored correctly, it WILL NOT! Why not? This is crucial. As the composite resin is adhesively BONDED to the tooth structure at the margin, it cannot chip. And, it CAN be adhesively bonded ONLY IF the angle of the preparation at the margin is such as to expose the ENDS of the enamel rods (see Chapter V.2 for discussion of enamel rods). Adhesion between composite resin and enamel depends upon exposure of these rod ends!
In the picture below, I’ve drawn the direction of the enamel rods in red. You can see that if the margin were bevelled it would cut across these ends and allows good adhesion.
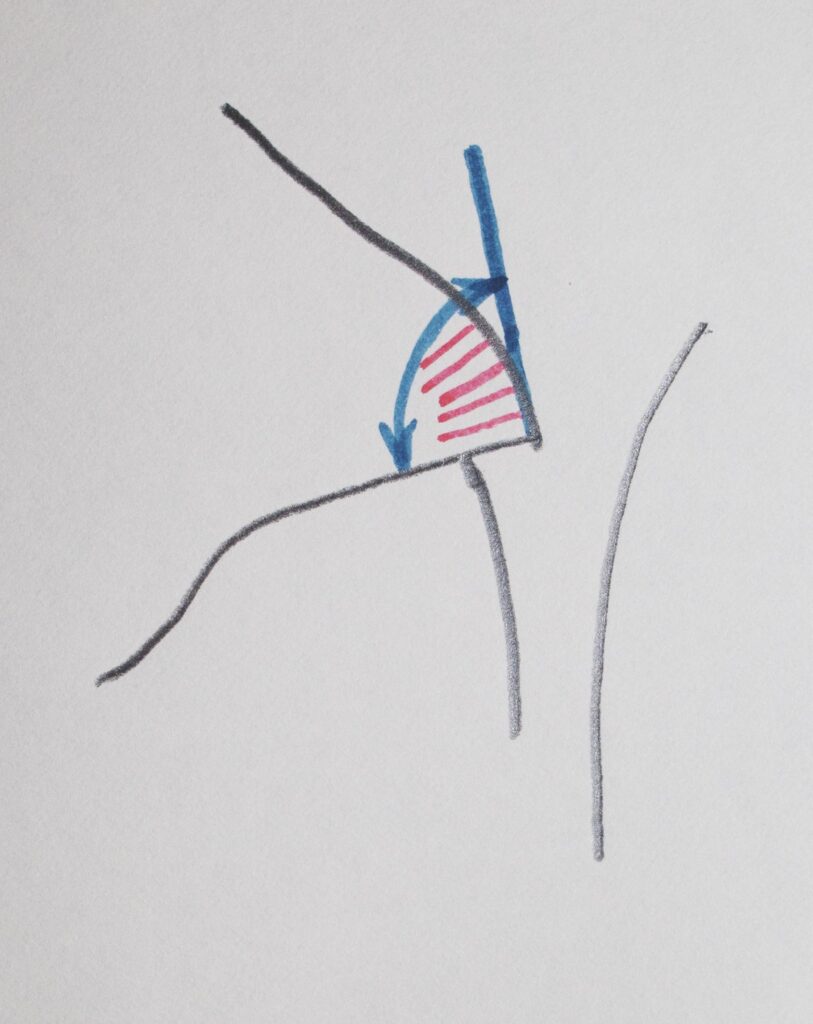
Now, the details of adhesion we need not get into in depth here (although visit Chapter V.4), but of primary importance is the fact that adhesion to enamel is better than it is to dentin, and that adhesion to enamel is far better when the preparation cuts across these rod ends.
So now we have a preparation that removes the decay, it is relatively small, and it allows restoration with a composite resin material such that the margins are adhesively bonded, so there is less chance that these margins will LEAK in the patient’s mouth over time. Leaking margins produces staining and eventually recurrent decay at that margin. If the preparation is NOT bevelled wherever possible, there will be premature leakage, discoloration, and the need to replace the restoration especially if the discoloration is visible conversationally.
The Misunderstanding of Most Dentists
If the truth be known, most dentists do NOT bevel their composite preparations. AND, most dentists come out of dental school thinking that since the composite resin is bonded to the tooth structure, leaving undermined enamel (see the last section) is OK. They are SO wrong, on both counts!
If a composite preparation is NOT bevelled at the margins, there will be leakage because the adhesion is compromised. If there is undermined enamel at that margin, the composite will bond to it, but during the curing process, when the composite shrinks, it will pull this piece of undermined enamel away from the rest, leaving a gap which is susceptible to recurrent decay. AND, bevelling particularly the facial margin of a class III is by far the most conservative way to remove the last of the surface decalcification which shows in the patient’s mouth. AND, bevelling the facial margin makes it so that the transition from enamel to composite is GRADUAL rather than sudden, so if there is a shade/transparency mismatch at the start, it is far less visible; AND after some years if the tooth changes appearance, it will still not be as obvious because of the placement of the bevel!
So, one must ask WHY, oh WHY do few dentists bevel the margins of their composite preparations? To save time at the expense of the patient? We’ll discuss this more later, but that is a possibility – sad to say! And, it just might have something to do with the fact that the composite resin restorations will need to be replaced far sooner than they should!
Placement of the Composite Resin:
However the preparation is done, we need to fill it with composite resin. In order to do this we need to place a matrix, as in the amalgam case, so that we don’t exude a lot of excess material, and so that we don’t bond the restoration to the ADJACENT tooth. This matrix is made of mylar and is transparent. We also wedge, as in the class II amalgam case, for the same reasons.
Then we prepare the tooth for bonding by etching the enamel (and dentin too) with phosphoric acid, a weak acid which is quite safe to use on teeth. Then we apply a coating of adhesive or bonding agent, which is actually just the resin without filler particles (more on the details of the composite material in Chapter V.4) The bonding agent has within it a chemical that absorbs visible light in the blue range and initiates polymerization. We use a CURING LIGHT to start this process and the bonding agent layer will harden. To this layer, which is well bonded to the tooth preparation, especially at the bevelled margins, we add layers of the composite resin, with embedded particles of filler (which increases strength, improves its response to changing temperatures, increases opacity to match tooth structure better, and provides more resistance to wearing out). We light cure each layer as added.
You might ask yourself what makes the additional layers of composite STICK to the previous layers. A very good question, which many of my students cannot answer. For amalgam we saw that adding each subsequent layer quickly, after scraping off residual mercury, allows the intimate joining of each layer, because they solidify together. For composite it is more subtle. The bottom line is that composite resin will not set in the presence of air – so there is an inhibited layer on the surface. Subsequent layers exclude the air and then they can cure together. Pretty neat!
We add SMALL, THIN layers of composite, because when each layer cures or sets with light-initiated polymerization, it SHRINKS! A lot! With a constant percentage shrinkage, the more material you cure at one time, the larger the amount of shrinkage. Shrinkage can have consequences for the comfort of the patient after the restoration is done, but we’ll discuss that later.
Several thin layers are added and each cured by light, until the preparation is filled completely, with some excess. I generally use a brush to shape the final layer of composite resin, so it is as natural in contour as possible before the final light-curing. Nonetheless, once the final layer is added, it is shaped (like carving amalgam) to match the contours of the surrounding tooth structure with a finishing bur in a high speed handpiece (“drill”).
Once the basic contours are finalized, recreating the concave fossa on the lingual surface of the anterior tooth, and the more convex marginal ridge, the restoration can be polished, using a slower handpiece with discs of various coarseness and fineness to achieve the appropriate shiny surface. This is especially important when the preparation extends significantly onto the facial or more visible surface. We even use this plastic strips with abrasive on the sides to smooth the area gingival to the contact area.
For a class III restoration it is often not an issue as to whether there is contact between the restorative material and the adjacent tooth, as the contact is not completely lost during the preparation stage. But, when the contact is to be reformed totally out of composite resin, this is much more difficult than with amalgam. As amalgam can be PACKED against the matrix band, ensuring strong contact with the adjacent tooth, composite cannot be packed or pushed against this band. Especially for class II composite restorations, rebuilding a solid contact can be challenging for this reason. Special matricing systems and thinner matrix bands are often used to ensure a good contact, which is important for the patient.
Dental Fillings – Anterior: The Class IV Composite resin restoration
Preparation of Tooth
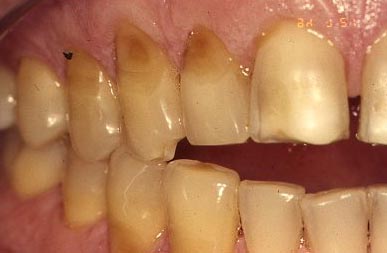
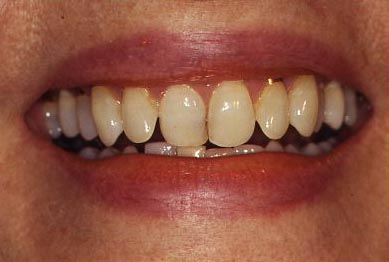
The class IV lesion involves at least one incisal corner of the anterior tooth, and at least some of the proximal surface. For example, when I was moving into a new apartment some years ago, there was a sliding glass door onto a second floor deck that I was not familiar with. Since I was moving boxes with the usual moving-in haste, at some point I was taking a box out onto the deck and, as the owner had done a great job cleaning the class, I ran smack into it with my face! One corner of my #8 central incisor broke off and became embedded into my upper lip, and my nose was not a pretty sight. After all else settled down, the chipped corner of my tooth would require a class IV restoration. It did not involve a significant part of the contact area. I have never had it done, although friends have offered to restore it for free – somehow there are always things that seem more important.
A Class IV lesion might also extend from a Class III, which has decayed or broken off toward the incisal edge, and in fact, does involve part of the incisal edge. This lesion will likely involve the entire contact. The drawing below illustrates this.

The preparation of the tooth for restoring these two types of class IV lesions will involve heavy bevelling – because there is a large volume of composite resin material compared with the surface area of the enamel to which it may be bonded. So, whether it is a class III/IV type lesion or a chipped corner class IV, both will have significant bevels on the margins, especially approaching and onto the incisal portion of the preparation. Otherwise, there are no specific guidelines for the preparation other than to remove any decay and place needed bevels.
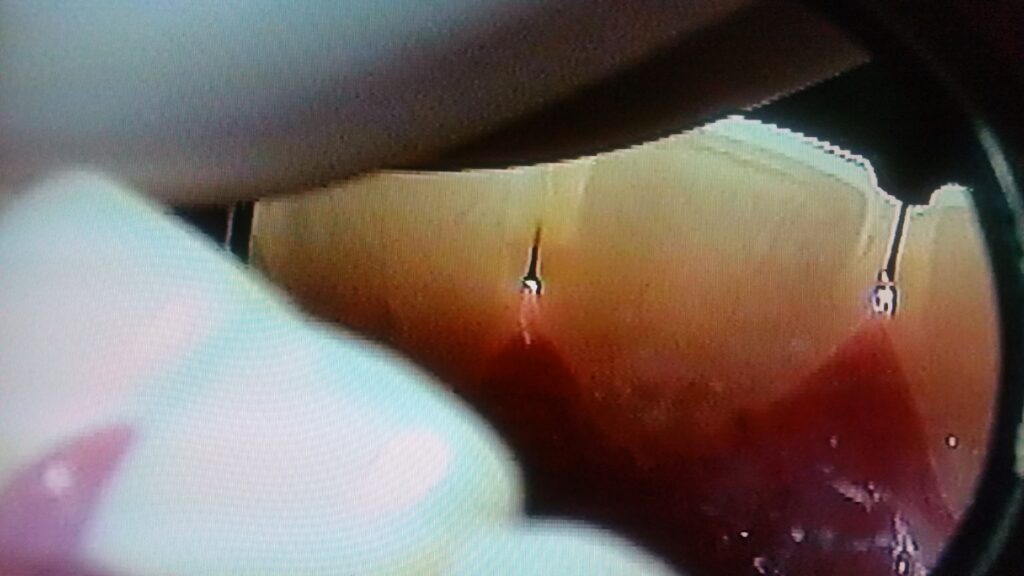
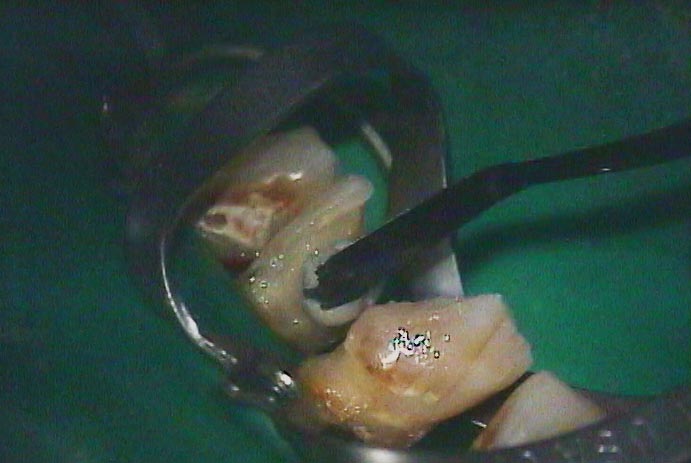
The photograph below is of a patient with large areas of decay on all of the anterior teeth – all starting on the proximal surfaces, but penetrating far into the teeth.
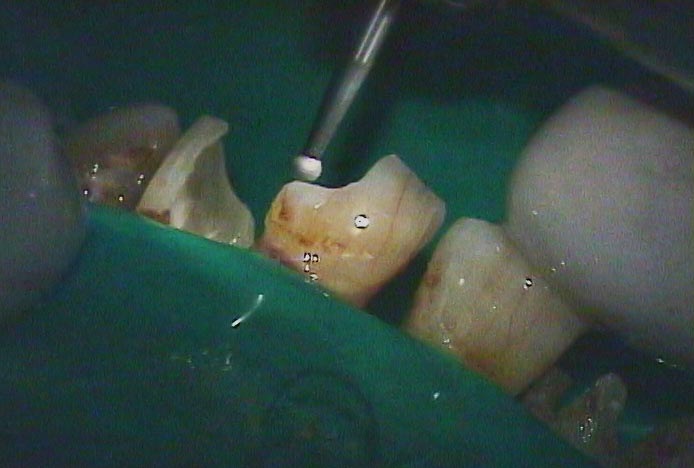
You can see below how far the decay went into the tooth. In this picture you can also see the residual of the pulp chamber which has filled in due to the irritation of the decay acids.
Restoring Class IV Preparations
Restoring the tooth with a class IV lesion can require attention on the part of the dentist. First, if it is a large part of the corner of the tooth that is being replaced, it is likely that strong forces will be imposed on this restoration from time-to-time, for example in eating an apple. The restoration must resist these forces, which means it must be well bonded to the tooth, which means bevelled enamel margins.
In the case where there is a lot of exposed dentin, we can ALSO bond to dentin, by etching and using a specific dentin primer before the bonding agent. Depending on the materials used and how well they are used, this dentin bond varies from little or nothing, to significant, but always less than bonding to enamel.
Second, for a large class IV restoration, when it involves the entire contact area, restoring the contact is challenging. As was mentioned before, one cannot PACK the composite against the matrix band and push it against the adjacent tooth. Really significant wedging is then required, and especially careful contouring using burs into the embrasures with the adjacent tooth, so whatever contact you have is not lost in the finishing process. An open contact can be at least an esthetic issue, if not a place where food can be trapped.
Third, for a large class IV restoration, whether it involves the contact or not, there will be a large corner of the tooth that is replaced by resin, for the entire facial-lingual thickness of the tooth. This means that the shade and, above all, transparency of the composite must be extremely well matched to the surrounding tooth structure, or it will look unnatural. The transparency issue is very important, because if the resin is slightly more transparent than the surrounding enamel, the darkness in the back of the mouth will be seen THROUGH the restoration, and it will appear DARKER than the surrounding enamel – a bad look. By simply selecting a composite resin material that is more opaque, the dentist can avoid this problem – but it requires a little more familiarity with the choice of materials than many dentists have.
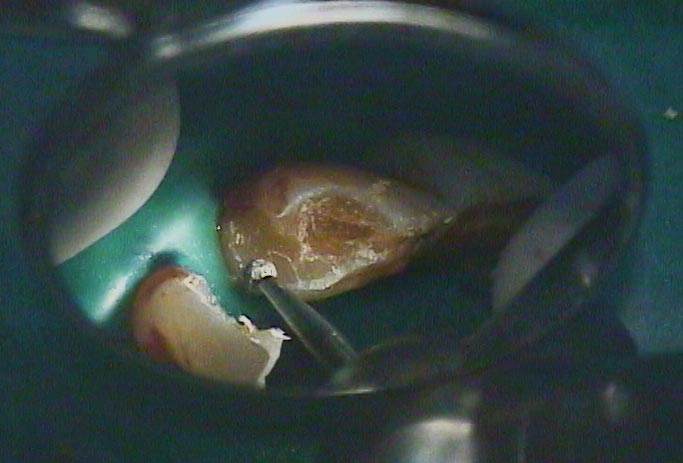
The picture below shows the first amount of composite being added to one of the large preparations shown above. Note the green rubber material surrounding this tooth. This is a RUBBER DAM, which insures good isolation of the tooth during the filling procedure, because any contamination of the etched tooth, primed dentin surface or bonded enamel surfaces, or of any intermediate layer of composite with saliva, will break the bond of the composite. This will lead to part or all of the restoration falling out later.
Dental Fillings – Anterior: The Class V Lesion
Nature of the Lesion
This is a fascinating area, because these lesions can be caused by THREE completely different types of phenomena. The location of the lesions is in any event on the facial or lingual surfaces of the anterior or posterior teeth – and by far the most prevalently on the facial surface.
The three disparate causes of class V lesions are: 1. Decay, and 2. Abfraction, and 3. Aggressive toothbrushing. The abfraction and toothbrush lesions were discussed earlier in Chapter III.5, so you may have some familiarity with this if you are going in order.
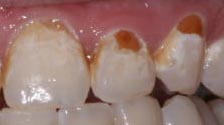
As a reminder, the pictures below illustrate the appearance of class V lesions due to decay, a bacterial process, and one due to abfraction, which is a strictly mechanical process, as is toothbrush abrasion.
The Class V Preparation and restoration:
The design of the preparation for these fillings depends on the cause. For a carious lesion, we will simply remove the decay totally, however far it extends, bevel the margins if in enamel, and fill the restoration with composite resin. Perhaps we will use dentin bonding, but certainly will get a good bond to the marginal bevels. If the lesion is deep toward the pulp of the tooth, we may take extra care to not expose the pulp chamber, or to place a material that stimulates formation of more protective dentin near this area in the pulp chamber.
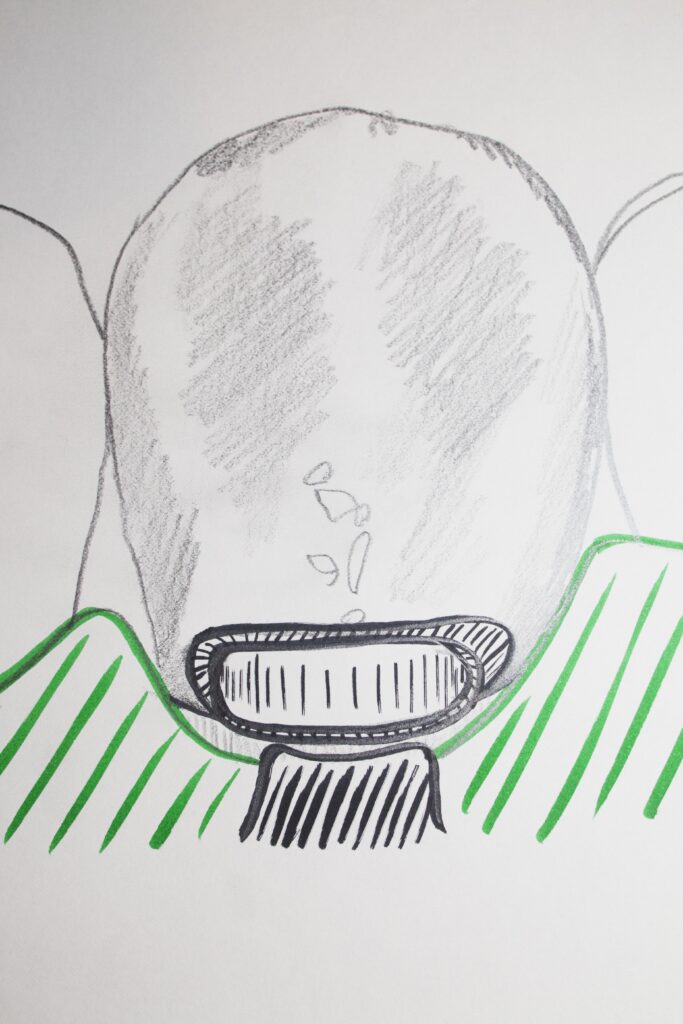
The drawing below shows the typical shape of an abfraction lesion, while the drawing below that shows what the final Class V preparation would look like, including bevels, and showing a rubber dam and clamp to pull the gingiva down to access and isolate the gingival margin.
The composite resin restoration then proceeds as normal, with small increments added with light curing between. The final surface is adjusted to match the contour of the tooth, and the shade and transparency selected as appropriate. There is no contact area typically involved at all, so no need for a matrix band.
For a non-carious class V lesion, whether due to abfraction (commonly) or tooth brush abrasion (rarely), the preparation is done to create a space for about 1 mm thickness of composite throughout the restoration, and enamel margins are bevelled. Typically, these lesions extend beyond the CEJ gingivally, so there is NO enamel on the margin near the gumline, so it is NOT bevelled. This requires that a good dentin primer be used in this area so that whatever bonding to dentin is possible is achieved. The integrity of the gingival margin is important as it is not as well bonded, not being in enamel, and it is generally subgingival, so harder to keep clean of plaque.
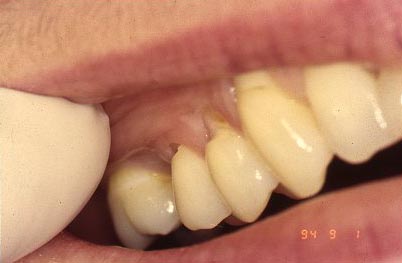
A reminder: The following picture shows a 90 year old woman who had a class V restoration done with GOLD FOIL when she was 21 years old. If longevity of restorations is what we are after – this case well illustrates what can be done. I always found the class V gold restoration appealing esthetically as well, probably because on the day I was born I looked up and saw this restoration in my mother’s mouth!
Composite Dental Fillings: Isolation While doing Restorations
Isolation of the gingival margin is most important for the successful restoration of class III and V lesions.
The problem with subgingival margins for composite is that there is a much larger likelihood that the margin will become contaminated during the restoration process. For example, the dentist might etch the dentin at this margin and apply the dentin primer, and then some saliva washes over the area, contaminating the primer. This makes the dentin primer virtually useless in achieving a good bond with the composite!
Isolation means that we do something to guarantee that saliva or fluid from the pocket or mouth cannot contaminate the margin during the restoration process. This is so the etching, priming, bonding agent and composite can all be added one-by-one with no risk of losing the bond to the tooth or between layers.
One way to attempt isolation is to pack a CORD, a yarn-like string, in the pocket. This will deflect the free gingiva away from the margin, and absorb the fluid coming from the pocket. It will NOT, however, stop saliva from washing over the area if the patient has to swallow, for example. An attentive assistant can attempt to suction up the saliva near the preparation for the entire time the restoration is being done, but the results are not guaranteed.
The best isolation, the fastest to achieve, and the most effective is the rubber dam. Now – most dentists only use a rubber dam when performing root canal therapy, and some not even then. It is well established that contamination of the inside of the tooth with saliva during root canal therapy can have a direct bearing on the success of the therapy. Hence, if it fails, and nothing is stated in the chart about the use of a dam, it is a losing lawsuit waiting to happen.
Few dentists use a rubber dam for restorative procedures because it is difficult to place single handed. Of course, in practice they have an assistant to help and they can train him/her so that the dam can be placed in less than a minute – BUT, in dental school they did not have an assistant. WHY would this be a consideration, you ask? Dental students HATE placing a rubber dam because they have to place it without help (yes they could ask a friend to assist for that step, but usually don’t). Few students have the manual dexterity to do it comfortably by themselves, so both the student and patient suffer through the process. Of course, once they get out of school they are determined to never use one again!
Yes – this is a child-like reaction. I am reminded of the fact that I didn’t eat brussel sprouts for 10 years after I left home because they tasted so bad. Eventually I discovered it wasn’t them, it was the way my Mom boiled them for 45 minutes!
In any event – with an assistant, the rubber dam can be placed easily and quickly and comfortably for the patient (I LOVE wearing a dam as a patient), and then the restorative process can be done with more security. The assistant can even go help someone else and the dentist can work on their own with confidence there will be no contamination.
I won’t go into any details about HOW the dam is placed for a class V – it involves a special clamp that needs to be positioned very carefully – but that is beyond the scope of our mission here. We only care here about WHAT might be done to improve the success of procedures in your mouth. Knowing something about the subject of isolation is valuable to you in that you might ask your dentist if he will isolate your tooth before doing the preparation and restoration.
The ironic thing is that, while I indicated that few dentists use a dam because of dental school experiences, as practicing dentists with able assistants, once the dam is placed (in under one minute), it will save the dentist at least 5 minutes of time (even just making it so the patient doesn’t have to swallow as frequently, interrupting the procedure). Investing a minute to save five means more PROFIT for the dentist. As many dentists are profit driven (I know, they should be care driven!), you’d think more would use the dam because they make more money. You’d think ….
Bottom Line for Dental Fillings – Anterior
Working in the front of the mouth requires that we use materials that look natural in the visible area. It also requires that we do preparations that will allow those materials to be used so there is less likelihood that the margins of the restorations will stain later.
Composite resin restorations, whether Class II, III, IV, or V, should last at least 12 to 15 years in the mouth, without getting recurrent decay, falling out, or showing staining at the margins.
They rarely last this long, because the dentist will not always utilize all of the techniques, materials and approaches available to him/her. This is a failing of the dental profession, which I sincerely hope PATIENT AWARENESS will eventually correct.