For a more detailed look at dental X-rays you may want to check out the Wikipedia article which covers this subject – including lots of references that can be used for further exploration.
Organization of this Chapter
You May Skip to Whatever Subject Interests You Now
Basic Introduction to X-radiography
Types of Dental Radiographs
Considerations for Bitewing Radiographs
Considerations for Periapical Radiographs
Comfort of Dental Radiographs
Observation of Decay in Anterior Teeth
Being Fooled by Broken Cusp
Evaluations of Four Patient Cases by Radiography
Bottom Line for Radiography
…………………………………………………………………………………………………………………….
Basic Introduction to Electromagnetic Radiation and Film
The earliest example of an X-ray that I ever saw was made by an elderly professor that I met at Caltech in the 1970s. As a teen he had built an X-ray unit and taken a picture of his hand – and I believe this was in the early 1900s. He proudly showed me the image and it was impressive in its detail for the times.
In dentistry we have used X-rays to image teeth and bones – hard tissues, for many decades – at first using huge generators suspended from the ceiling by massive supports, and then later by smaller and more compact units, and now there are even hand-held X-ray generators.
The images produced are actually SHADOW PICTURES of whatever the light passes through. Note – that X-rays are a form of light! Now, if you take sunlight and let it shine through a leaf onto a piece of film, you get an image of the leaf that is very much like what you get using X-rays to pass through harder and more solid materials. The only difference between X-rays and visible light is the frequency.
To be more complete – visible light and X-rays are just different frequencies of electromagnetic radiation – where the “beam” of radiation is composed of two waves that are mutually perpendicular, one magnetic and one electric. Maybe you recall that you can induce an electric current in a coil by moving a magnet near it, and cause a magnetic field by running current through a coil of wire. Mutual induction is how electromagnetic radiation works.
OK – too much information, I know – but it’s just really cool.
The lowest frequencies of electromagnetic radiation are radiowaves – yes, the same ones that carry (or used to) your favorite show to your TV antenna – radiowaves also are used in MRI machines in the hospital. They are the lowest energy waves. The next level of “light” is the microwaves – yes, your oven uses them to cause water molecules in your food to rotate around fast and generate heat. Above that is the infrared areas, both far infrared and near infrared. Far IR is used more in scientific research, to measure vibrations between heavy atoms in molecules (that was my undergraduate research, by the way), and near IR for looking at vibrations in typical organic molecules. Then comes visible light, with which we are all familiar. The different frequencies of visible light are displayed in the rainbow, split by the prism of the rain into red, orange, yellow, green, blue, indigo and violet. With higher frequency and more energy comes the ultraviolet radiation in a couple of bands, A and B, and these are responsible for that tan you enjoy in the summer, and for the skin cancer (specifically basal cell carcinoma) you have removed later on. Even more energetic radiation then are the X-rays and the gamma rays. These radiations are of such high frequencies and low wavelengths that there is much less interaction with solid matter at all – there is nothing in the matter which absorbs the light by rotating molecules, vibrating molecules, or exciting electrons to higher energy levels – so they just pass through, with some scattering aside just because there are heavy nucleii around.
OK – that was a little more detail than I expected to go into – but it’s always been fascinating to me.
Now – when an X-ray is shone on the jaw and teeth in a parallel beam, and a piece of film is placed on the other side of the jaw, there will be exposure of the film. Now – the most astute among you will ask, but if the radiation passes through matter, why will it not pass through the FILM without any interaction? GREAT question! And I admit to being a little stumped about this as well. While I have exposed thousands of negatives with light and thousands with X-rays, it was up to the developers of the process to find a frequency of X-ray and sensitivity of film wherein the X-rays pass through bone, where the atoms are not very heavy, and yet get stopped by the heavier silver particles of the film. The absorption of the X-ray by the film has to do with the light causing changes in the molecular layer of the film that requires higher energy than for visible light. The higher energy of visible light can expose these films to some extent, but the reds and orange colors do not at all.
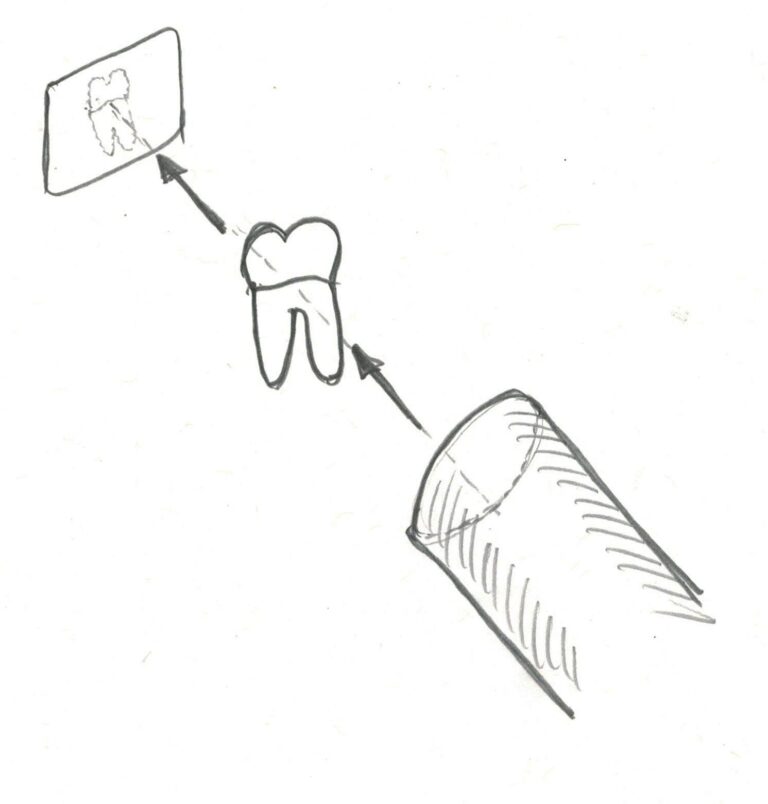
But – these days many dental offices use digital X-ray equipment. This is no different as far as the X-ray light itself is concerned, but there is NO film – it is an electronic sensor – like the sensor in your digital camera, but optimized for the higher frequency. With the sensor connected to the office computer, digital X-rays of high quality can be produced immediately at chair-side – no developer, fixer, washing and drying. Another big advantage to the digital sensors in dentistry is that the exposure of the patient to X-rays is reduced by a considerable fraction, perhaps even by 70%.
Types of Dental X-rays or Radiographs
The films that you typically see in the dentist’s office are small, and many are taken to cover the entire mouth, including the roots of every tooth – in fact 18 typically comprise the Full Mouth Series. On the other hand, if we are doing a routine check every year or so, a more limited set of just the back, posterior, teeth is taken – and these are called bitewings, because the original paper holder for the films had a tab that you bite on, and they looked kind of like wings. The Full Mouth Series, or FMX, contains both bitewing “films” and periapical films, which show more of the root and bone.
There are four bitewings taken, whether digital or film, at a vertical angle where the beam of X-rays is as much as possible parallel to the direction that proximal caries – decay on the sides of the teeth – spreads out. This maximizes the ability to distinguish the decay from the tooth structure. Since the bacteria that cause decay demineralize the enamel and dentin, the regions on the film where the X-ray passes through the decay are darker, because there is less mineral to stop the beam. We call them “radiolucent areas” because the structures in that area are more translucent to the beam.
There are a few images below that show the typical appearance of X-ray films where decay is detected.
There are also panoramic films taken by some offices – although this more spread out image of the mouth is being rapidly overtaken by CAT scan type systems. The original panoramic had one large sheet of film that wrapped around the head, but the digital systems now rotate around the head and record fine sections through the entire jaw. In the past the panoramic was used often for looking at the entire jaw, with the prospect of doing large restorations like dentures. But in the last 30 years the importance of whole jaw recordings has magnified because of the advent of implants in dentistry. In fact, the Computed Tomography systems (cat scan) are mostly used for implant planning, and the accuracy is so good that they can be used to actually generate alignment guides that the dentist can use in the placement of the implants. Much more on this later in Chapter V.14.
Considerations for Bitewing Radiographs
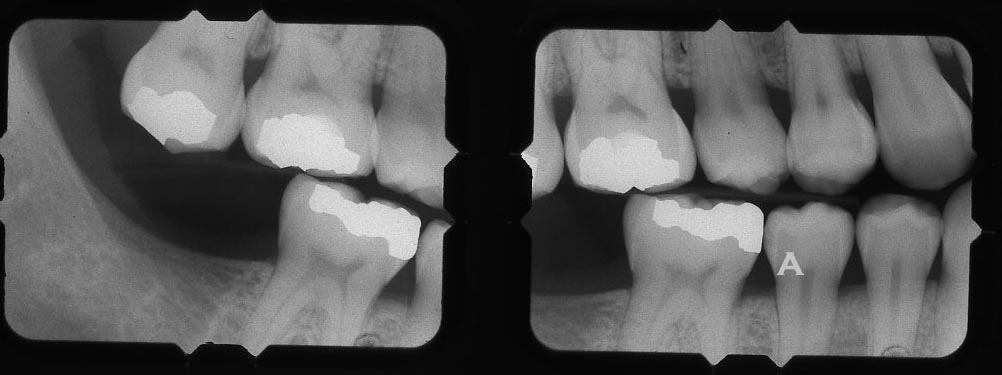
Bitewing
A – just a suggestion of decay on the side of the tooth near involving the contact – maybe more surface decalcification that wraps around the tooth though.
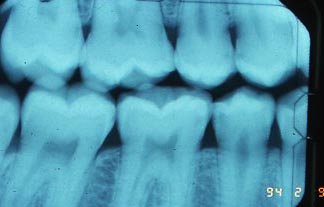
The angulation of the X-ray beam relative to the teeth and film is crucial in determining the value of the film in diagnosing decay, particularly. For example, if there is decay on the proximal surfaces of the teeth (sides that contact adjacent teeth), it generally extends from facial to lingual as a line of decalcification, and from occlusal to gingival (top of tooth toward root), it forms something of a narrow triangle. Some of the radiographs above show this triangular appearance.
If the X-ray beam has a vertical angulation so that it points ALONG the line of decalcification, then the triangle shows up clearly – but if the VERTICAL ANGLE is off, even 5 degrees, the appearance of the lesion is much less dark and spreads out more vertically on the film, making it harder to detect. Also, if the HORIZONTAL ANGLE of the beam is not bisecting the contact between the adjacent teeth, they will appear to overlap on the film, and the increased density (whiteness) of the film over the area where the decay would be seen, obscures the decay, or at least over emphasizes its depth of penetration. You can see some overlap in a few areas of the X-rays above.
So – the angulation of the beam is critical for obtaining diagnostic radiographs. For many years I helped students take X-ray films for patients that were prospective board patients. For the student to have their patient approved as a board case, where the filling is graded by professionals outside the school to determine qualification for licensure, the film must accurately show the patients actual condition. Poor quality films were rejected.
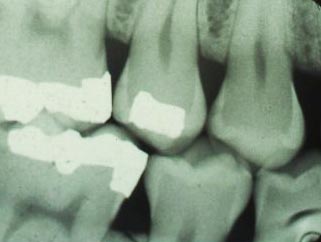
The upper first premolar above has the perfect class II lesion for a board examination. Vertical angle and horizontal angle are exactly right.
In many dental offices the person taking the films for patients can be careless about beam angulation, resulting in films that do not show accurately your state of decay.
Decay that is extending into the tooth from the occlusal (biting) surface is hard to detect with bitewings because of the increased density in the film caused by all of the hard enamel on this surface. The increased whiteness of the film in that area will tend to obscure the darker radiolucencies due to decay, unless that decay penetrates considerably into the tooth. For this reason, initial or incipient or even moderate occlusal decay is generally detected by the dentist using an explorer.
Considerations for Periapical Radiographs
The periapical series of films are angulated to show the roots of the teeth, particularly the root apices. If there is an infection WITHIN the tooth pulp chamber and this infection has progressed through the apex into the bone, there will be seen a periapical radiolucency. The image below shows such an observation. When this circular radiolucency is observed clearly centered on the apex, it is clear that root canal therapy is needed. In this case the tooth may or may not have pain associated with the problem – it is possible that the nerves in the tooth are dead (necrotic) and produce no pain from inside the tooth – no classic toothache.
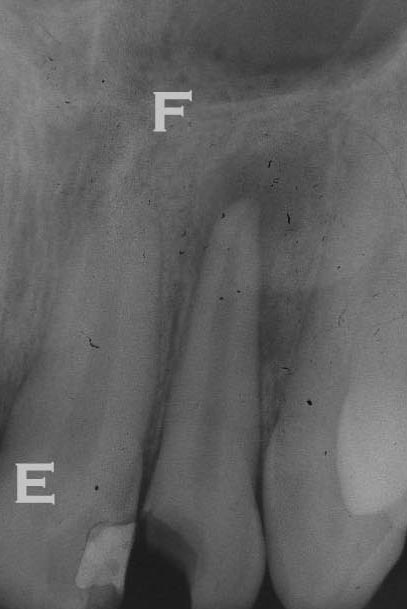
These periapical films can also be used to identify the level of bone that is supporting the tooth – although this can also be seen in the bitewings, and perhaps better there depending on the vertical angle of the beam. The bone level is normally found to be 2 mm or so below the place where the enamel and dentin come together on the side of the tooth. If it has migrated more apically (down toward the root tip) than that, it is generally a consequence of periodontal disease.
Also, the periapical films tend to show much more of the bone around the teeth and the bitewings, and this will allow evaluation of the integrity and density of bone. If there are radiolucencies, darker areas, in regions of the bone where it is not expected, this may be a sign of a disease state. It could be due to a cyst, which is relatively harmless, or of a tumor or osteomyelitis – both more serious.
The Comfort of Dental X-rays:
As I write this I just returned from the dentist where the assistant took a couple of X-rays of a tooth that has been bothering me. She used a digital sensor. The digital sensor is about the same size as a traditional x-ray film, but is much thicker. While the older films were thin, we often had to bend the corners of the film packet so they did not “dig in” to the tissues, especially on the palate and under the tongue. But getting the thick digital sensors into the same location so the root tips can be seen can be quite cumbersome. The dentist or assistant must position the film in just the right place so the angles are correct for the most valuable information, and so that structures will actually show up on the film that need to be evaluated. These requirements can make the process somewhat uncomfortable at times. In my case, she just took radiographs in the area of the roots of tooth 17 with a digital sensor, and it was quite comfortable for me.
Observation of Decay in Anterior Teeth
The anterior teeth, particularly upper incisors and canines, are subject to decay on the proximal surfaces (touching adjacent teeth), just as are the posterior teeth. But now the X-ray films may not be as diagnostic as simple observation in the mouth.
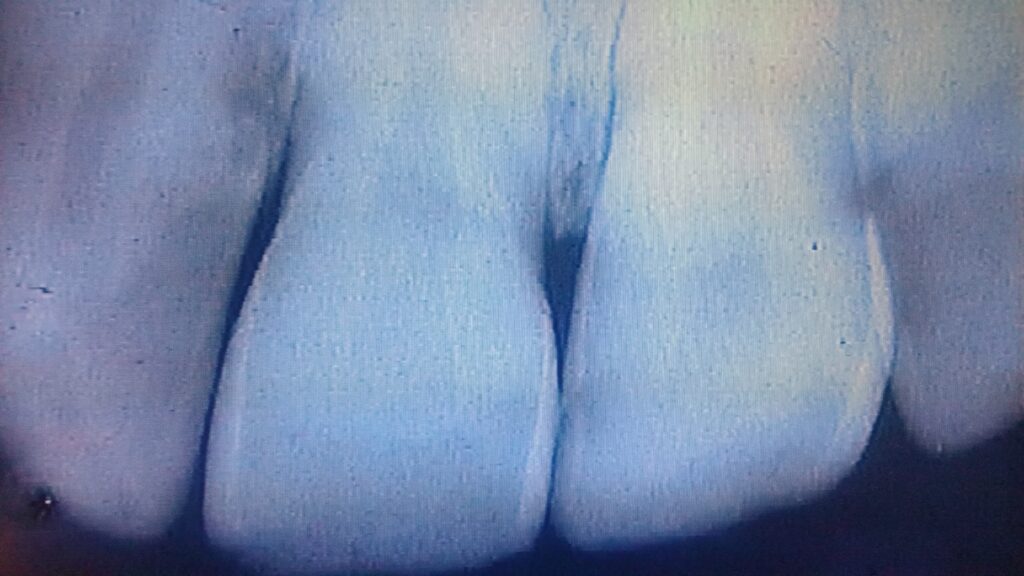
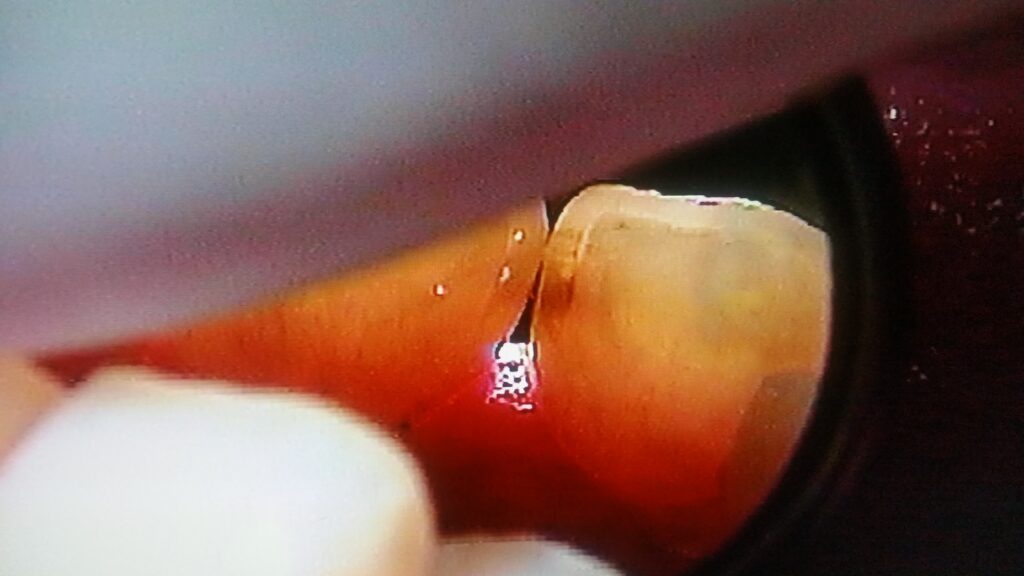
For example, X-rays of upper central incisors may show a dark area on the proximal surfaces of both teeth in the X-ray, but it is not representative of decay at all! Many dental students have been fooled by this. When the opposing teeth bite on teach other, there is often a little area of wear between the teeth that is called a wear facet (like the facets of a diamond). This little step on the lingual surface of the upper anterior teeth makes the enamel thickness from facial to lingual (front to back) on the teeth a little less in that area. This means that the beam will encounter less tooth structure at that level than for the surrounding enamel areas – hence producing a less white area because of less thickness, that is a dark radiolucency.
The image below shows what these radiolucencies can look like, that are NOT caused by decay at all.
Being Fooled by Broken Cusp for Posterior Teeth
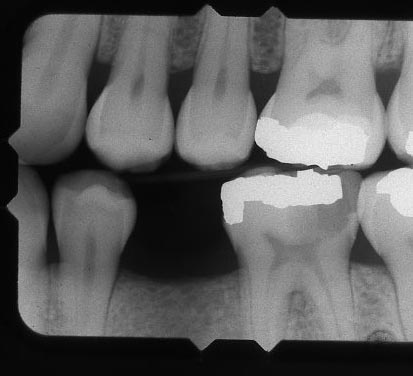
Similarly, when you break a cusp off a tooth, clearly it will produce a large area of radiolucency on the film – a large darker area will be seen that is certainly not representative of a normal situation. It is just showing the dentist that there is not as much mineralized tooth structure in one area – not why. This is often interpreted by less experienced students as a large area of decay, and it often looks like it involves the proximal surface of the tooth as well. From the film it may not be possible to distinguish between a broken cusp and large decay – which is why we must always cross check appearances on the films with observations in the mouth.
Detailed evaluation of some Patient Full Mouth Series X-rays
Each of the four cases below will present many observations typical of what dentists are looking for to form a complete evaluation of the patient. Under each set of films I will notate only SOME of the observations that can be made.
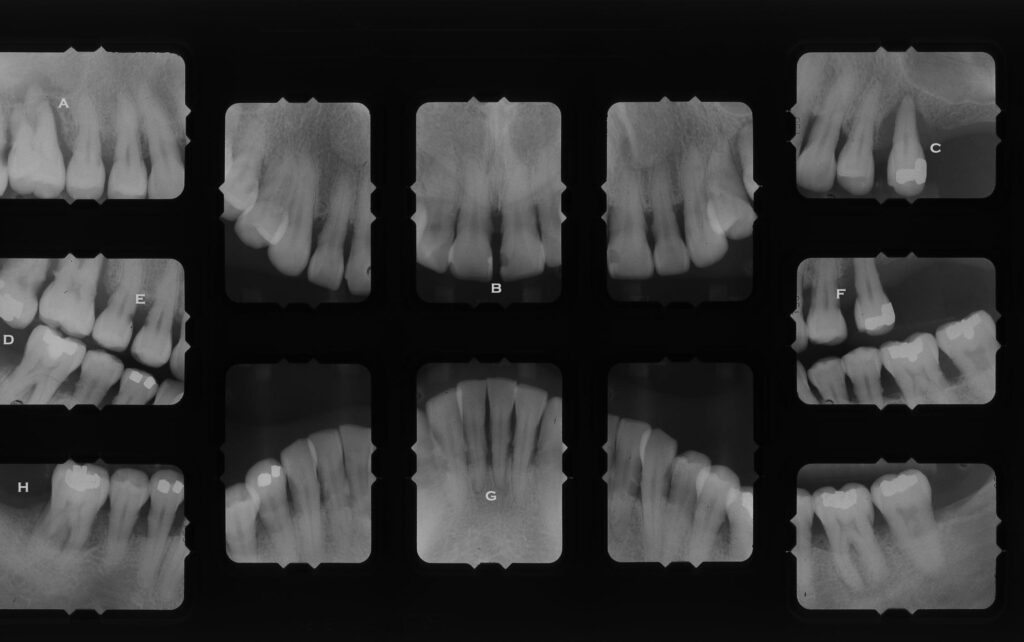
- A – Vertical bone loss down side of root to apex. Possible pulp involvement
- B – Bone loss with large area of calculus on root of tooth
- C – Tooth with virtually NO bone support, and lots of calculus on the roots.
- D – Upper tooth supererupted and decay on side of contact with adjacent tooth – allows to tip toward front
- E – Dark areas where enamel meets root are root decay
- F – More root decay here
- G – Very little bone support for lower incisors, with lots of calculus
- H – Bone level so low that the furcation between the roots is exposed.
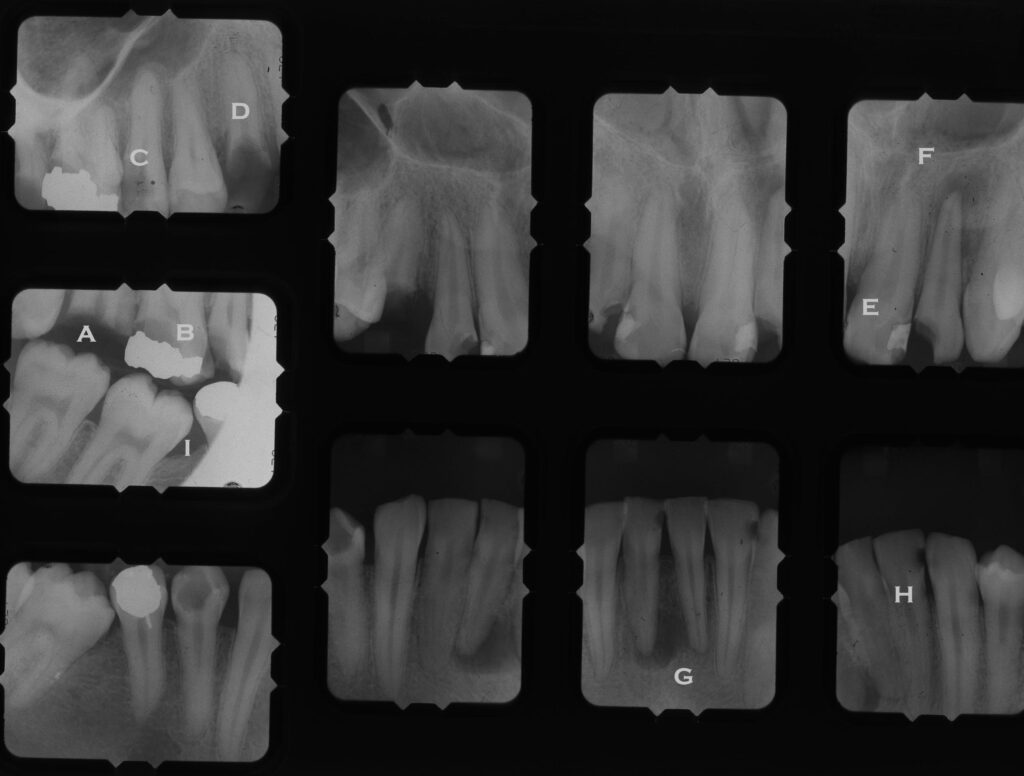
- A – Crown of tooth missing, only roots left
- B – Decay under amalgam on the back side
- C – Decay down the side of the tooth approaching pulp
- D – Only root left
- E – Composite Class III needs replacement
- F – Radiolucency at apex indicating root canal infection
- G – probably cyst in bone
- H – Class III decay on lower incisor
- I – Missing first molar and other two molars TIPPED into space
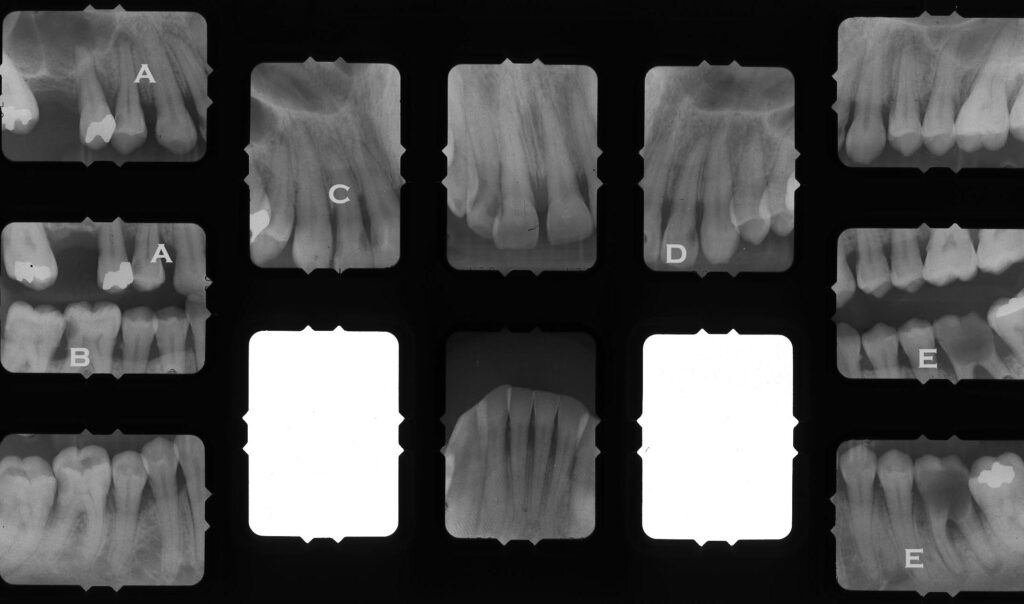
- A – Decay on Premolar with infection at root apex
- B – Tooth behind is tipping into decayed area on first molar, which is supererupting because of missing opposing tooth
- C – Class III lesions on both sides of lateral incisor
- D – Class III lesion
- E – Gross decay on first molar with infection at root apices
- Note – near the roots tips of E, dark area is nerve fossa
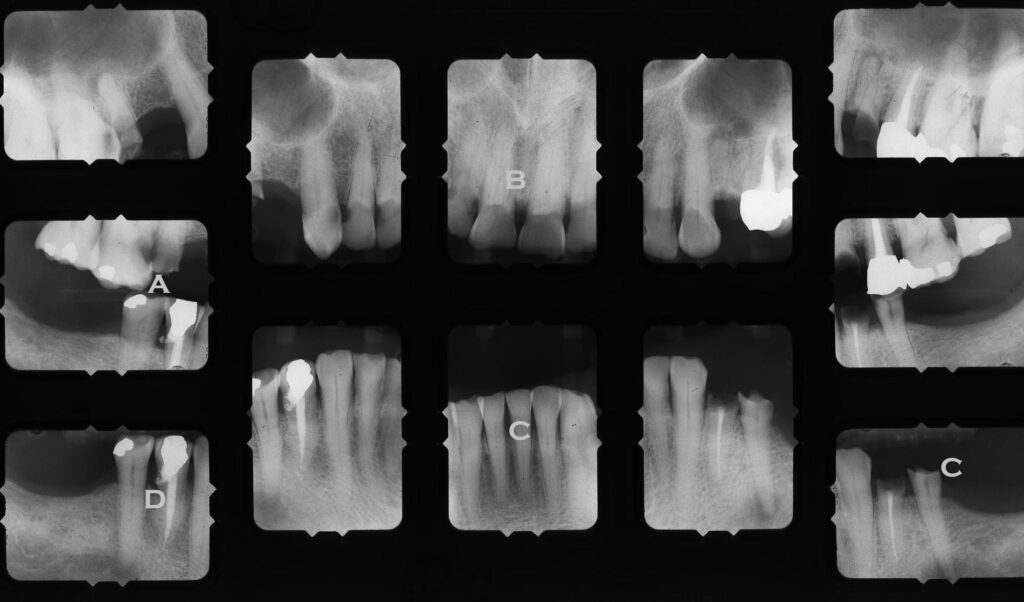
- A – Premolar almost gone, and molar gross decay approaching pulp
- B – The anterior teeth look dark, because the lingual sides are worn away by opposing teeth
- C – There is tremendous grinding – not how short the incisors are, the the premolar has no enamel
- D – The access for this root canal went out the side of the tooth!
Bottom Line for X-rays
Radiography is the single most powerful tool that we have in dentistry to diagnose a variety of hard-tissue pathologies. Whether it is teeth or bone, the display of density relates very well to the presence of demineralization, from whatever the cause.
Caution is needed, however. First, to make sure that the radiographs are taken skillfully, at the correct angles, particularly. Second, to make sure that we CHECK our observations on the “films” carefully against what can be observed in the mouth.