If the pulp chamber and canal contents need to be removed from a tooth, the procedure is called a “root canal”, or root canal therapy. This produces a tooth that is NOT alive – that is, non-vital.
Wikipedia has a nice section on root canal therapy, for those that want to explore more deeply and research the primary literature in the field.
Organization of this Chapter
You May Skip to Whatever Subject Interests You Now
Basics
The Need for Root Canal Therapy
Accessing the Pulp Chamber
Canal Instrumentation Techniques
Hand Instrumentation
Rotary Instrumentation
Filling or Obturation of the Canals
Modes of Failure for Root Canal Therapy
Bottom Line for Endo
………………………………………………………………………………………………………………………
Root Canal Therapy: Basics
As we saw in Chapter III.3 – discussing infection into the pulp of the tooth and into the bone at the root apex or apices – bacterial invasion into the pulp is an irreversible process. That means that everything within the canal system needs to be removed – the bacteria, the blood vessels, the nerves, the connective tissue – virtually everything living or organic needs to be cleaned out, completely. Recall in Chapter II.2 where we discussed the internal organization of the root canal system.
If ANY bacterial cells are left in any part of the pulp chamber or canal system, then there is a probability that the infective process can begin again, even years after root canal therapy, RCT, and produce symptoms. Then the RCT will need to be redone, probably by an endodontist, who will charge a significant fee for his efforts.
If there is any leakage in the seal of the tooth after RCT, then the possibility of a recurrence is real. If the canal system is not cleaned out thoroughly, and I mean every wall of every canal is SCRAPED smooth to remove any bacteria or bacterial products that might have penetrated into the dentin surface of the canal wall, there is the possibility of recurrence. If there are accessory canals that are not chemically treated to kill and flush out all bacteria and organic matter, there is the possibility of recurrence. If the tooth were not isolated during the RCT process, to prevent recontamination of the internal volume of the tooth, there is the possibility of recurrence.
The bottom line – here at the start of this chapter – is that the RCT needs to be done well. For most endodontists a significant part of their practice is REDOING root canal treatments done by other dentists.
The Need for Root Canal Therapy
Recall that in the part of the tooth that is visible in the mouth – the crown of the tooth – there is a chamber called the pulp chamber, in which reside a variety of cells, vessels and tissues. Once decay from any surface of the tooth penetrates to the pulp chamber (see label “A” in the X-ray below) and bacteria enter, it is likely that symptoms will ensue, and root canal therapy will be required.
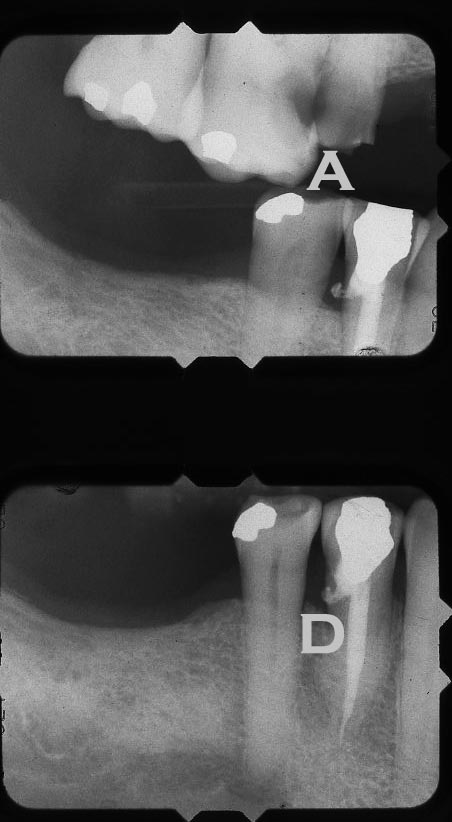
Bottom Picture shows how the Access was done Wrong – cutting to the OUTSIDE of the lower Premolar
Between the pulp chamber and the root apices (one to three roots, depending on the tooth), there are ROOT CANALS through which pass the blood vessels, nerves, and lymphatic vessels which keep the living cells of the tooth alive, and keep the tooth in contact with the nervous system.
When the root canal system, including the pulp, is invaded by bacteria, due to the limited blood supply to the tooth, the immune system is generally not up to the task of fighting off this infection. The same holds true, for much the same reason in the HEAD – where brain infections are extremely difficult to treat and are rarely recovered from without aggressive antibiotic therapy. For a tooth, antibiotic therapy can calm the infection temporarily, so that the symptoms are not as noticeable, but this is only temporary until root canal therapy can be accomplished.
As mentioned above, when the pulp chamber and root canal system is cleaned out to eliminate bacteria and infectious agents, it must be done VERY thoroughly, using both mechanical and chemical means. Any material that is left is a source of potential recurrence of the infection and symptoms.
And, once the root canal system is cleaned out, it must be filled (obturated), and completely sealed, so that the possible influx of bacteria is no longer possible into the far future.
In the sections below will be described the techniques, choices and precautions that are used when executing root canal therapy.
Accessing the Pulp Chamber
It is possible that the decay process has already “accessed” much of the volume of the pulp chamber – but it is preferable if the dentist opens it up mechanically, and with great control.
Assuming that the pulp is infected and the site of entrance of bacteria into the pulp is just a small area, then the dentist will use burs (basically little drill “bits” with various shapes) to open the pulp chamber more completely. The dentist needs to access the canal system of the tooth, and needs to make sure that any organic material or bacteria are eliminated from the pulp chamber, including the pulp HORNS. The ROOF of the pulp chamber must be completely removed. Where the roof extends occlusally over each of the canals is called a pulp horn, and sometimes these are not completely removed, leading to the possibility of recurrent infection.
You might want to review the basic anatomy of the pulp chamber here.
When the dentist accesses the pulp chamber with a bur, he has to have a pretty good idea where it IS! Many times a dentist is fooled by a tooth that looks like it is positioned normally in the arch due to wear, but it is actually TIPPED, often toward the front of the mouth. In this case he may drill vertically down into the tooth and cut into the wall of the pulp chamber. Many times such an error will result in the bur cutting THROUGH the wall of the pulp chamber, leaving a HOLE to the outside – this is a PERFORATION. You can imagine how difficult it is to patch up a perforation so that there is a complete seal, protecting the canal system from leakage and recurrence of infection! The X-ray above shows a perforation where an attempt was made to “patch” it up. The X-ray below shows how thin is the side wall left by the dentist when the access was done. This removal of tooth structure was totally unnecessary, and compromises the ability to make a crown with a sound margin in that area.
Provided that the dentist drills at the correct ANGLE, he will find that his bur drops into the pulp chamber with a sudden lessening of the pressure. We’ve talked about the form of the pulp chamber before, but when the pulp chamber has RECEDED, it will likely be very short, between the floor and the roof of the chamber. We can get a pretty good idea from the X-ray how far this distance is, but if it is short, and the dentist is a little heavy handed, his bur may drop into the pulp chamber and cut into the FLOOR! Not a good thing. It is possible to perforate through the floor of the pulp chamber as well.
When I go into a tooth that has a very short pulp chamber due to the deposition of dentin on the roof (mostly to pull back from the irritation of encroaching decay), I use a SMALL round but, so that I can feel the drop into the chamber without hitting the floor. Then I use the bur to sweep occlusally, toward the biting surface of the tooth, cutting off more and more of the roof. There is a definite technique to this, and damage can result from a moment’s carelessness or distraction.
Once the pulp chamber has been entered and the roof has been removed so there are no ledges which might be hiding pulp horns, attention is paid to the extent of the hole or access preparation – the important question being then whether it allows access to all of the canals.
Whereas cleaning the pulp chamber is done partly by feel and partly by inspection of how things are going at each step – the canals are instrumented only by feel. If the dentist’s instrument that is extending into the canal is required to bend because of an inadequate access, it distorts the sensations that might be felt deeper into the canal. So – we make sure that every canal is visible so that instruments don’t have to bend before they get into the canal. More than that, we make sure that a straight needle-like instrument can be placed into each canal, showing the orientation of the canal toward the top, and that instrument does not touch the outline of the access preparation. We call this STRAIGHT-LINE ACCESS.
The access preparation on the occlusal surface of the tooth must be large enough so that there is direct and unimpeded access to each canal by the instruments the dentist uses to clean the canals.
It is not enough that the dentist can SEE the orifice of each canal on the floor of the pulp chamber through the access preparation, but he/she must be able to insert an instrument straight into each canal.
Canal Instrumentation – Techniques:
In order for the dentist to clean each of the canals of a tooth, he/she will use endodontic FILES. These are really needle-shaped instruments that have edges that cut.
There are several things about these files that are worth noting: First, they cut ONLY on their sides; Second, the side cutting stops the closer to the tip we get, the tip does not cut and is smooth; Third, the file has a taper built into it so it is smaller at the tip and larger as the handle is approached; Fourth, these files are FLEXIBLE, for they will likely have to extend into canals of some curvature, perhaps a LOT of curvature; and Fifth, files come in many different SIZES – ranging from .06 mm diameter at the tip to .8 mm or more.
While all systems designed to perform root canal therapy utilize files as described above, there are TWO COMPLETELY DIFFERENT APPROACHES.
Hand Instrumentation of the canal system:
This has been traditionally how dental students are taught to perform RCT. It involves cleaning the canals with hand files. These are files as described, but the taper of all hand files is fixed at .02, that is for every mm farther from the tip of the file, the diameter of the file increases by .02 mm.
Many dentists will routinely use hand filing for doing RCTs, but more and more will be using an alternative method, which is described in the next section.
Hand filing can be done in either of two ways – either cleaning the upper portion of the canal toward the orifice first, and then extending toward the apex, OR starting near the apex and moving back toward the orifice. The former approach, called the crown-down approach, is probably the wiser of the two, but either approach is likely to be utilized by the experienced dentist.
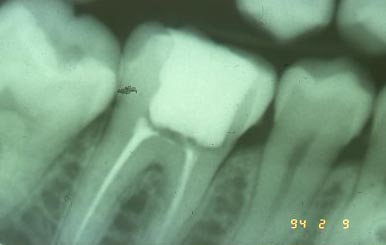
A critical point is that the dentist has to file the canal toward the apex, but STOP filing at a very particular place! The illustration here shows the typical appearance of a canal as it approaches the apex of the root. You can see where the filing should stop – approximately .5 mm from the apex where there is a constriction.
How, in the world, can a dentist know that he is exactly at that point? There are several ways. A really experienced dentist, with great tactile sensory awareness, can, for a normal canal geometry, detect the constriction near the apex by feel. Otherwise, we use the X-ray to give us an idea how far to go, stop short and take an X-ray with the file in the canal to determine how close we are and how much farther we need to go. Another approach is to use an APEX LOCATOR – which is an electronic device which connects to both the file and the patient’s tissues. An electronic circuit responds when the file gets to the end of the canal – and the more calibrated is the instrument and the clinician, great reliability can be achieved in this method.
So let’s say the clinician discovers the constriction near the apex with a file with a tip diameter of .1 mm, known as a #10 file. Typically, we’d open up the size more than that, because we need to cut off some of the contaminated wall of the canal. We might go from a #10 to larger files until reaching a #25 file, .25 mm in tip diameter. Then we go to an even larger file, but don’t insert it quite as far into the canal.
What is happening is that we’ve cut to the WORKING LENGTH with a #25 file, and then we’ll move up 2 mm farther and make sure a #30 file reaches that point. If we have to cut the walls of the canal somewhat to get the larger file to reach that point, that is what we want. We move up the canal mm by mm with slightly larger files each time, so that the entire canal is instrumented to the working length, AND it is uniformly tapered from orifice to apex.
This is the STEP-BACK method of hand instrumentation, and is commonly used, and sounds rather tedious, I know.
When we know that the canal is very curved, it makes the instrumentation much more challenging. If the file is rather stiff, not very flexible, as it inserted into a curved canal, it will want to straighten, and may cut a little ledge in the side of the canal. This can cause great problems later for the filling part, and is to be avoided at all costs. When canals are very curved, and the dentist is not certain of his skills to manage the situation with hand filing, the second method can often be used successfully – ROTARY INSTRUMENTATION, which will be described next.
But, however the canal system is instrumented, note that there is no way that these files can do anything to clear the accessory canals – those off to the side from the main canal. Also, note that as we instrument these canals, some kind of lubricant may well be useful – as in drilling through a piece metal using oil as a lubricant (actually it does more than that).
AS the canals are being instrumented we often use a lubricant that includes a chemical called EDTA – OK, ready for this? – ethylenediaminetetraacetic acid (told you I was a chemist). That stuff is well known for grabbing onto charged metal ions. In fact, if you have ingested a high dose of lead, for example, and are concerned about lead poising, the physician may well inject EDTA directly into your veins, where it ties up the lead in the blood stream and is eventually removed by your kidneys. EDTA also binds to calcium from the dentin in the roots and helps to soften the surface for instrumentation by the files. ALSO – we traditionally use BLEACH in diluted form to rinse out the canal as it is being instrumented. This denatures any proteinaceous material left in the canal AND accessory canals, so it can be rinsed out easier, and disinfects anyplace it reaches. The frequent use of bleach and flushing is designed to open up canals that can be mechanically instrumented.
Rotary Instrumentation of Canals:
Rotary instrumentation is done using files that are connected to a handpiece (“drill”), which turns very slowly and allows the files to be inserted into the canals while quickly stripping off the inner surface and walls of the canal. These files are much more tapered – they are designed to MATCH THE TAPER of the canal they are working in (at least for some systems). These files are far more flexible, and can be advanced into VERY curved canals.
The risk of rotary instrumentation for the novice is that if the file is left turning too long in a curved canal, it will straighten out! That can create a ledge toward the outside of the curve near the apex, which will never get filled well, compromising the long-term results of the treatment.
But a reasonably skilled clinician can use rotary instrumentation to solve complex problems in the canal system. Not only that, but the canal can often be instrumented to a CONSTANT TAPER. This means that the filling of the canal can be done very simply – as we will see soon.
An apex locator system can also be used with rotary instrumentation, so the filing and the determination of length can be done far more easily than for traditional methods.
Root Canal Therapy: Filling, or Obturation of Canals:
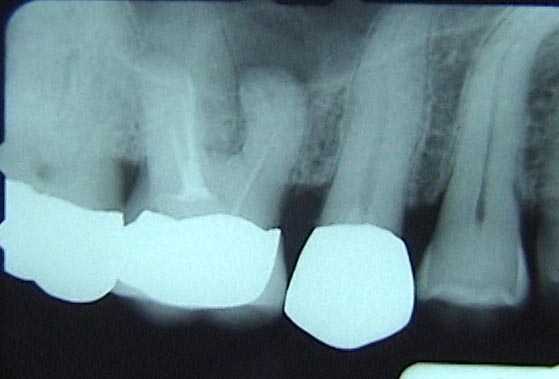
The filling of root canals after thorough cleaning is done most often with some form of Gutta Percha. This is an interesting rubbery material obtained from tree sap somewhere in Asia. I have no idea who came up with the idea of using it to obturate root canals, but it has been so successful over the decades, that it is still being used in one form or another, despite many attempts to find something better.
The most basic way that gutta percha can be used in a tooth is to form it into POINTS, which approximate the shape of the root canal, and then push it into the canal. Traditional hand instrumentation techniques has us putting points in the canal that ONLY fit the canal precisely near the apex, where the filing stopped, and from there up to the orifice, the point did not contact the walls of the canal. Additional accessory points were added and pressed firmly into place beside the first gutta percha point, effecting a pretty tight fit overall.
The next most effective approach with COLD gutta percha points is to file the canal to a constant taper and use a gutta percha point of the exact same taper and press it in firmly, making a firm contact for the entire length of the canal.
Other approaches involve using HOT gutta percha, either brought into the canal on a plastic carrier, or extruded into the canal from a heated gun, like a hot glue gun. The compaction of the gutta percha can be done using ultrasonic instruments or simply by pushing it vertically by hand.
However the obturation is done, there must be some SEALER in the canal as well. This sealer is PUSHED by the pressure of condensing the gutta percha into all of the lateral, accessory canals, particularly those near the apex, IF a good fit is achieved between the gutta percha and the walls of the canal.
While many systems of obturation have been tried over the years – hot and cold gutta percha are still the most favored by clinicians, and have achieved the best long-term record of success.
Modes of Failure for Root Canal Therapy:
As introduced in the first few paragraphs of this chapter, the continuing existence of bacteria in any part of the root canal system can lead to eventual failure. If the chemical debridement or physical cleaning of the canals are not done thoroughly, enough organic material and bacterial cells may exist to start the infection process again.
If the gutta percha is not condensed well enough, so gaps remain on the sides of the canals, or if it does not seal at the apex tightly, or if the accessory canals are not cleared out and the sealer doesn’t extend into these canals, or if the gutta percha is condensed TOO HARD into the canal and the root cracks, perhaps without detection, or if the seal of the tooth at the occlusal surface, or anywhere around the original decayed area of the tooth is not tight, or if a canal is not even discovered and left completely unfilled, or if the gutta percha doesn’t extend to the actual apex of the tooth, or extends beyond the apex into the bone, THIS CAN LEAD TO FAILURE.
How to FIX the tooth again if the root canal therapy fails?
A skilled endodontist may be able to take everything out through the original access preparation and redo the cleaning and filling – which may be successful. Or, it is even possible that the best approach is to go through the BONE on the side of the ridge that supports the tooth and access the apex of the root directly! Then, the apex is filled from the bottom – called a retrofill.
Imagine drilling through the bone and trying to find the apex of a tooth! Frankly, I have never done that, and few general dentists ever have – but my understanding is that if there has been a recurrent infection that produces an abscess or cyst at the apex, this hollowing out of the bone in this area makes finding that root tip safely much easier. Of course, one has to watch out for the major nerve in the area for the lower arch, and the possibility that for upper molars and premolars the root tips can actually reside WITHIN the sinus!
Best to get the root canal therapy done well the first time!
Bottom Line for Root Canal Therapy
We’ve seen that when a pulp chamber or root canal system is contaminated by bacteria, it needs to be cleaned out. The tooth is not capable of fighting infection once it has entered the pulp chamber.
In order to clean out the root canal system, the pulp chamber first needs to be entered and the access shaped so as to allow entrance into the canals.
The canals are filed close to the apices, using mechanical and chemical means to eliminate all organic material and scrape all walls smooth.
The canals are filled with gutta-percha, either by applying it hot or in the form of cold tapered points. A sealing cement is used that the pressure of the gutta percha will force into any accessory canals, completing the obturation process.
There are many ways in which the root canal treatment can fail, but with reasonable care the dentist can insure that success will be experienced. When the RCT does fail, and the tooth becomes symptomatic again, it is generally the endodontist that does the treatment again.