There is a useful page of information about dental fillings on the webmd.com site, which you may wish to explore. For more details you may look at the Wikipedia site, which has lots of references as usual.
It is important to note that the LIFETIMES of various materials used in fillings are wildly varying, depending on where you read. It is VERY largely dependent on the dentist and how carefully he/she works. There should be numbers for careless dentists, average dentists and careful dentists. In each of these cases the silver amalgam filling is by far the longest lasting restoration commonly done in dental offices. But it’s applications are only for the back, posterior teeth.
The next chapter will discuss composite filling materials, which are uniquely good at restoring front, anterior teeth, but suffer from a limited lifetime for the posterior teeth.
Organization of this Chapter
You May Skip to Whatever Subject Interests You Now
Basics: The Importance of your Dentist doing well at his Work
General Concept of Fillings
Removal of Decay
Extent of Decay
How do you know the decay is gone?
Classification of Fillings
Class I
Enamel, Diamonds and Wood Logs are Similar
Class II
Filling Class II preparations with Silver Amalgam
Placing the Amalgam in the Cavity Preparation
Carving to a Natural Contour
What Happens when the Tooth was not prepared Well?
Large Fillings that Replace Cusps
Mechanical Retention of Silver Amalgam
Bottom Line for Fillings on Back Teeth
………………………………………………………………………………………………………………………..
Dental Fillings Basics: The importance of your dentist doing well at his work:
We finally made it to the part where we try to fix what is wrong with the teeth. Recall Chapters II.1 and III.1, where we looked at the shapes, surfaces and composition of the teeth, then at the decay process, which causes us so much trouble. Now we need to consider what to do when these structures break down.
We know that if decay is not arrested quickly, toothaches and other unpleasantness may result. But, just because we’ve removed the decay and filled the tooth with something, we can’t expect to never get decay on that tooth again. In fact, depending on the quality of the filling, the tooth can be much more susceptible to decay near this filling than it was on the original tooth surface. We call this recurrent decay.
The concept of a plaque-trap must be kept in mind. This is where the filling does not reproduce exactly the original surface contour, having either open spaces at the margins with the tooth, or having overhanging filling material. Plaque bacteria will accumulate here and cause tooth decay as well as gum infections, either of which can be destructive. These conditions were created by virtue of inattention (to assume be best) on the part of the dentist.
So now we start to learn some things about dentistry as a “performing art” – some people are better performers. To be able to get a good one, it helps to have some understanding of the critical details of the art – so we will study first what is involved in doing a good filling.
The General Concept of Dental Fillings:
When some amount of tooth structure has been broken down by acid forming bacteria, this decayed material and the inhabiting bacteria must be removed. Once this is done there may be little of the tooth left above the gum-line. But often much of the crown of the tooth is left. This remaining structure must then be prepared to receive whatever filling material is selected. There are, in general terms, five categories of filling materials that may be used for a “permanent” restoration, and each of these requires a different preparation design, based on the properties of the material. In this Chapter we will concentrate on the silver-amalgam filling for the posterior restorations. In another Chapter (visit Chapter V.3) I’ll discuss the use of composite resin materials to fill anterior teeth.
The five categories referred to above are: 1. Silver-amalgam. 2. Cast Gold. 3. Directly applied gold foil. 4. Composite resin. and 5. Porcelain or another ceramic. We will discuss each in turn in the various Chapters of Section V.
The preparation for the silver-amalgam filling must be such that the filling cannot fall out. This could seem obvious, but is only so when one considers that silver-amalgam has absolutely no adhesion to the tooth. It is a paste–like material which sets very hard indeed. But, if the preparation is not undercut so that the opening is smaller than the internal form, then the filling can come out.
We will see later how tooth preparations are designed to be retentive even when there are a large number of tooth surfaces involved. But, before we get into preparation design, we need to know more about how decay is removed.
We will also discuss soon how the silver-amalgam is applied to the tooth and carved to give a functional and anatomically correct restoration that lasts a lifetime.
The Removal of Decay:
Extent of Decay
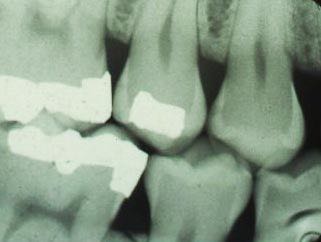
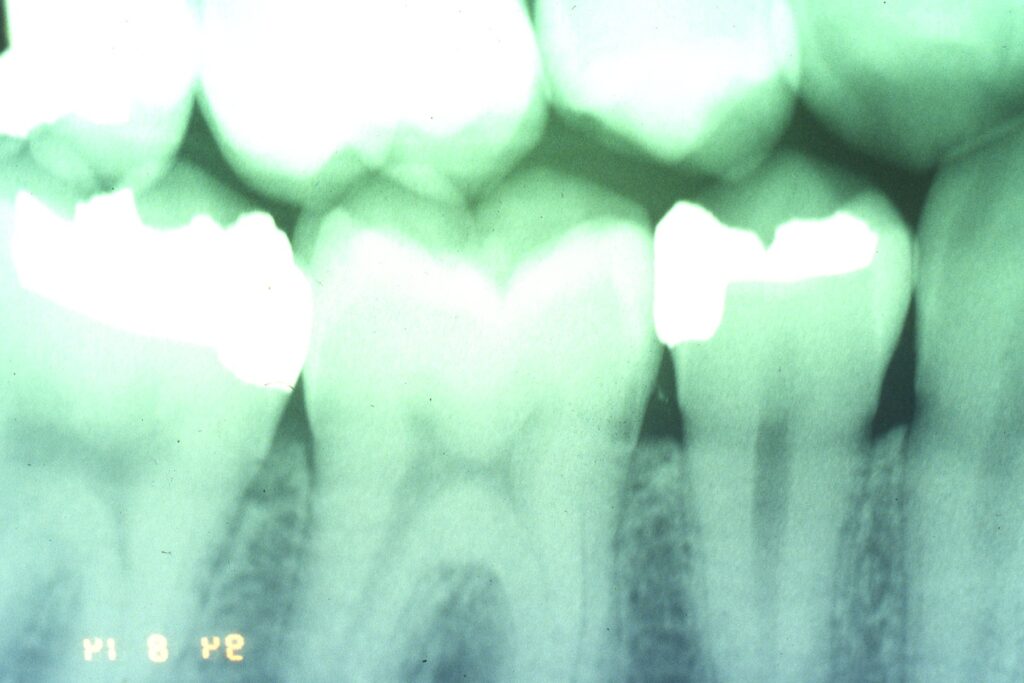
The X-ray below shows a tooth with no decay, and two with decay. The upper first premolar shows a clear triangular shadow through the enamel to the dentin on the back, or distal side toward the molar, and the second premolar shows the same, but not as obvious. The second premolar has the amalgam filling in it involving only the occlusal surface. The lower second premolar shows no decay.
We’ve discussed how the cells in the pulp chamber can still deposit dentin inside the chamber in response to irritation, but this is not observed here due to the early stage of decay.
It is often the case that decay from the grooves can essentially hollow out the crown of the tooth – leaving a shell of enamel. When this decay is removed one is often cutting far past where the pulp chamber used to be, but because of pulp recession there is no exposure of the pulp and there’s no need to do a root canal. This is only the case when the pulp recedes faster than the decay advances.
How do you know the decay is gone?
Now, how is decay removed and how does one know it is gone? Also, how important is it that it be totally removed? These questions are especially important when the dentist is working 1/2 mm or so from the pulp!
First, decay is soft and gushy stuff on the top and then deeper it is sort of flaky and fibrous and then leathery and finally hard but typically brown stained at the point of deepest penetration. Each of these layers represents the effect of bacterial acids on the dentin core of the tooth. When the dentist sees that there is a place in one of the grooves where his explorer will penetrate easily 2-3 mm, it is clear that all of these layers will be found inside. There are several steps generally taken to clean the decay out. The first step is to cut away the occlusal enamel (on the biting surface), revealing enough of the interior to work, but leaving as much solid tooth structure behind as possible. Then the dentist must go deeper until the decayed dentin has all been removed. Normally, this must be done with a slowly turning bur (drill bit), generally with a round end, or by using a sharp excavator – kind of a little shovel – or a combination of a bur and excavator.
When the remaining tooth produces dry, dusty debris when cut with either instrument, then the decayed dentin is gone, what is left is “sound dentiin”. If this has been done and there is no bleeding from an exposed pulp, then the tooth can be prepared for a restoration.
Most often, the excavation of decay does not get anywhere the pulp, but when the decay goes on for too long then one must expect to go deeper.
In this chapter we will be concerned with both conservative and more aggressive restorations of the back teeth. In the conservative case there is minimal removal of tooth structure to access the decay, involving from one to three sides of the tooth. We will also discuss here larger restorations that involve four or all five sides of the tooth, and often require restoration of one or more cusps. In Chapter V.9 will be discussed building up large parts of the tooth with the intention of placing a crown over the tooth. In Chapter V.10 will be discussed the need for pulp therapy if the decay goes too far inside the tooth.
The Classes of Dental Fillings:
Fillings are classified according to which surfaces are involved. If only the occlusal surface is restored, it is a class I. If the occlusal and one or two side surface touching adjacent teeth are involved it is a class II. If the facial or lingual surfaces are restored by themselves, then it is a class V. If a side surface of a front tooth is restored it is a class III, but if that involves an incisal corner of the tooth it is a class IV. We’ll look at class III, IV and V restorations when discussing plastic (composite) fillings later in this section (Visit Chapters V.3 and V.4).
The Class I Preparation:
Outline
The class I preparation on a decayed occlusal surface generally follows the grooves in both the mesial-distal and facial-lingual directions, basically, wherever they are. This is for two reasons: 1) When decay is found in one pit or groove it will probably continue into others, so these should be cleared out as well; and 2) When the preparation is done we want to have the wall height around the preparation fairly uniform, and not let it get too short in places – so the filling material will be weak and possibly break. This requires extension into the groove areas. (For an example of this breakage see the description for a class II case later)
There ARE exceptions when the decay only goes deep in part of the groove structure (second drawing below), but this is not common and this conservative restorative approach is rarely done.
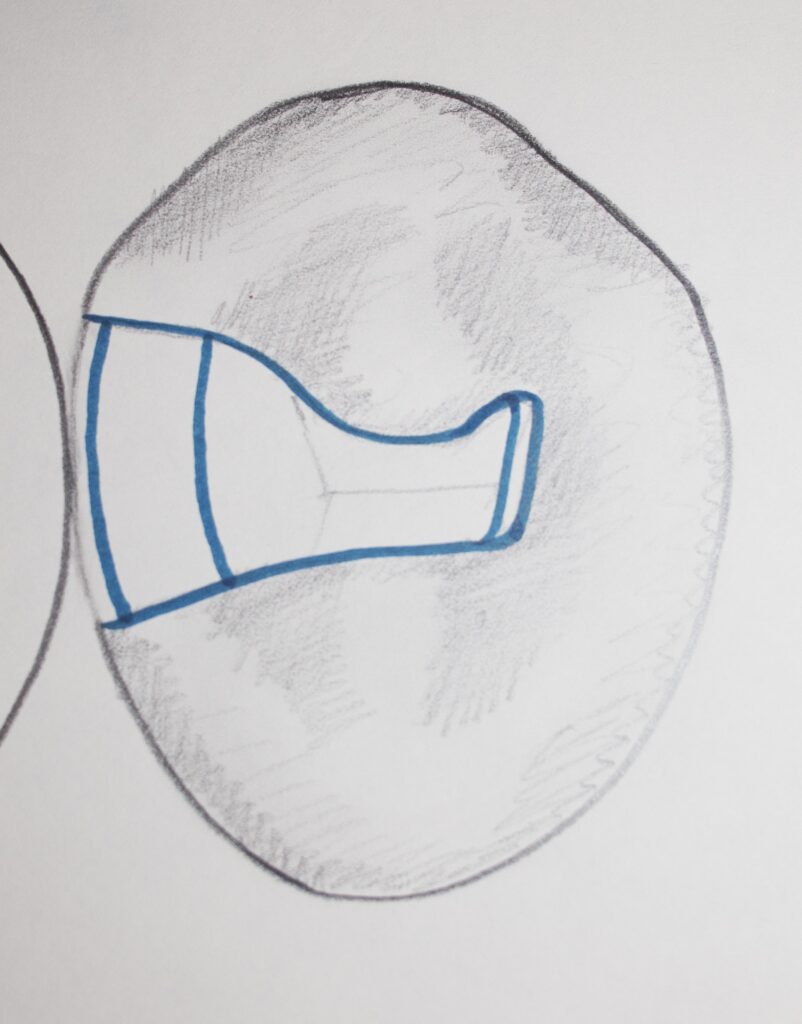
The concept of extending into grooves is more readily seen if you picture the tooth surface like a valley between some mountains (considering a molar). The valley extends between each pair of cusps (mountains). If you flood the valley with water, it will go up into the areas between the mountains until it reaches a uniform level. Picture the “water-line” on a tooth surface where there are 4 cusps. If we cut into the tooth and make a flat and level floor, then the walls will all be the same height if our “outline” as seen from above, goes where the water would go.
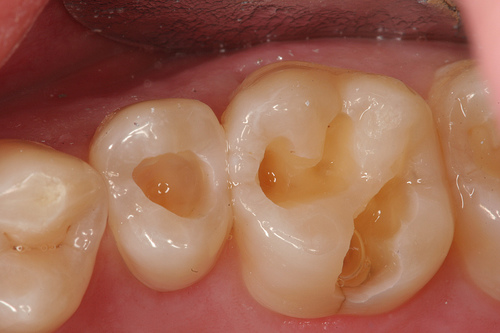
This may be seen in the picture below, showing a filling that also includes one side (proximal) surface, but clearly follows the groove structure between the cusps. The “water level” is similar everywhere.
Depth
How deep do we place the floor if the decay is only slightly advanced into dentin? Generally, we go about 1/2 mm into the dentin, with walls about 1 1/2 mm tall, leaving no enamel on the floor. The reason for this is again twofold: 1; The BULK of material in the filling must be enough to give strength, even if years of grinding reduces the bulk somewhat, and; 2) While a little enamel on the floor may look sound, there might be a pin-point penetration of decay through it which opens up much larger in the unseen dentin.
Undercutting
When the preparation is filled, we need to know that the amalgam will not fall out. This is done by making sure that the access to the preparation is SMALLER than the size of the preparation internally. Then the amalgam filling is physically unable to come out.
Enamel, Diamonds and Wood Logs are Similar
Another concept that can be brought up now is one of the most crucial in determining preparation design. It has to do with the nature of the enamel. Enamel is a brittle material that can be easily cracked and cleaved. The cleaving of a substance is where you can cut it in two by a sharp blow – for example cleaving a diamond. But there are only CERTAIN cleavage planes where the diamond will but apart. A more familiar example would be a wood log. If you ever split a nice dry maple log into smaller pieces for firewood, you know that striking it with an axe along its axis will generally split it into half lengthwise – not CUT it but SPLIT it. It just doesn’t hold together very well with forces in this direction. Now, if you tried to do the same thing on the side of the log you’d be out of luck. The properties of the log are different in different directions. You can hit the log on the side with even a sharp axe all day long and get nowhere!
The same holds true for tooth enamel. Like the log, the enamel has a direction in which it can be wedged open – this direction is always perpendicular to the surface. The interpretation is that there are enamel rods (or long thin collections of crystals bound together) which lie in this perpendicular direction and which strengthen the enamel along their length but not side-to-side. You might think that the enamel would be falling apart all the time, but breakage of the enamel is NATURALLY avoided by connecting it to a tough and resilient material, dentin. As long as each enamel rod has dentin backing it up, then it is “supported” and will generally not be in danger of cleavage.
Our preparations, then, must be done such as to leave no unsupported or undermined enamel. In general, when we see a patient come in with a crack or broken off area of tooth near an old filling, it is because unsupported enamel was left at a margin.
For a Class I preparation, all of the margins are on the occlusal surface, and the walls of the preparation will rarely interfere with the connection of any enamel rods to the dentin. In a Class II preparation, below, for the box form which removes the decay on the side surfaces in adjacent tooth contact, we must be very careful or undermined enamel will result.
The leaving of UNDERMINED ENAMEL in a preparation design will always shorten the lifetime of a restoration!
The Class II Preparation:
This is a filling done on a posterior tooth, covering parts of the top, occlusal surface, and extending onto the side where it contacts the adjacent tooth. Often, decay starts on the smooth side of the tooth in the contact area, because these areas are hard to keep clean, especially between the contact and the gum level.
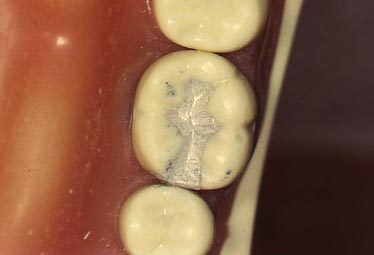
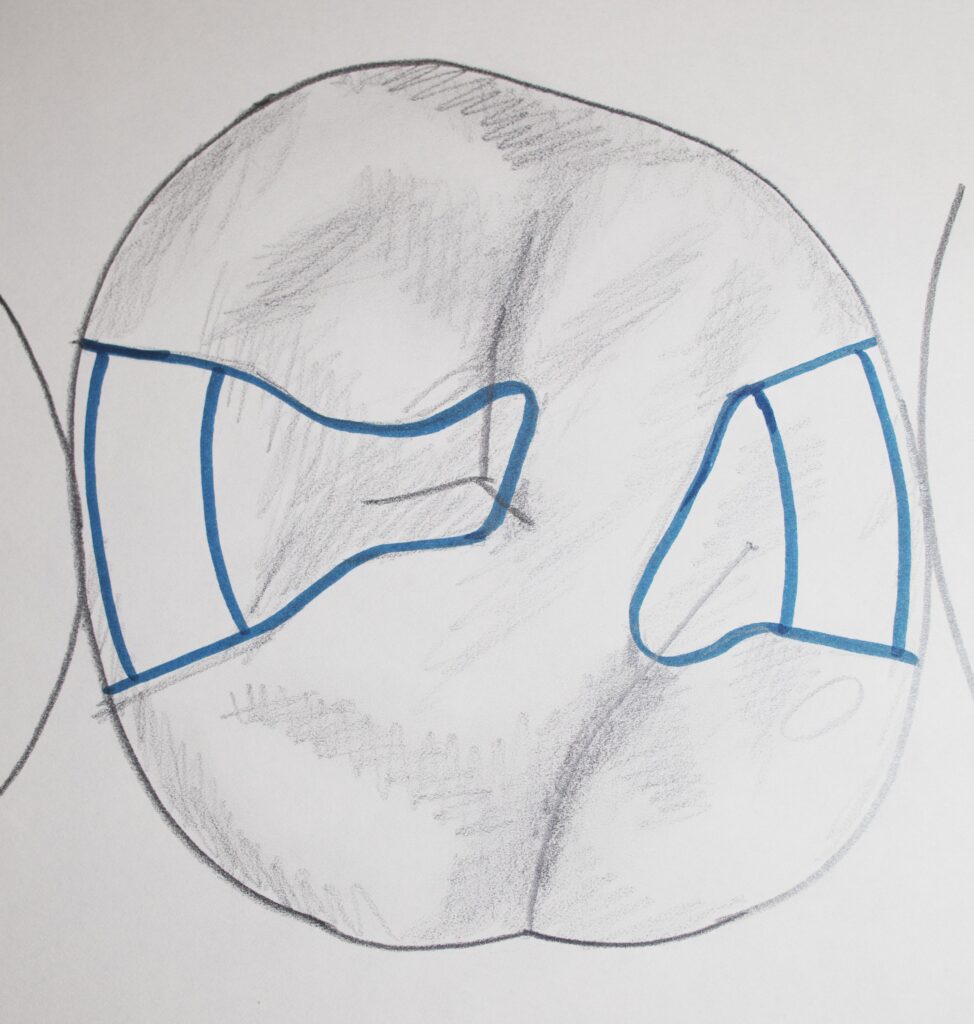
The concept of unsupported enamel is especially critical here, as the box form on the side of the tooth involves three walls which must be angled so as to be parallel to the enamel rods, and not undermine them. The picture below shows preparations as they would appear in a patient’s mouth – but the one next to the canine has UNSUPPORTED enamel because of the acute angles at the surface.
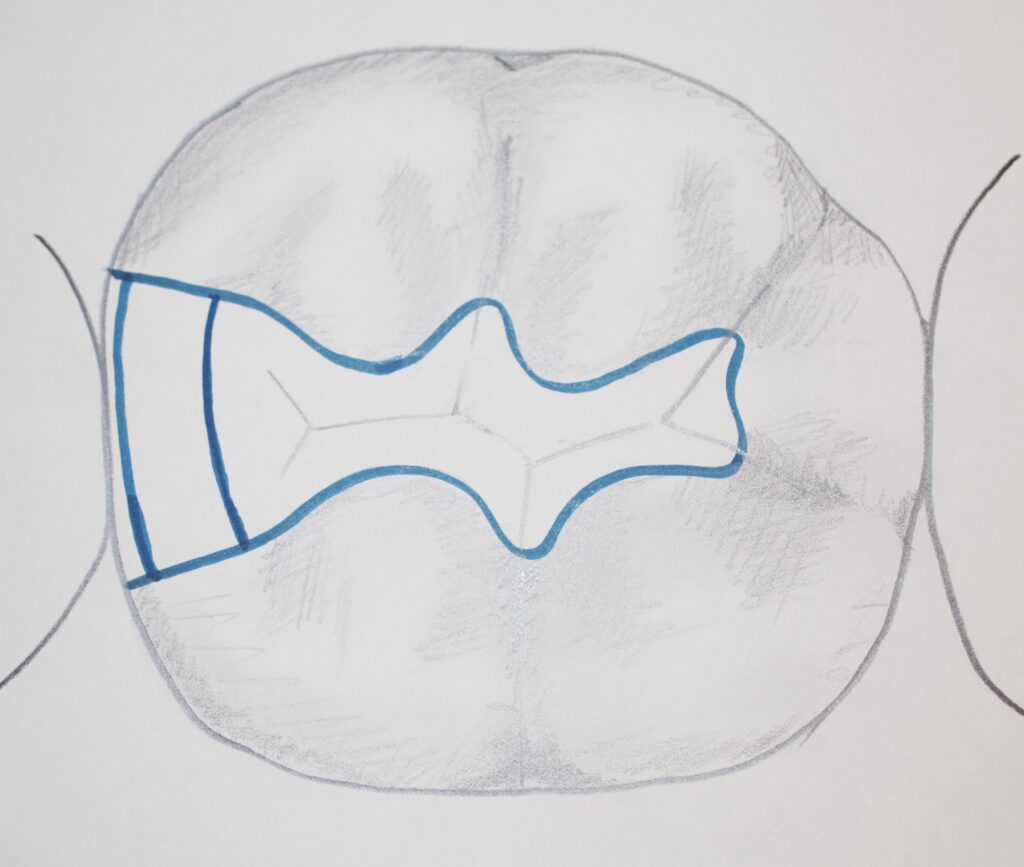
Below are shown typical Class II preparation designs for lower and upper molars, respectively. For the lower first molar you can see the extensions of the outline into various grooves, so that the walls don’t get too short, and because there is often decay progressing into these grooves. For the upper first molar you can see Class II preparations on both sides of the tooth, but they are not connected together because the ridge between them is rarely crossed by a groove which is decayed.
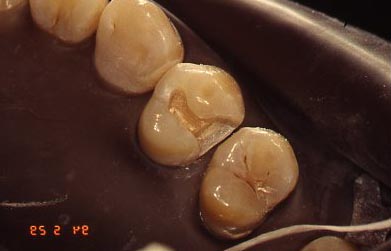
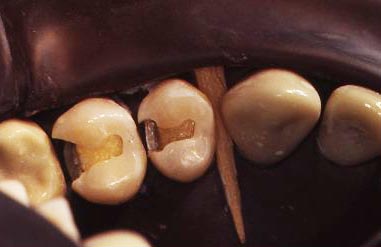
The photograph immediately above shows a typical, rather ideal, Class II amalgam preparation for a patient. The FLOOR of the box form shows a line of color change, running from the facial wall to the lingual wall – this is the DEJ (dentinoenamel junction). The depth of the box toward the axis of the tooth is just into dentin, so that we can see whether all decay has been removed.
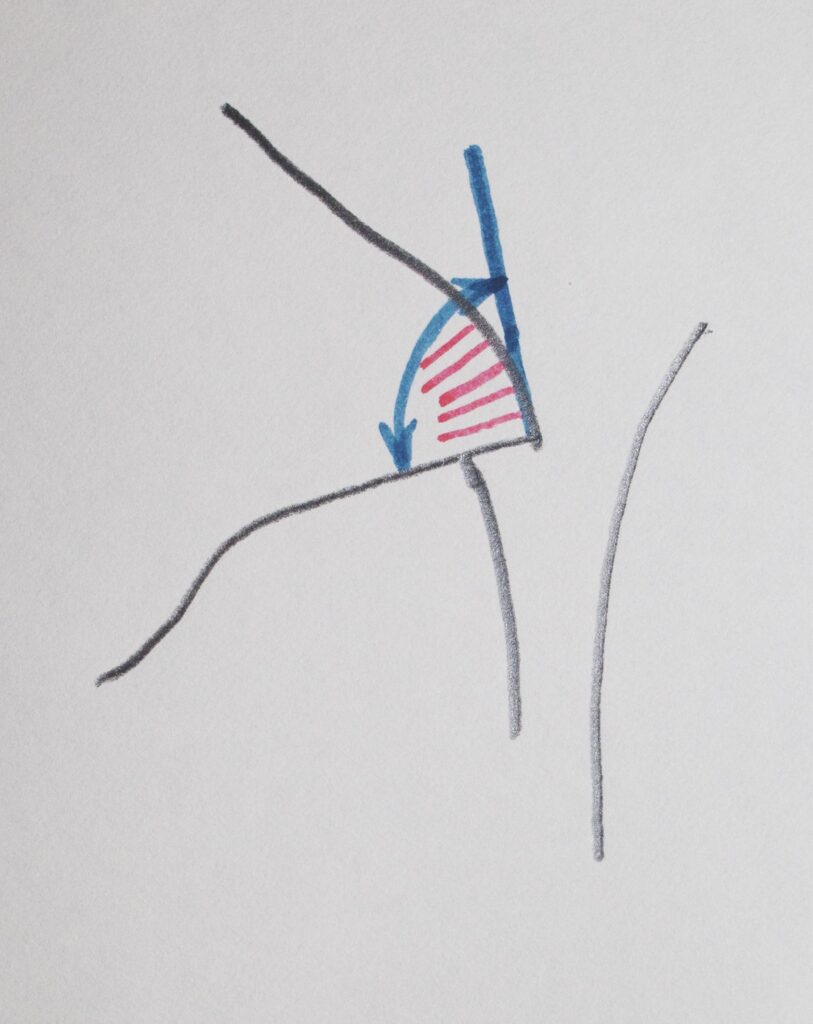
Creating retention in a class II preparation requires that we consider two different paths of possible dislodgment. For prevention of dislodgment upward – along the axis of the tooth, we must only undercut the facial and lingual walls of the preparation, as described for the Class I. But, the possibility of the silver-amalgam restoration dislodging sideways, toward the adjacent tooth, must also be considered. The shape of the outline on the occlusal surface contributes to the sideways retention if any part is wider than any other part. But, we may also create grooves in the facial and lingual walls of the box, to assist in the sideways retention. You may be able to see the groove in the facial wall of the box in the class II preparation shown in the picture above.
Filling the Class II Prepared tooth with Silver-Amalgam
Placing the Amalgam in the Cavity Preparation
Now, of course, once the preparation is done so that the decay is removed and the tooth structure has been protected as far as possible, and the design is done such as to retain the silver filling in the tooth – we need to actually FILL it.
First, we realize that the preparation that was required to remove the proximal decay extends down the side of the tooth. Since there is a space between the preparation and the adjacent tooth (called clearance), we can’t just stuff amalgam in it without it coming out the sides. So we need to place some kind of matrix that will retain the filling material in the preparation while we are packing it in. Ever go to a restaurant and have an ahi-stack as an appetizer? Beautifully cylindrical stack of various delights, with a flat top, and maybe some aged balsamic over it? OK – just saying that those are made with metal matrices that hold everything together while the top is compacted with a flat disk. When the matrix is removed and the disk slides off the top – it is a gustatorial work of art. This is just like we do the amalgam restoration.
Second, we find a matrix. We will use a thin metal strip that wraps around the tooth, covering the box part of the class II preparation. The ends of this band are held by a device that tightens it snuggly around the tooth. Now, there are two possible problems. The matrix band may not be touching the adjacent tooth, AND, the thickness of the band itself will take up space that the amalgam should fill. If we just fill the band with amalgam as is, the thickness of the band will create a gap between the amalgam and the adjacent tooth – in other words, there will be no contact. This can lead to food getting uncomfortably stuck in this space. We solve these two issues by using a ball-like instrument to rub the matrix band against the adjacent tooth from the inside, and it thins the metal as we do this; and we place a wooden wedge between the teeth which pushes them apart (just enough mobility in the teeth for this) a distance equal to the thickness of the matrix band. When we pack in the amalgam it pushes the band against the adjacent tooth, and when the wedge and band are removed we have a solid contact.
Silver amalgam is packed into the preparation in layers, rather quickly between each, so that they will set or harden together into one solid mass. The amalgam material is purchased in premeasured carpules that are shaken up by a device which mixes the silver alloy and the mercury intimately. As the packing takes place the mercury rises to the surface where it is scraped off before adding the next layer. This way there is the optimal mix of alloy and mercury, so that they are completely bound together.
Carving to a Natural Contour
Once the amalgam is packed over the margins on the occlusal, sharp carving instruments are used to shape it. Allowing the instrument to rest on the surface of the tooth, will allow the surface to guide the formation of the amalgam so it exactly matches the tooth contour and fits against the margins of the preparations with great accuracy.
When the matrix band is removed, the parts of the filling near the adjacent tooth are carved, and any extra amalgam beyond the margins is cut away very cleanly.
A silver-amalgam filling that has been condensed and carved well is one of the longest lasting restorations in dentistry – typically it can last the rest of the patient’s life, if there is no undermined or weak tooth structure left beyond the filling.
Not only this, but when the patient returns for the next visit, the dentist will POLISH the amalgam filling – this produces a mirror-like shiny silver surface which is perfectly adapted to the tooth surface and margins. It even happens that the reflective silver can look tooth color if it reflects the opposing teeth into the viewer’s eye!
Unfortunately, dentists are often lax about polishing amalgam restorations, and they are left rough. This means that as the silver TARNISHES, it turns black and there is nothing that you can do to make it look nice again, other than have the dentist polish it. One of the reasons that silver-amalgam restorations are decreasing in popularity this last 20 years is because of the image people have of black, unsightly fillings.
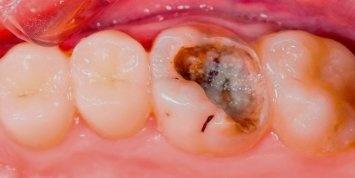
What Happens if the Tooth is not Prepared Well?
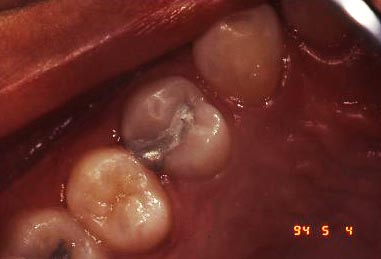
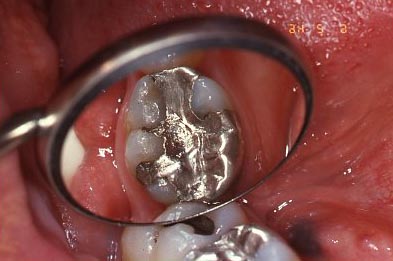
In the case illustrated by the Picture and X-ray above, the original preparation was not done well. The OUTLINE of the preparation was not taken adequately into a groove on the surface of the tooth that extended lingually. The groove is not very clear from the photo, but starts right where you can see the break in the amalgam. When grooves on a tooth cross the margin of a preparation, they shorten the walls at that point. This means that the thickness of the amalgam will be less there, and weaker as a result. The significance of that in this case was that the amalgam broke.
In this particular case the original preparation and restoration were done on the daughter of one of my students as a Board Exam procedure, which she failed. They should have required that she extend into the groove before filling, but they failed her for not doing so, nonetheless. The consequence of this is that the filling broke later, as we have seen. When she studied with me to prepare better for the next attempt at the Board Exam, she brought her daughter into the class – where we studied the situation, removed the amalgam, reprepared the tooth into the groove and refilled with amalgam, expecting much better success.
Dental Fillings: Cusp-replacement Amalgam Restorations:
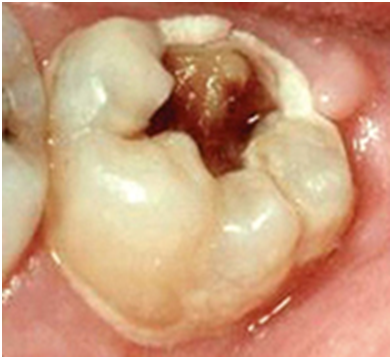
The pictures shown above for the class II case showed reasonably small restorations, not extending very far beyond the contact with the adjacent tooth. But – often when there is a lot of decay, or an old restoration that is large and needs to be replaced, OR there was a cusp that broke off the tooth – a significantly larger restoration needs to be done.
The pictures and drawings below show several situations.
The first shows a large preparation on an upper molar – where there is also a class I amalgam filling, and the ridge between the class I and the new area has been preserved. In this case the box is far wider than “ideal”, but it is what was needed for this case.
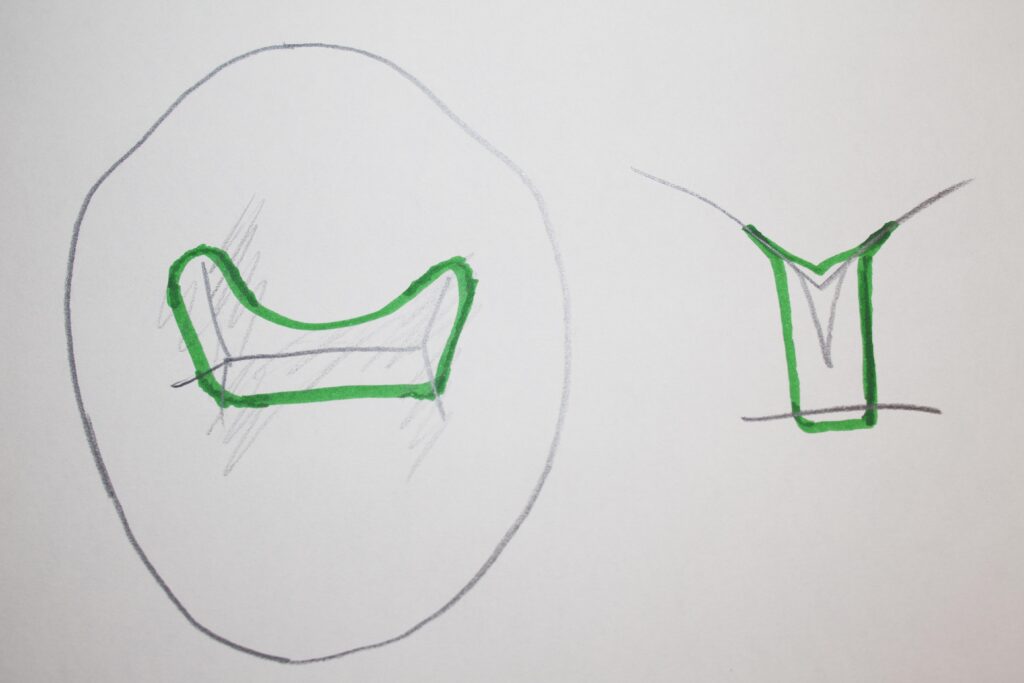
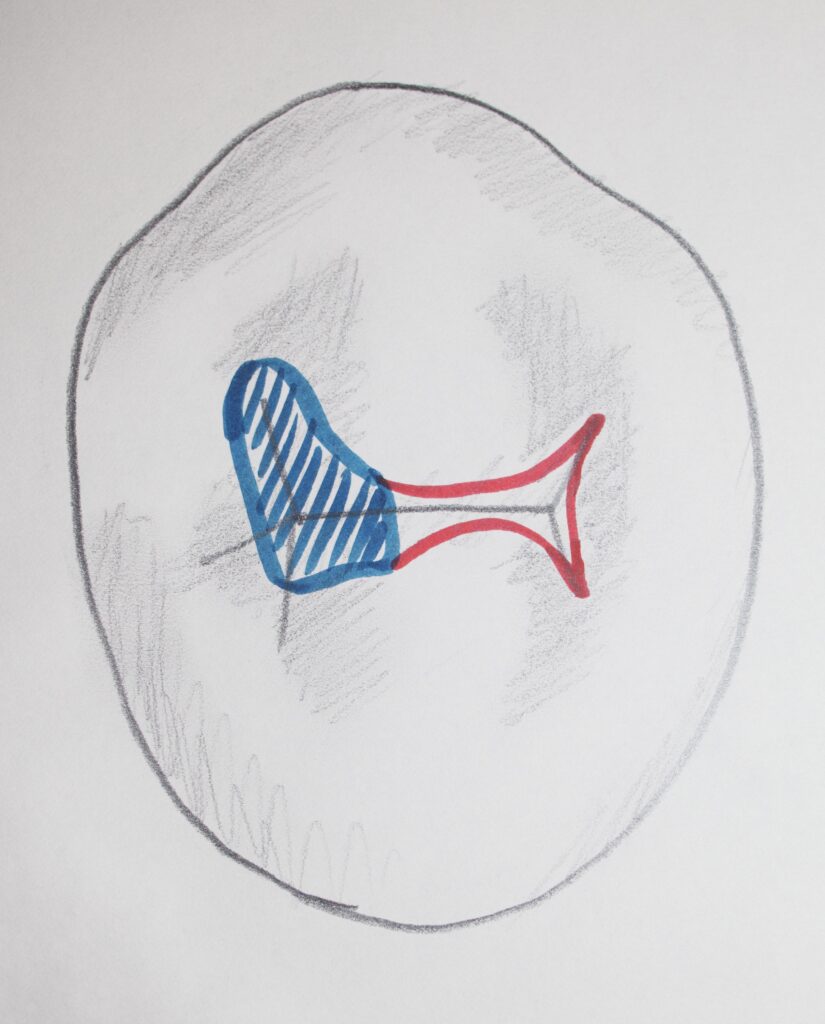
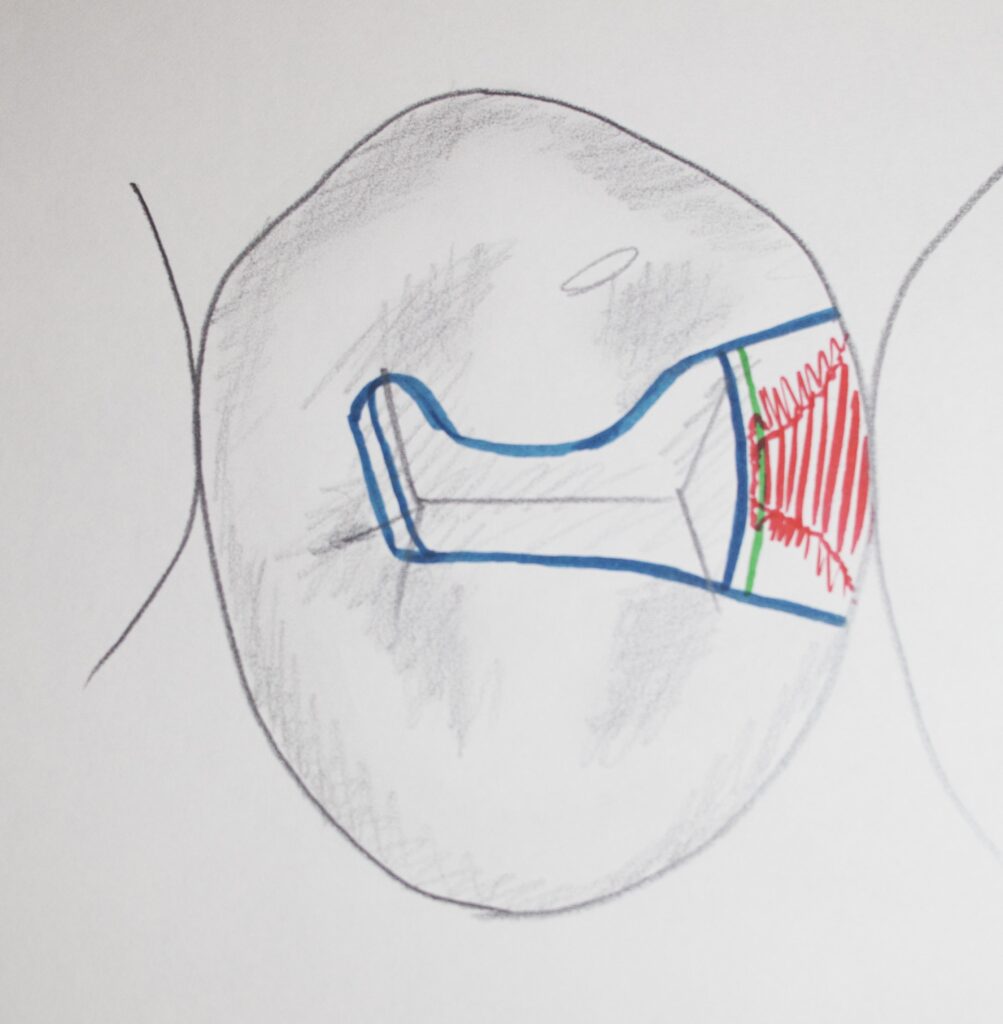
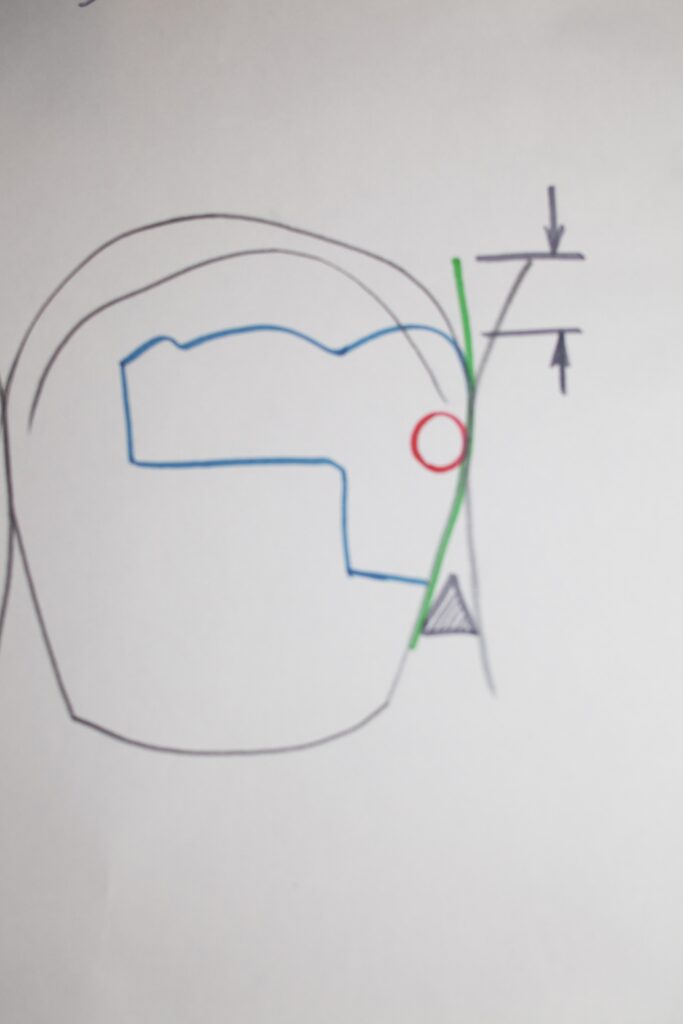
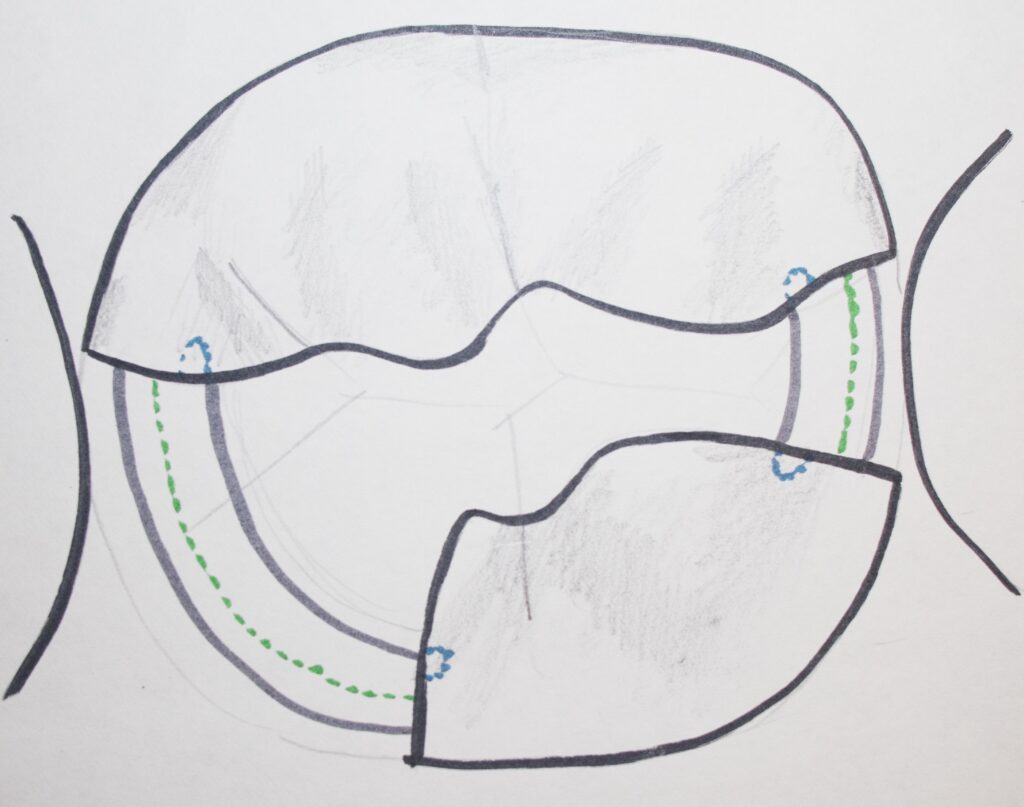
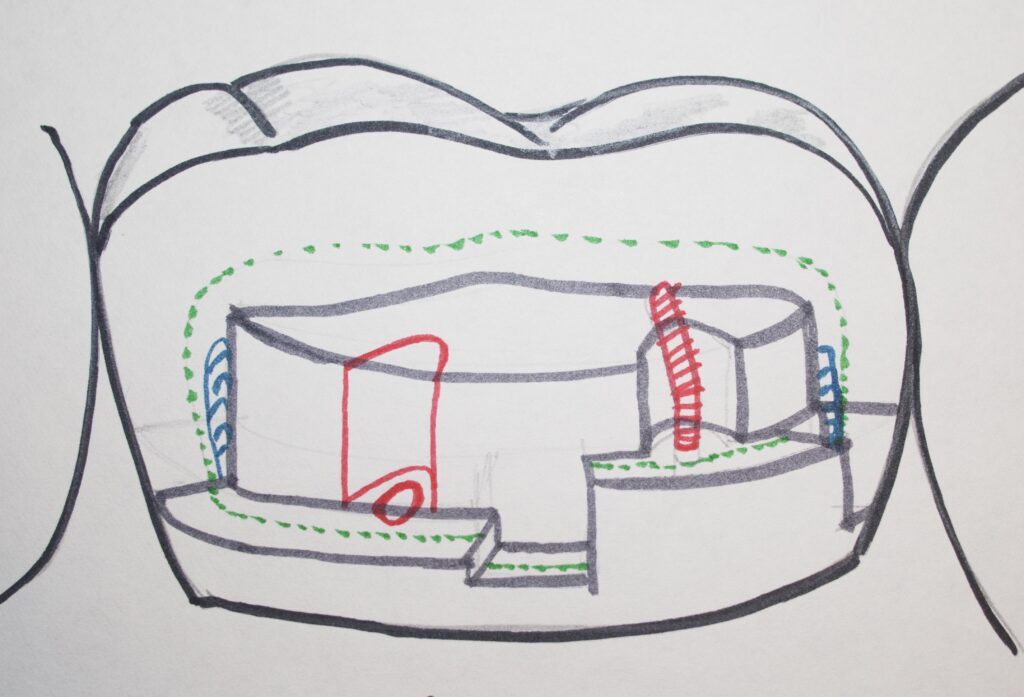
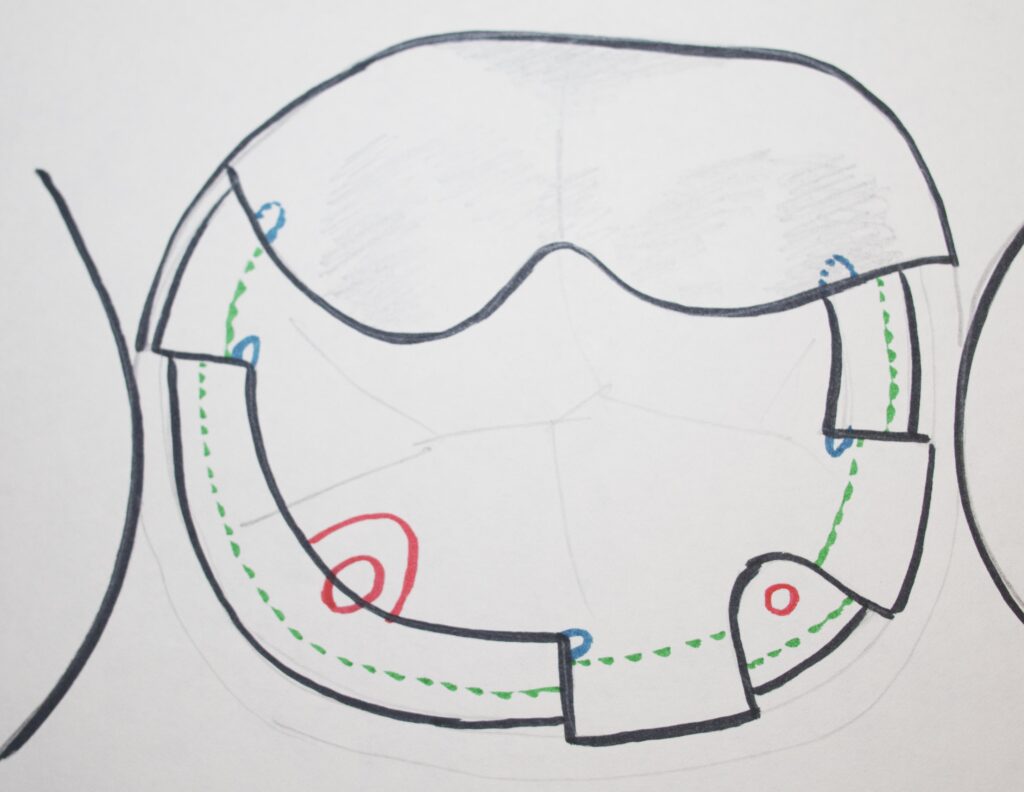
The drawing below shows a large box form on a lower molar where both contact surfaces of the tooth are involved. The position of the DEJ is shown in green, and retentive grooves needed for retention are shown in blue.
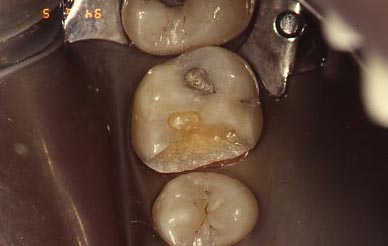
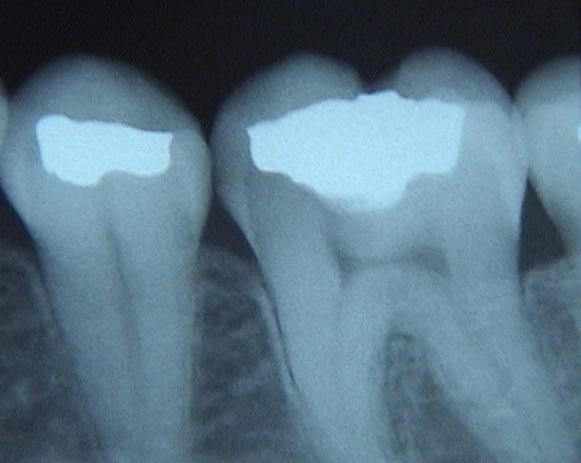
The X-ray, below, shows a clear large shadow on the side of the tooth toward the premolar. There is an existing class I amalgam in place. We cannot see a clear triangular shadow of decay penetrating through the enamel, so it is not clear that decay is a problem here.
The following photograph of the same case shows the class I restoration and the broken and missing cusp next to it. The dark coloration in the dentin suggests decay has taken place there, but probably AFTER the cusp broke away. The reason for the breakage is pretty clear, in that the Class I restoration probably left only enamel on that cusp – it was undermined!
The restoration of this tooth will require removal of the amalgam and the decay, and then placing a pin (as described later) so that the new amalgam restoration will be retained well. The dentist will make sure that no parts of the tooth are undermined by the new restoration.

Now, for most dentists these days, a broken cusp means a crown. The full discussion of crowns is coming later (visit Chapters V.6 and V.7, for gold and porcelain crowns, respectively). In essence, for a crown, we are cutting down the occlusal surface of the tooth and all around the sides so that gold or porcelain may be cemented OVER the tooth to protect it from further damage. This is a very aggressive restoration, and may be more aggressive than really needed. We will discuss partial crowns later as well, but for now we need to think about what can we do to restore the tooth for less than $1500!
Laboratory fabricated crowns are expensive – whether made of gold or porcelain or another ceramic. Can we restore a tooth that has a lot of missing tooth structure by a less costly procedure? In a word, YES!
Silver-amalgam is the only material that we can use in dentistry that can be directly applied to the tooth to restore large areas, even replace cusps, and have any significant chance to last a long time – likely as long as a crown should last. And, if you cannot afford a crown, then this option is very attractive indeed.
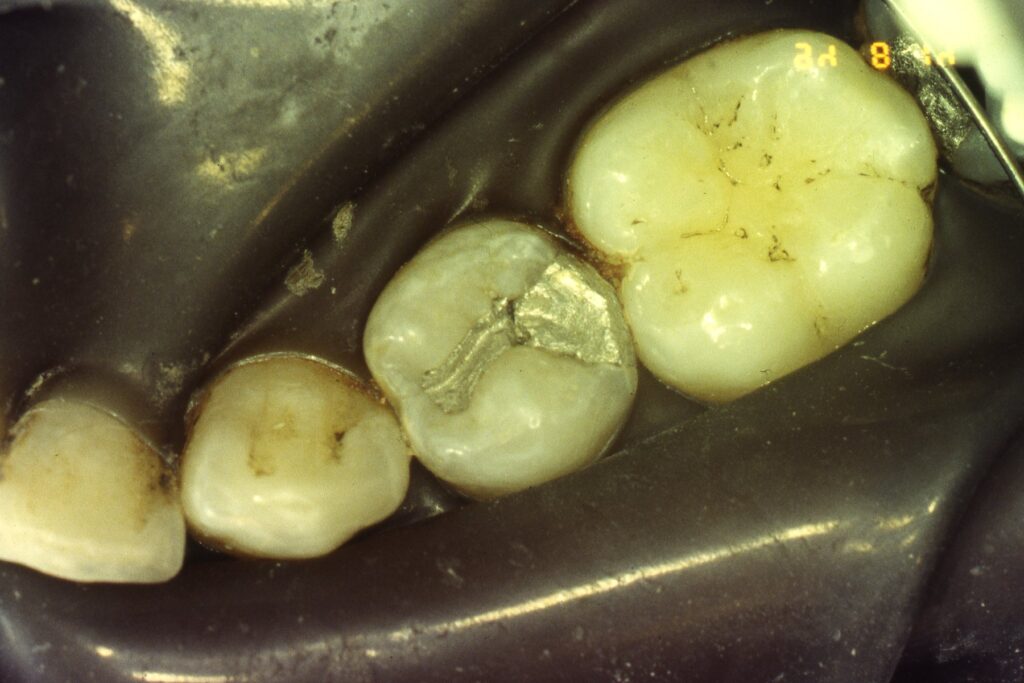
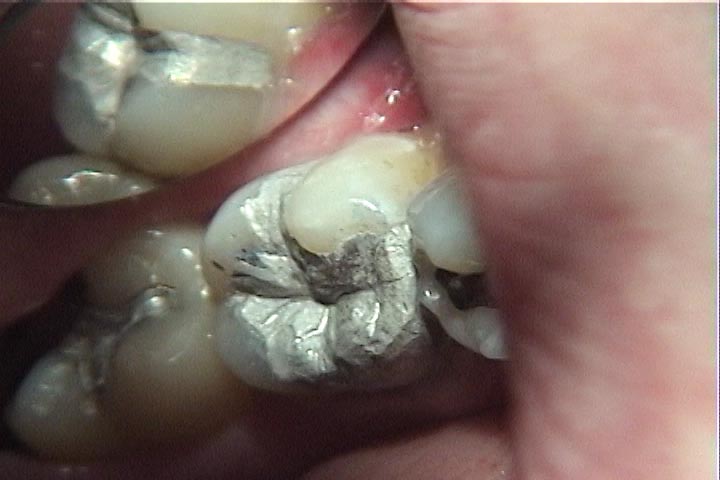
The photograph below shows a large amalgam restoration that was done previously in one of my patients. It is not a particularly well done restoration in many respects, but is likely destined to last a long time in the patients mouth. And, it was not expensive!
Military dentistry is generally done using amalgam restorations rather than crowns, for one obvious reason: when the recruits come in, they need to get their teeth fixed and off to boot camp – can’t wait for crowns to come back from the lab. I have seen MANY, MANY very large amalgam restorations in servicemen, and the work is generally impressive, and lasting a long time. Those that I saw during my study of potential amalgam toxicity with Air Force personnel in 1992 and 1997 had been mostly in the mouth for close to 30 years.
Mechanical Retention of Silver Amalgam
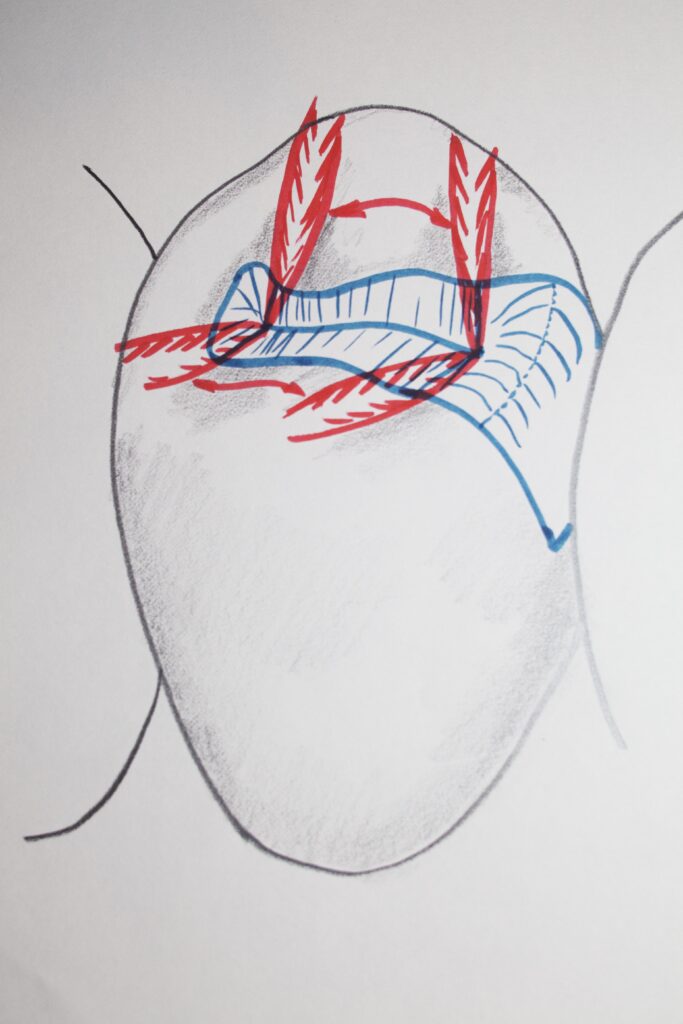
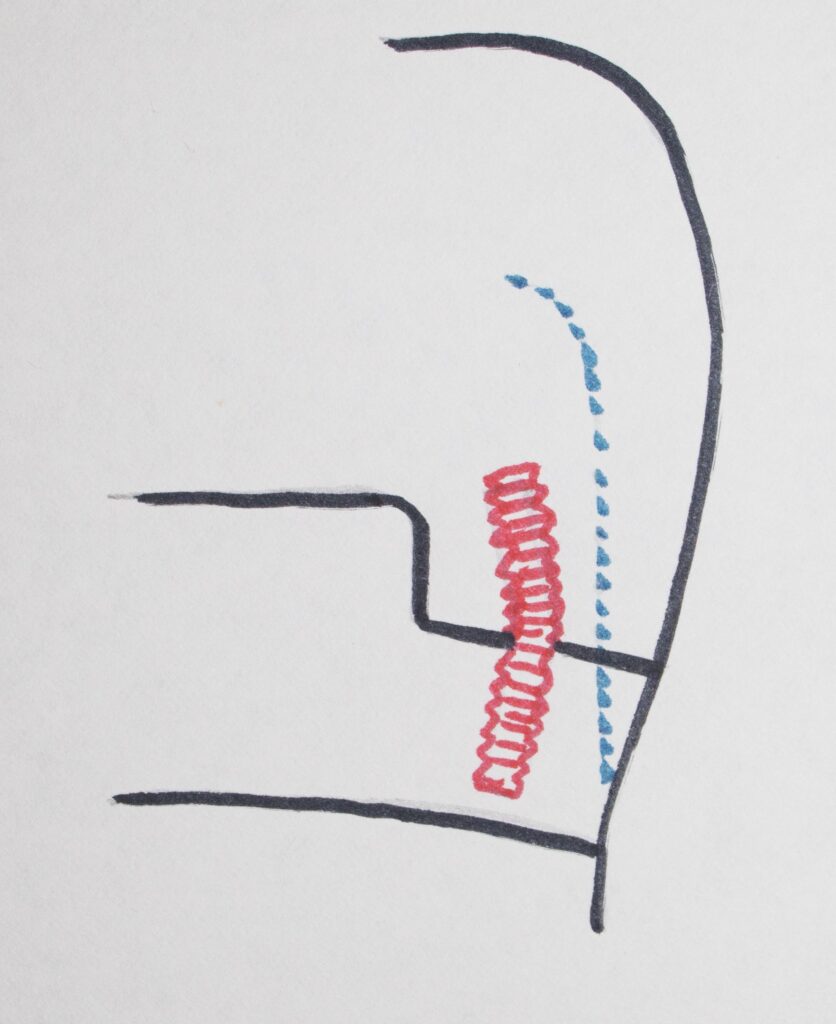
When a large amount of tooth structure is missing due to decay, fracture, or failed previous restoration, the preparation of the tooth for final restoration requires some engineering skill. It’s all about mechanically retaining the amalgam once it is placed in and around preparation features cut into the tooth. There may be boxes, slots, grooves and even small screws, called pins, placed in order to retain the amalgam. The drawing below shows something of what may be done along these lines.
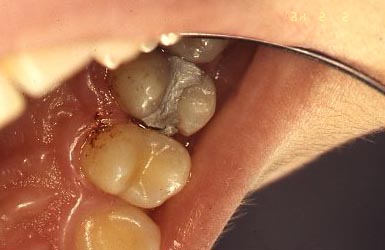
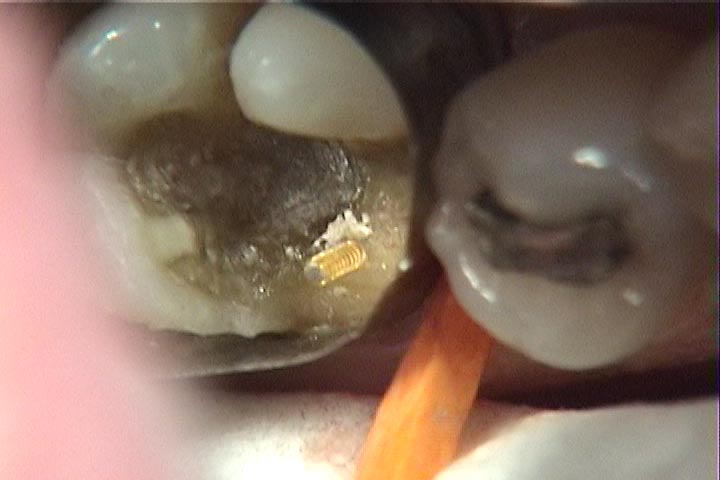
The pictures below show the actual procedure for placing a retentive pin. The first picture shows a drill bit that is connected to a dental handpiece which turns rather slowly with significant torque. A hole is drilled to the depth of the cutting part of the drill. The pieces of dentin that came out during this process are shown on and around the drill.
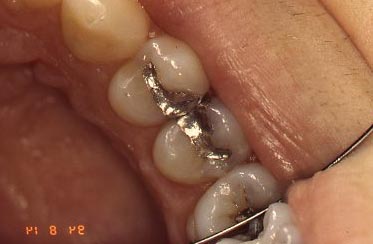
The second picture shows the gold plated pin that has now been screwed into the dentin. I will generally screw these pins in by hand so that I can feel the resistance. In this way I make sure there is no possibility of excess stress put on the tooth structure.
The third picture, below, shows the final amalgam restoration done for this tooth, with the pin embedded into the mass of amalgam, retaining it for many years to come. When the amalgam is polished the anatomy of the filling will be finalized to look very much like the natural formation of the tooth, though not the same color.

One of the things about dentistry is that every tooth is different, and that it takes some imagination and creativity in many instances to see the design of the preparation that will allow a long-term restoration that is inexpensive and not too destructive to remaining tooth structure.
That’s what makes the profession enjoyable for many dentists – they can exercise their reasoning and creative powers on a daily basis – no assembly line for them!
Dental Fillings: Bottom Line for Fillings on Back Teeth
We have seen that for posterior teeth, after decay is removed, there are a variety of different types of fillings that may need to be done. These range from a small filling involving just the biting, occlusal, surface – to replacement of one or more cusps of the tooth with amalgam.
I’ve illustrated these restorations with amalgam, because for the posterior teeth, it has the most success in the full range of fillings that may be necessary.
For smaller fillings composite resin can be used as an alternative, but it will have a shorter expected lifetime, although it does look more natural.
But – if we are going to restore posterior teeth that have had a range of exposure to the decay process, we CAN use direct restoration – either amalgam or composite depending on size and complexity – in almost all circumstances.
As we will see in other Chapters, when large parts of the tooth are missing, the dentist may choose to rebuild a lot of the tooth with amalgam or composite, and then put a CROWN over everything. This is an expensive option and not guaranteeing of better success in most instances than a well-done cusp-replacement amalgam restoration.
The decisions as to what materials are used, and whether a buildup and then crown are done, are based on many factors – and as we cover in more detail many other approaches to restoring teeth, you will see all of these factors and have some idea as to the nature of the decisions involved.