Tooth Replacement involves many considerations – including why they were lost, the position of the loss and related structures, and the convenience or cost of the replacement modality.
Wikipedia has articles on fixed bridges for tooth replacement, and on removable partial dentures, and on implant alternatives. For those who would like to extend their exploration into more details and review the published literature in these areas, this is a good place to start.
In another chapter there will be said a lot more about implant-supported dental prostheses.
Organization of this Chapter
You May Skip to Whatever Subject Interests You Now
Tooth Replacement: Basics
Removable Appliances for Replacing Teeth
Classes of Partial Dentures
The Design of Partial Dentures
Support
Retention
Stability
Esthetics
Future Changes
Making and Delivering the Appliance
Fixed Appliances for Replacing Teeth
Data needed to Make Decisions for Bridges
Connecting Replacement to Adjacent Teeth
Other Conservative ways to Connect to Adjacent Teeth
Retention for Fixed Bridges
The Implant Alternative
Bottom Line for Replacing Teeth
………………………………………………………………………………………………………………………….
Tooth Replacement: Basics
We’ve discussed previously, in Chapter III.9, what may cause missing teeth and in general what are some of the choices about what to do about it.
In this chapter we will go into much more detail about choices that the patient has regarding replacement. The decision about how to proceed, or even whether to proceed, is not easy in many instances. There is a judgment that needs to be made about tooth replacement, and this judgment is based on many observations and factors.
The main reason why the possibility of tooth replacement is made with great deliberation is because it is EXPENSIVE! Few people can readily afford tooth replacement from their checking account, or even their savings account. This means that the NEED and APPROACH must be considered carefully.
A patient’s financial security can depend on the choices made here.
This chapter is organized around whether the tooth replacement is done with a removable appliance or with a fixed appliance. We will consider replacement of ALL of the teeth in a chapter on Full Dentures – but if some teeth are left, there are more options. We will consider the use of Implants in Chapter V.14.
There are many compromises to be made with the choices of how to replace missing teeth – compromises in cost, longevity, comfort, convenience and appearance. The variables should all be made clear in this chapter.
Tooth Replacement: Removable Appliances
Removable Partial Dentures (RPDs) are cost effective, functionally useful, and potentially esthetic solutions to a variety of tooth loss situations.
Classes of Partial Dentures
The Classification of a partial denture design or style depends on where the teeth are missing. The specific design of the denture will depend totally on what teeth are left to support the denture as it replaces whatever teeth are missing.
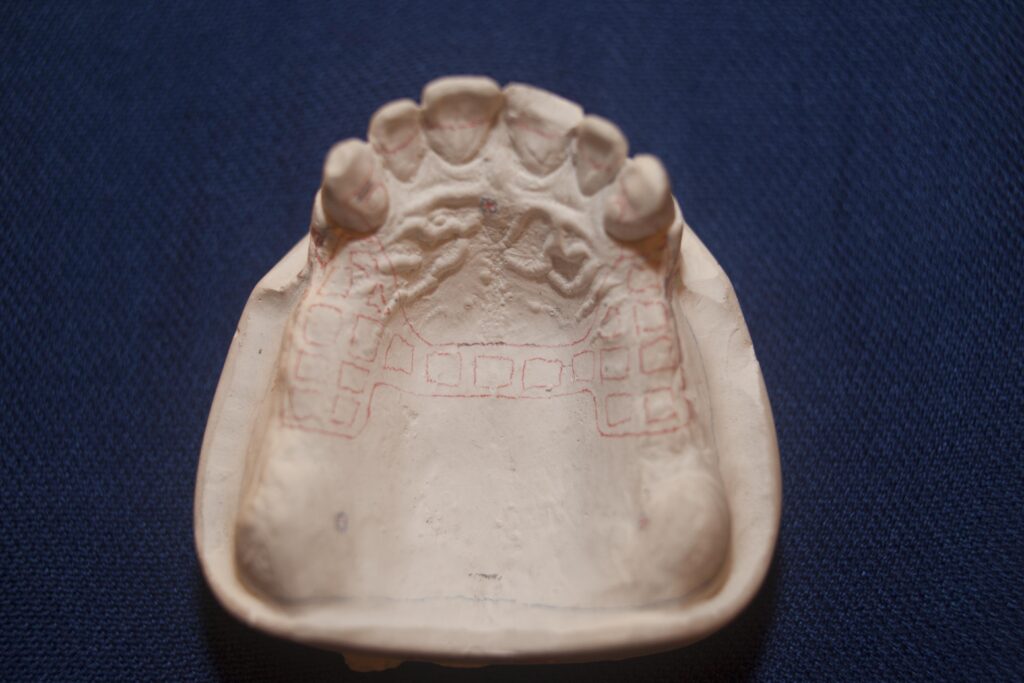
Class I partial dentures are those that replace teeth that are missing BEHIND all the teeth that are left, BOTH on the left AND right sides. For example, if the patient has all of the anterior teeth and premolars for one arch, the molars can be replaced with a Class I RPD.
A Class II RPD replaces the missing posterior teeth on just ONE side. This could be missing molars on one side of the lower arch, while on the other side the molars are still there, but it always involves the MOST posterior teeth.
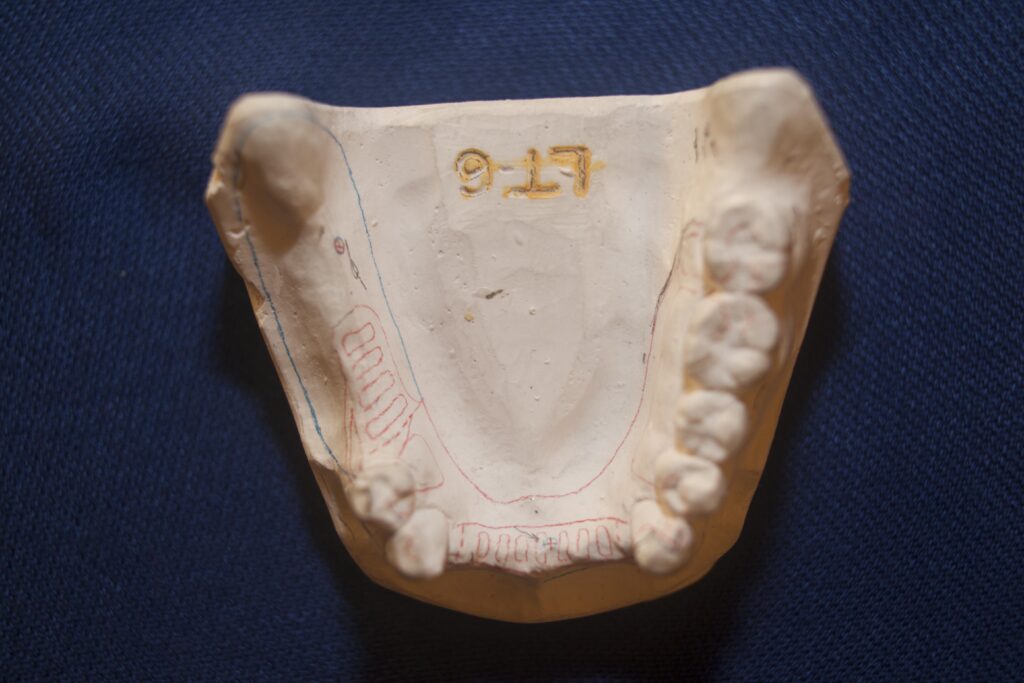
There are no teeth behind the missing ones for either the Class I or Class II partial dentures.
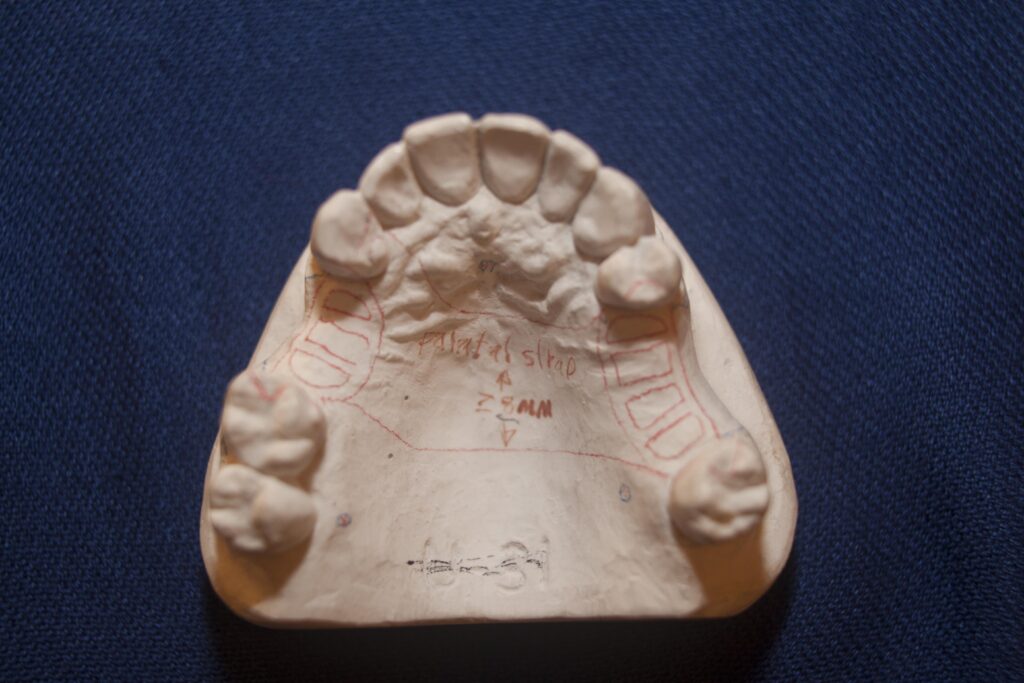
A Class III RPD is very different. In this case there are missing teeth, but there are existing teeth on both sides of ALL spaces where teeth were lost. This is very significant, because it means that whatever is used to replace the missing teeth can be connected to the existing teeth on each side – so it is TOOTH SUPPORTED.
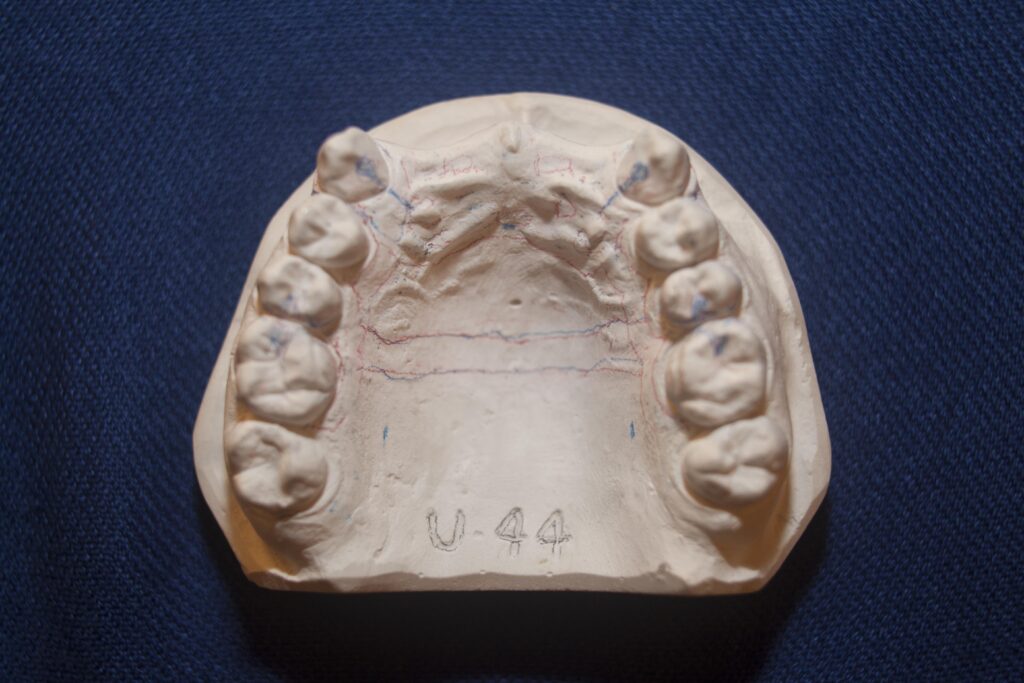
A Class IV RPD is missing specifically some anterior teeth on both sides of the midline. So, for example, the ice hockey player in Canada that got hit in the teeth by the hockey puck and lost the upper incisors. If the space, or edentulous area, includes teeth on both sides of the arch, right and left, then it qualifies as a Class IV. This is not considered a Class III, although the denture may connect only to existing teeth, but there is enough area in the front to be replaced that there arise specific problems peculiar to this class.
The Design of Partial Dentures
If this were a textbook on partial dentures, we’d spend a lot of time discussing all of the ins and outs of RPD design, most of which a patient will never need to know.
For this site I am interested more in just informing you of aspects of the design that will potentially impact your comfort and convenience. These are things that the dentist should discuss with you before delivering the denture – but if he does not, it gets done here.
For whatever class of denture is appropriate for the configuration of missing teeth, there is one constant – the denture must have a FRAMEWORK, generally made of cast metal.
The RPD framework consists of a major piece that runs from one side of the mouth to the other, and minor parts that extend up to the teeth. These are called the major and minor connectors.
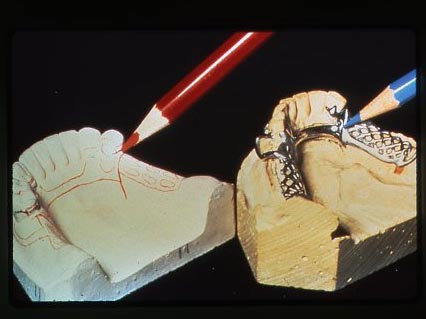
From the major connectors also extend mesh areas that can be used to support gum-colored plastic and also replacement teeth that are embedded into that plastic.
The minor connectors are used to HOLD onto the existing teeth, and SIT on them solidly.
Other than esthetics, RPD denture design is ALL about mechanics – how well does the denture stay in the mouth, does it work and does it feel good. The mechanical aspects are divided into three areas: Support, Retention and Stability.
RPD Support:
This is how well the denture resists when it is pushed DOWN toward the gingiva. The denture needs RESTS, which are metal pieces that sit in little concavities that are prepared into the existing teeth, called REST SEATS. If you push down and it moves, that is not a good thing – for it will feel uncomfortable and will not give the wearer a sense of security.
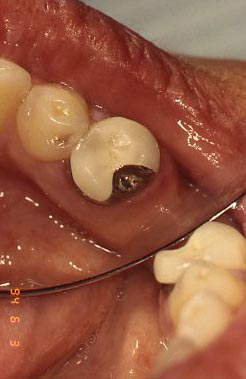
For Class I and Class II denture designs, when you push down on the back part of the denture, it should not move either. In this case, however, the support is more challenging because that part of the denture in both cases is sitting on SOFT TISSUE. When the denture is made, an acrylic extension from the major connector covers the soft tissue at the back of the ridges, where the first and second molars would be, and this acrylic contains the replacement teeth. But – the degree to which the acrylic is solidly sitting on the soft tissue determines the likelihood that the denture will move.
Eventually, as the bone underneath these extension areas resorbs because forces are not being exerted IN the bone, the denture will have to be relined to make a more intimate seating on this tissue area, so there is more support.
Note that IF a Class I RPD, for example, were to be pushed down in the back, it would TEND to rotate like a teeter-totter about some axis between the back rest seats and lift UPWARD in the front. We would not like these upward forces to occur, as they will tend to lift UP any front teeth to which the RPD is connected.
RPD Retention:
This is the ability of the denture to resist being lifted UPWARD. If the denture is connected to teeth through the minor connectors, these connections should RESIST the lifting up of the denture. Of course, it cannot make it too difficult to lift up, or the patient would not be able to take the denture out. But, for normal use, the lifting of the denture off of the teeth should not happen.
For areas that are directly connected to the teeth, we use CLASPS to hold onto the teeth. As the patient pushes downward on the denture when inserting it onto their teeth, there is a flexible arm of the clasp which moves outward over a bulge on the tooth, and then back in as it arrives at its resting place below the bulge. The amount of bulge and flexibility of the arm determines the ease of insertion, AND the ease of removal.
Also, for Class I and Class II RPD designs, if you lift upward on the back parts which sit on soft tissue, they should not lift either.
As we saw before, pushing down on these back extensions might tend to lift upward on the front of the denture – and lifting UP on the back extensions will tend to make the front go DOWN. IF the denture is designed so that the front part will NOT GO down, then it is harder to lift the back.
Why would you try to lift up the back extensions of the denture? If you are chewing on something sticky, it will tend to lift up the back, and this INDIRECT RETENTION is critical to it staying seated firmly in place.
You might be getting the idea that the design of a denture is critical to its comfort for the patient – and you would be right. But, what does the dentist know about design in this regard – is there a dentist out there that wears a partial denture? I don’t know of any.
Then, the dentist must learn all about denture comfort, stability and retention from his patients, by paying attention to their experience. A dentist that simply uses mechanical principles without augmenting his or her understanding based on observation with real people, is not doing their job.
RPD Stability:
This mechanical criterion is a little more subtle, but has more to do with movement of the denture SIDEWAYS in the mouth. For whatever teeth are supporting the denture, on either side of missing tooth areas, there is often an area flattened out on the side of the tooth so that a flat GUIDE PLANE on the denture can fit snuggly against the flat area as it is inserted. The size and flatness of this area determine how effective this feature is in keeping the denture from moving around.
For Class I and Class II RPD designs where the ridges of bone have become relatively flattened out with age, the stability of the denture is less determined by the shape of the ridge and more determined by the anchoring to the existing teeth and the existence of good guide planes.
The Esthetics of an RPD:
There are several areas we must watch with RPD designs, depending on the classification (which teeth are replaced).
For a Class IV denture, replacing missing front teeth for either arch, the appearance of the teeth is the most important thing. Dentists can select particular styles and shapes and shades of denture teeth to be inserted into the RPD. If it is needed to replace some anterior teeth that show easily, and there are some natural teeth left that also show, the comparison between them is critical.
It may even be necessary for the laboratory technician to custom-make porcelain teeth for an especially difficult esthetic challenge – for example an older patient who has unusual shapes or characteristics to their teeth. Normally, however, standard denture teeth can be found that will work well.
We’ve also talked about LIP SUPPORT in previous chapters, and this is an important consideration here as well – how far out do the replacement teeth reach, and do they alter the relationship between the upper and lower lips away from that which would be the most attractive?
For any design that involves clasps, these arms need to be positioned where they cannot be seen. Part of this is to FIND bulges with the undercuts under them that are in locations out of the esthetic zone, so the metal pieces are not seen. Also, there are different styles of clasps arms that can be used, approaching the undercut from a more invisible direction. In any event, wherever there is a clasp arm placed, it should be out of the way as much as possible. This may not be completely possible in certain circumstances, but the dentist will be aware of the need and will discuss it with you, and present options that won’t compromise the support or retention.
Planning for Future Changes in the Patient’s Teeth
If the partial denture relies on one tooth that is standing in the back of the mouth, all by itself, what happens if that tooth is lost? Now the retention and stability that was provided by that tooth is lost. Is it possible to modify this partial denture so that it will WORK without that tooth? IF the denture design was done in the first place with the thought that this tooth might be lost, then a modification should be possible.
If a lower denture is made and all of the lower incisors are natural teeth, but periodontally involved, what if a lower incisor is lost? If the denture were made from the start with this loss in mind, then when each incisor is lost, it can definitely be ADDED to the denture by a simple modification.
IF the dentist does not think about the changes in the patient’s mouth that will possibly come over the next 5 years, then the opportunity to modify the denture to take these into account will be lost. So, when the patient loses a tooth, the partial denture will have to be completely remade! That is possibly a totally unnecessary expense.
Making and Delivering the RPD
There are several pictures above that illustrate plaster models of patient’s arches so that partial dentures can be designed. These models are placed on a device which measures the location and depth of undercuts on all teeth, so that clasp positions can be determined. The laboratory technician will use these models to fabricate the denture for the patient, based on the design indicated by the dentist by drawing red and blue lines on the cast.
The dentist will then deliver the denture to the patient, adjust anything that needs adjustment, tightness, seating, etc. And the dentist will work with the patient so that, especially if this is the first time they’ve had an RPD, they can easily seat the appliance and remove it easily as well.
Tooth Replacement: Fixed Appliances
Data Needed to Make Decisions about Bridges
Before any determination of how to replace a tooth with a fixed appliance, some decisions need to be made.
First – is it a posterior tooth or an anterior tooth? Will it mostly be for functional correction enabling good chewing efficiency, or will it mostly be for esthetic purposes, being in front of the mouth? Once we know WHERE the replacement will take place, we can decide what material the replacement tooth will be made of. The choices, as we have seen earlier, are gold or porcelain or a combination of a noble metal with porcelain. When I say porcelain here, it could mean any type of ceramic.
Second – How many teeth are missing? Are there two teeth in a row that are missing, or more? How many adjacent teeth are there from which we could support a bridge? Once we know HOW MANY teeth need to be replaced and what is there in terms of neighbors, we can decide if a bridge makes sense or not.
Third – how strong are the teeth that are adjacent to the area of missing teeth that will be replaced? Are there many restorations on these teeth? Are the teeth mobile because of periodontal disease? Are there already indirect restorations, crowns for example, on the neighboring teeth? Once we know the CONDITION of the neighboring teeth, we can decide IF it is feasible to fabricate a bridge based on these teeth.
Fourth – what is the angulation of the teeth that are adjacent to the area where the missing teeth will be replaced? Are they tipped one way or the other? Are they leaning into the space for the replacement tooth? Once this is known, we can decide if a bridge can be made without changing the position or angulation of the teeth that will support it. We can ALSO decide if an implant can be placed readily in the area of the missing tooth without changing the angulation or position of the neighbors.
Fifth – what is the amount of bone left in the area where the tooth will be replaced? For the upper arch, is there significant bone on the ridge over the sinuses? For the lower arch, is there significant bone overlying the mandibular nerve, which runs under the roots of all of the lower teeth? How much bone is there left on the alveolar ridge, which is that boney area that supports the teeth? How thick is the ridge from outside to inside? Knowing these things will allow us to decide if it is feasible to place an implant in the area and support the replacement teeth on that. Perhaps a procedure will need to be done to increase the thickness of bone over the sinus by augmenting the bone on the floor of the sinus.
Sixth – how ground down are the neighboring teeth? How much space is there between the level of the ridge in the area where teeth will be replaced, and the level of the occlusal surfaces of the opposing teeth? Knowing this will allow us to decide if there is enough ROOM for either a bridge, where there must be a minimum thickness of the metal connectors between the replacement tooth and the adjacent teeth that will support the bridge. OR, we can decide IF there is enough ROOM for an implant to be placed with such a short crown on top.
Seventh – for missing anterior teeth specifically, what is the relationship between the missing area and the opposing teeth? For example, with a missing upper front tooth, where are the lower teeth in relation to the space? If they have grown up into the space, or are leaning forward in that area so that the natural position of the replacement tooth cannot be attained – it will limit the possibilities. Knowing these relationships, we can decide if it will require some adjustment of the opposing teeth, either by extraction and repositioning, or perhaps crowning them as well, in order to replace the upper tooth.
Eighth – whenever we are replacing a tooth or teeth, we need to evaluate the condition of the surrounding teeth. Are the adjacent teeth ground down? Are the cusps flattened off? For the anterior teeth, are they all ground flat across from canine to canine? Do the canines still have cusps, or are they worn flat? Do the canines still function to DISCLUDE or separate the back and front teeth from each other when the jaw moves left-to-right, or front-to-back? Knowing these things will tell us what would be the best materials to use for restoring this person’s mouth. Since they grind their teeth, it is a good guess that they will with the crowns or bridge in place, and this will potentially do great harm if these have ceramic on the occluding surfaces. We need to decide what KIND of crown or bridge to make so that the opposing teeth are protected. We may even have to decide to crown the canines so that they will again serve their protective function for the posterior and anterior teeth.
Nineth – What is the condition of the teeth opposing the area where the tooth will be replaced? Are they crowns? Are they gold crowns or porcelain crowns? Knowing this will allow us to decide if placing a porcelain replacement tooth will be wise, for porcelain is NOT abrasive to other porcelain, but is quite abrasive to opposing gold restorations.
And, for the posterior teeth as well as for the anteriors, it is possible that the opposing tooth has erupted farther into the space of the missing tooth, and this will complicate the bridge procedure. It may even required a root canal and a crown on the opposing tooth!
Connecting Replacement Teeth to Adjacent Teeth
This is the BRIDGE. This is a time-honored restoration, but it does involve more than just the area where the tooth is missing.
If there is only one tooth missing, whether front or back, generally one tooth on each side needs to be prepared for a crown, so the two crowns and the replacement tooth are all part of the same appliance. This bridge is then cemented to the two adjacent teeth and would be termed a “three unit bridge”.
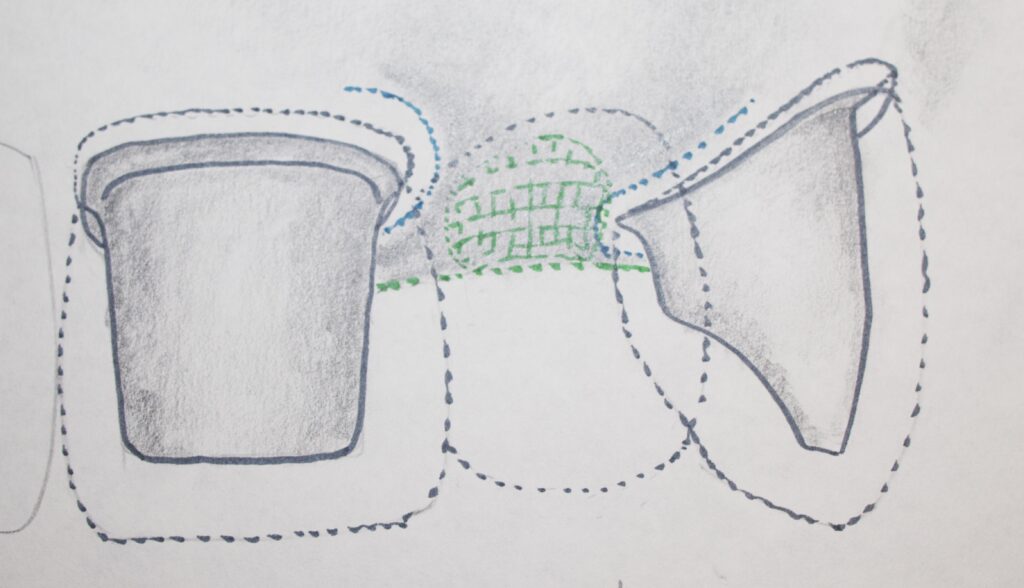
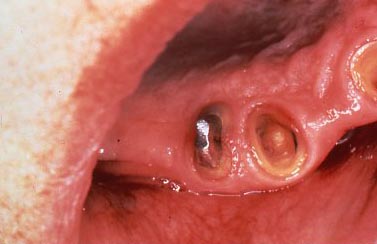
We discussed the most conservative possibility for adjacent teeth supported restorations like this, and that is the Maryland or resin-bonded bridge. While that was discussed in Chapter III.9, and it is a compromise that may not have the longevity of a full crown bridge, we won’t discuss this in much more detail here. The illustrations below do show the basic design of the Maryland Bridge, however – as a reminder.
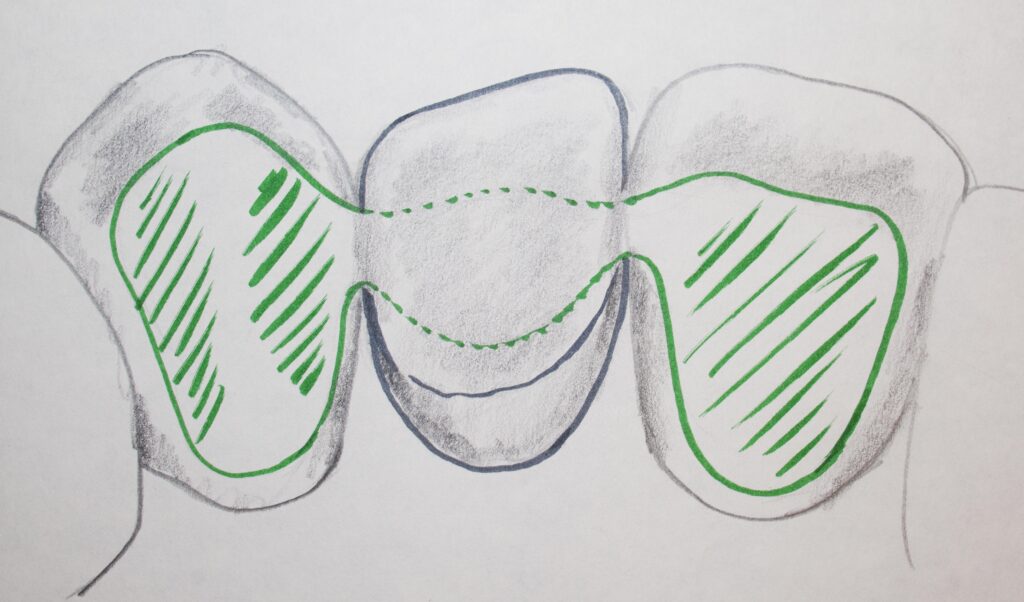
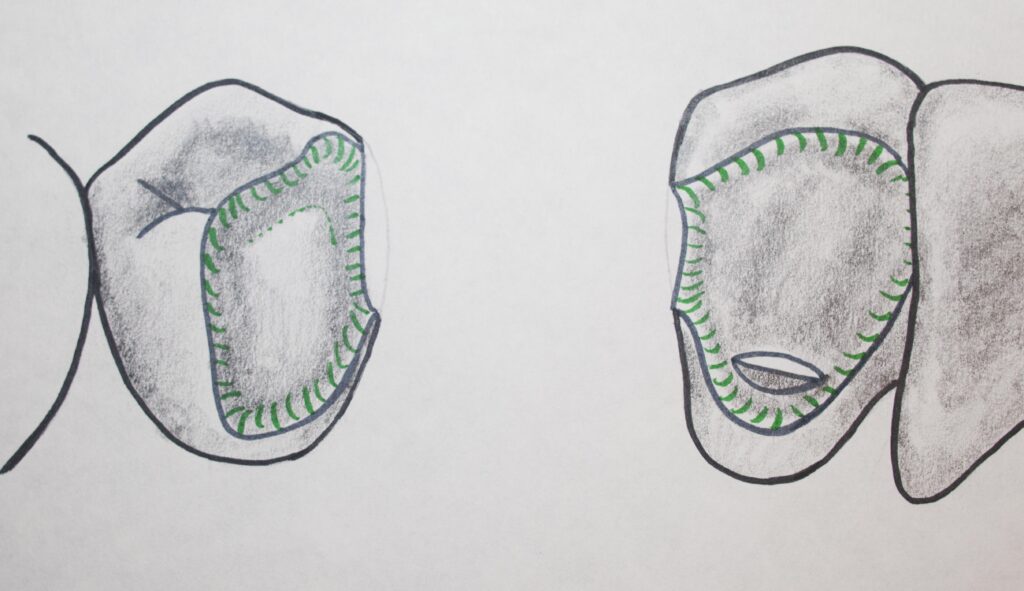
If there are more than one tooth missing in the same area, it is possible that more than one tooth on each side may be prepared for crowns, so there is more strength in the final product. There might be a lower canine and first premolar prepared in front of the bridge while the second premolar and first molar are replaced, connected to another crown on the second molar. This five unit bridge is quite costly, because it is normally charged the same as five crowns!
Now – realizing that virtually ALL of the posterior teeth are bring replaced on one side of the arch, this large bridge is more challenging because ALL of the occlusion on that side of the mouth is designed into the bridge. How the bridge is made in relationship to the opposing teeth has a lot to do with how the whole arch closes, and whether there is any TILT of the bite toward one side. Reasonable precautions will allow the dentist to do an appropriate job of this type of restoration, however.
Other Conservative ways to Connect to Adjacent Teeth
As we have seen previously in the chapter on making gold crowns, it is possible with this metal to create a cast restoration that will replace decayed and missing tooth structure, while not preparing ALL of the rest of the tooth. These esthetic restorations could be gold onlays or gold 3/4 crowns, for example. Both of these could be potential preparations to support replacement teeth in a more conservative bridge. In fact, it might even be possible to use an INLAY on an adjacent tooth to support a bridge under just the right circumstances.
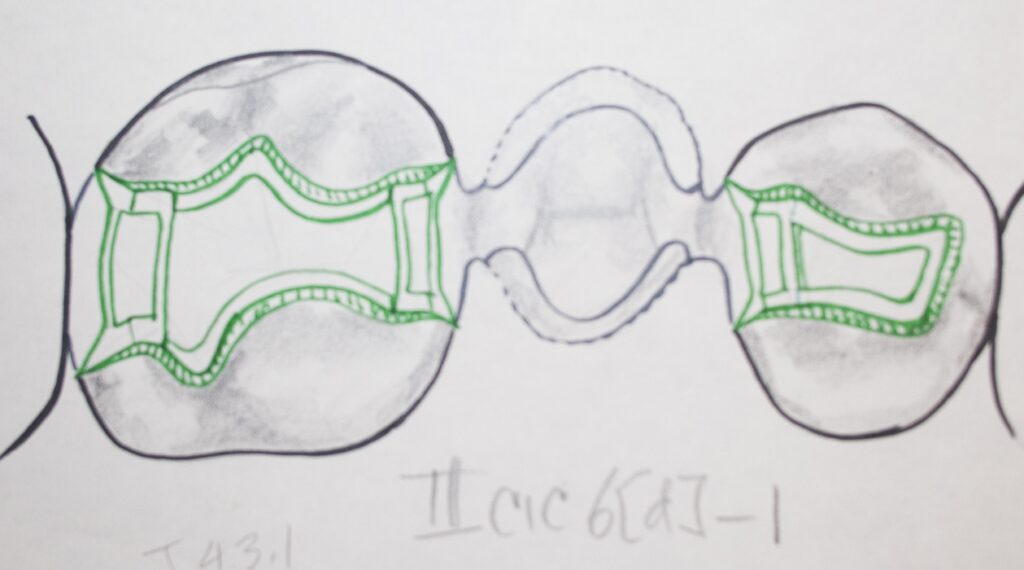
Partial coverage gold crowns as esthetic bridge supports can provide a restoration that is kind to the opposing teeth, easy on the eye, more conservative in terms of cutting tooth structure, and will have margins that are superior so the longevity is expected to be longer. Of course, you have to find a dentist that thinks in terms of longevity and conservative preparations and has the skills to do this restoration.
If you know that this is something that you want, you can find the person that can make it happen!
Retention for Bridges
Just as for single crowns, which we have discussed earlier, the retention of a bridge is vital. And, the requirements for a bridge are even more strict.
Consider that when there are THREE occlusal surfaces, as for a three-unit bridge, there is far more chance for forces to be applied to the bridge structure that would tend to dislodge it.
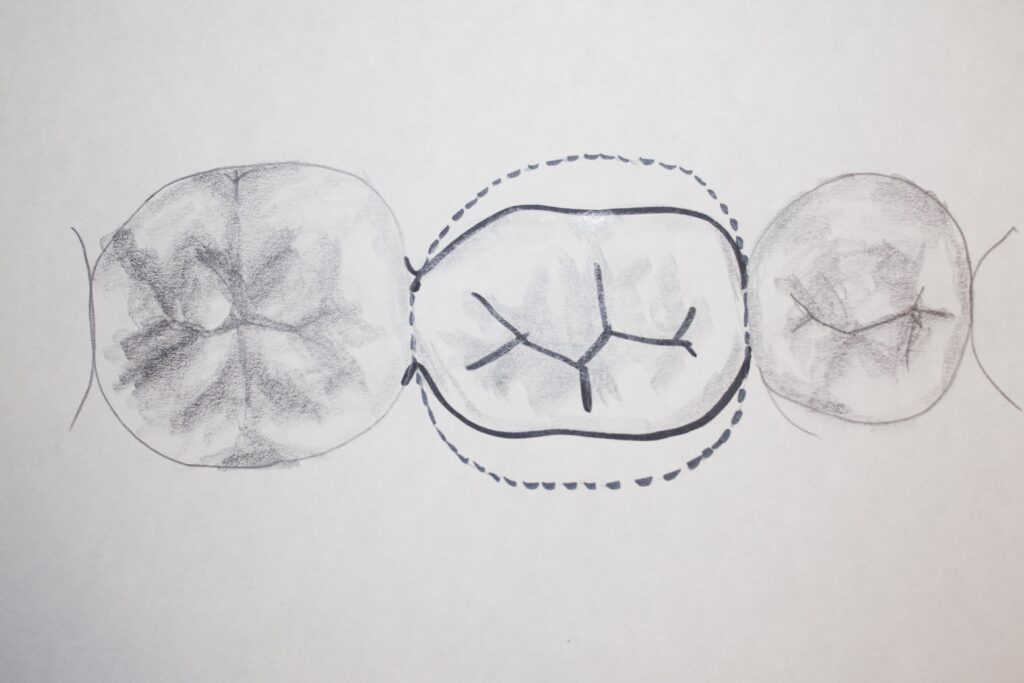
There are three sets of lingual cusps that can be pushed on during eating or grinding of the teeth, and all will tend to make the bridge tip off toward the lingual. Somehow, we have to prepare the teeth so that when the crowns are cemented to these prepared surfaces, there is adequate resistance to dislodgment, no matter what direction the applied forces.
When the teeth, before preparating the bridge are already shortened by grinding, it is difficult to prepare the tooth with adequate wall height to provide retention. Recall that the height of the walls of the preparation AND the taper of these walls toward each other, are the major determinants of retention.
Sometimes with bridges, when there is little tooth height to start with, we have to drop the margins as far below the gingival line as possible, just to get more height. We may also need to place grooves on various surfaces in order to keep the crowns from tipping along those surfaces.
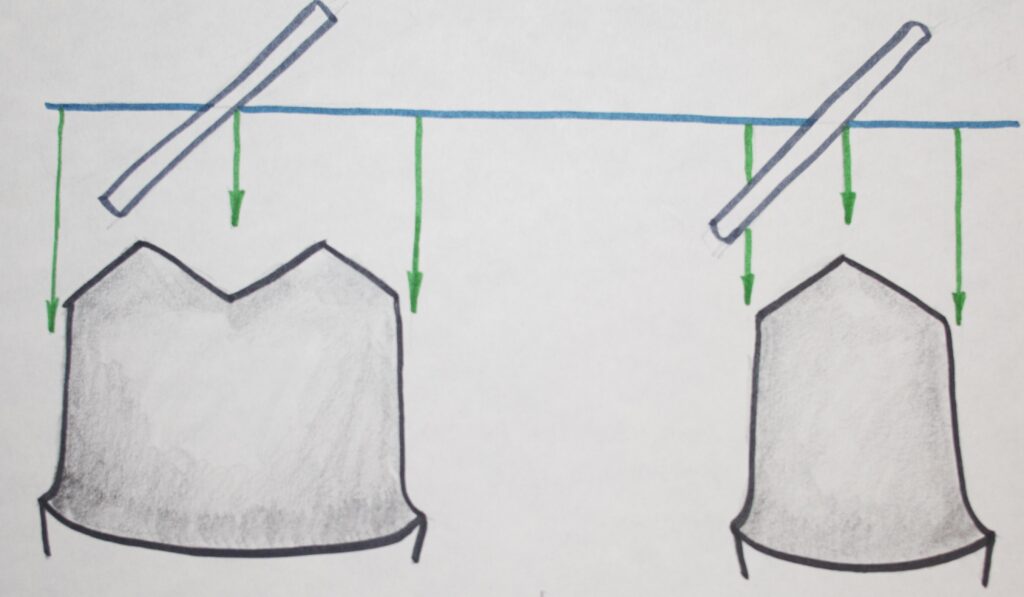
For example, if we have a three unit bridge that we are concerned might tip toward the lingual, we may place grooves on the sides of the prepared teeth near the adjacent teeth, so that metal placed in these grooves will tend to lock the crown so that it cannot tip lingually. This type of retention is not possible with all ceramic bridges, because these grooves would exert too much stress on the brittle ceramic. Mechanical details like this only suffice for metal crowns or porcelain crowns with metal substructures.
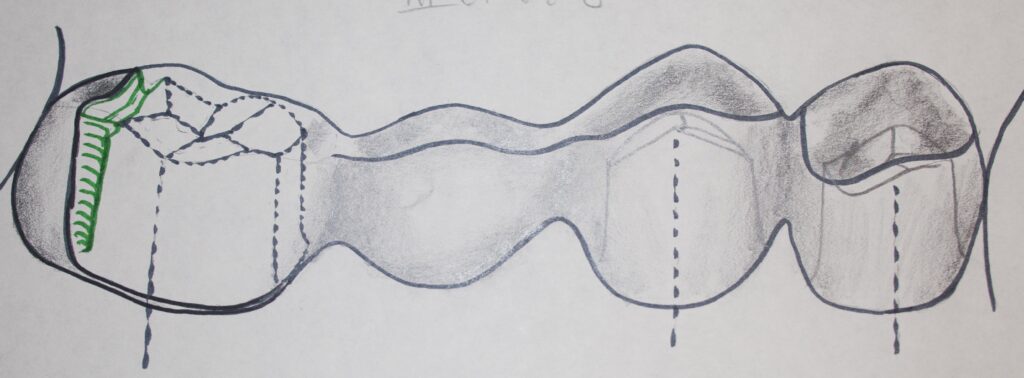
For all ceramic bridges with short walls, the reliance of adhesive cements to retain the restoration on the supporting teeth is risky at best.
Tooth Replacement: Use of Implants
On the other hand, for the example illustrated in the drawing above, instead of doing a five-unit bridge, it might be possible to do two implants, for the two missing teeth, and not have to involve the adjacent teeth at all. As we’ve discussed, the possibility of this still depends on the level of bone, position of nerve, angulation and position of the adjacent teeth, but it is possible. If there is a need to replace the second premolar and first molar and the adjacent teeth have moved inward to close the space somewhat smaller than for these two teeth ideally, it MAY be possible to put one molar in that area on an implant, which is designed to fit the two opposing teeth and look somewhat natural. This will cost half the price of the alternative. So, sometimes not enough space is a good thing!
We will discuss implants more in chapter V.14, but for now, only realize that the possibility is often there, and that the teeth adjacent to the replacement site will not have to be prepared and crowned. Of course, if the adjacent teeth NEED crowns anyway, the bridge could still have a cost advantage, because implants are generally very expensive to have done. An implant and crown is generally as expensive as a three-unit bridge.
Whether a three-unit bridge or implant will offer the best longevity or the best care of the opposing teeth depends on the exact circumstances, as introduced in the section with nine decisions above.
As we will see later, implants can even be used to replace teeth by using two implants to support a replacement tooth between them, creating a three unit bridge with two implants. This saves money on the number of implants, but makes the home care somewhat more challenging to clean under the bridge.
Implants can be used to replace ALL of the teeth in the mouth, perhaps on a total of just 8 implants, four on the top and four on the bottom. That will be discussed more in another chapter as well.
Bottom Line for Tooth Replacement
There are THREE basic ways to replace teeth.
- Removable Partial Denture
- Fixed Partial Denture
- Implant supported prosthesis, from one tooth to many.
The decision as to what is the best approach involves consideration of many factors, all of which have been described in this chapter.
In general, all things being equal (which they rarely are): 1. Many people would prefer not to have a removable appliance, but it is the cheapest; 2. Many people cannot afford to have implant-borne prostheses done; and 3. We always have to be concerned about wear to the opposing teeth, whether it is a fixed bridge or implant supported tooth replacement.